# Welcome to Quanti: Documentation

<table data-view="cards"><thead><tr><th></th><th data-hidden data-card-cover data-type="image">Cover image</th><th data-hidden data-card-target data-type="content-ref"></th></tr></thead><tbody><tr><td>Key Concepts</td><td><a href="https://1847929239-files.gitbook.io/~/files/v0/b/gitbook-x-prod.appspot.com/o/spaces%2FoRN0sxIyI0UJdSqkwdBu%2Fuploads%2FicQzN5cYVc8GzS03QhtN%2Fquanti_AI_powered-02.svg?alt=media&amp;token=f993d7f8-7b9e-4a69-828c-2b04d5396c0e">quanti_AI_powered-02.svg</a></td><td><a href="/key-concepts/concepts">Key Concepts</a></td></tr><tr><td>Primary Destination</td><td><a href="https://1847929239-files.gitbook.io/~/files/v0/b/gitbook-x-prod.appspot.com/o/spaces%2FoRN0sxIyI0UJdSqkwdBu%2Fuploads%2FSXSnrL1STeSiNroi4Avm%2Fquanti_AI_powered-07.svg?alt=media&amp;token=d98df35d-ad1f-49a1-aaa5-c2887d2b66ae">quanti_AI_powered-07.svg</a></td><td><a href="/primary-destination/primary-destination">Primary Destination</a></td></tr><tr><td>Connectors</td><td><a href="https://1847929239-files.gitbook.io/~/files/v0/b/gitbook-x-prod.appspot.com/o/spaces%2FoRN0sxIyI0UJdSqkwdBu%2Fuploads%2FvTp3udbMl4lvldFXXbxb%2Fquanti_AI_powered-03.svg?alt=media&amp;token=d25e4d14-3284-48dc-866e-6b21acc462fb">quanti_AI_powered-03.svg</a></td><td><a href="/connectors/analytics-connectors">Analytics connectors</a></td></tr><tr><td>MCP Server</td><td><a href="https://1847929239-files.gitbook.io/~/files/v0/b/gitbook-x-prod.appspot.com/o/spaces%2FoRN0sxIyI0UJdSqkwdBu%2Fuploads%2F9zQxWxSJx155GAu0TOsA%2Fquanti_AI_powered-06.svg?alt=media&amp;token=ef2e4283-d1f5-43ca-b878-c450f016750f">quanti_AI_powered-06.svg</a></td><td><a href="/mcp-server/mcp-overview">MCP overview</a></td></tr></tbody></table>


# Key Concepts

This section defines the key terms and concepts you'll encounter across QUANTI: plans and features.

* [Connected Account](/key-concepts/concepts/connected-account)
* [Data Source](/key-concepts/concepts/data-source)
* [Project](/key-concepts/concepts/project)
* [Data Refresh](/key-concepts/concepts/data-refresh)
* [Real-time Analytics](/key-concepts/concepts/real-time-analytics)
* [Pre-built Report](/key-concepts/concepts/pre-built-report)
* [Use Case](/key-concepts/concepts/use-case)
* [Extra Analytics Capacity](/key-concepts/concepts/extra-analytics-capacity)
* [Semantic Layer](/key-concepts/concepts/semantic-layer)
* [Marketing Mix Modeling (MMM)](/key-concepts/concepts/mmm)


# Connected Account

In QUANTI:, a **Connected Account** refers to a user account within a data source. Each platform uses its own terminology. Facebook Ads calls them *ad accounts*, Google Analytics 4 calls them *properties*, Instagram Insights calls them *profiles*. In QUANTI:, all of them are called Connected Accounts.

When a connector does not have an account concept of its own, the connector instance itself counts as a single Connected Account.

A Connected Account always belongs to a single [Data Source](/key-concepts/concepts/data-source). You can create multiple Connected Accounts from the same Data Source. For instance, two different Meta Ads ad accounts for two different markets.

Connected Accounts are the **unit of billing** in QUANTI:. The number you can activate depends on your plan:

| Plan       | Connected Accounts |
| ---------- | ------------------ |
| Free       | 1                  |
| Pro        | 5                  |
| Growth     | 15                 |
| Expert     | 50                 |
| Enterprise | Unlimited          |


# Data Source

A **Data Source** is a connector type available in QUANTI:, such as Meta Ads, Google Ads, GA4, or TikTok Ads. Each Data Source represents a specific platform or service you can connect to.

All QUANTI: plans give you access to the **full catalog of Data Sources**. There is no restriction on which connector types you can use, regardless of your plan.

From a single Data Source, you can create multiple [Connected Accounts](/key-concepts/concepts/connected-account). For instance, connecting several Meta Ads ad accounts using the same Meta Ads Data Source.


# Project

A **Project** is your top-level working environment in QUANTI:. It represents a single data warehouse destination where all your data is loaded and made available for analysis.

Projects follow a nested structure: a Project contains [Data Sources](/key-concepts/concepts/data-source), each Data Source contains [Connected Accounts](/key-concepts/concepts/connected-account), and each Connected Account generates [Pre-built Reports](/key-concepts/concepts/pre-built-report).

If you manage multiple brands or clients, you can isolate each one in a separate Project.

The number of Projects available depends on your plan:

| Plan       | Projects  |
| ---------- | --------- |
| Free       | 1         |
| Pro        | 1         |
| Growth     | 1         |
| Expert     | Unlimited |
| Enterprise | Unlimited |


# Roles & Permissions

Each QUANTI: project has three distinct roles: `owner`, `admin`, and `user`. Roles control what each member can see and do within a project.

***

## Permission matrix

| Action                                               | owner | admin | user |
| ---------------------------------------------------- | :---: | :---: | :--: |
| View the project                                     |   ✅   |   ✅   |   ✅  |
| View project members                                 |   ✅   |   ✅   |   ✅  |
| View own permissions                                 |   ✅   |   ✅   |   ✅  |
| Access the data warehouse (schema, datasets, tables) |   ✅   |   ✅   |   ✅  |
| Use the AI assistant (query)                         |   ✅   |   ✅   |   ✅  |
| Edit the project AI context                          |   ✅   |   ✅   |   ✅  |
| Invite a member                                      |   ✅   |   ✅   |   ❌  |
| Change a member's role                               |   ✅   |   ✅   |   ❌  |
| Remove a member                                      |   ✅   |   ✅   |   ❌  |
| Edit project settings                                |   ✅   |   ❌   |   ❌  |
| Edit BigQuery configuration                          |   ✅   |   ❌   |   ❌  |
| Edit DWH budget                                      |   ✅   |   ❌   |   ❌  |
| Delete the project                                   |   ✅   |   ❌   |   ❌  |

***

## Role descriptions

**`owner`**

The owner has full control over the project, including configuration, billing settings, and member management. There must always be at least one owner on a project — the last owner cannot be demoted or removed. Only an owner can promote another member to the `owner` role; admins can only invite members as `admin` or `user`.

**`admin`**

Admins can manage the team (invite, change roles, remove members) but cannot modify project-level settings or delete the project. This role is suited for team leads who need to onboard colleagues without full platform access.

**`user`**

Users have read-only access to the project and its data. They can query the data warehouse and use the AI assistant, but cannot manage members or change any settings. This role is suited for analysts and stakeholders who consume data without administering the project.

***

## Invitation lifecycle

When a member is invited to a project, the invitation goes through the following states:

```
pending → success (accepted)
       → refused (declined)
```

The invited person receives a transactional email at the time of the invitation. Once accepted:

* If the project uses a **Managed BigQuery**, the new member is automatically added to the GCP IAM policy with the `roles/bigquery.admin` role.
* When a member is removed, their GCP IAM access is **revoked before the deletion** is recorded. If the GCP revocation fails, the deletion does not proceed.

***

## Plan limits

The number of members per project depends on the plan associated with the project's Billing Account. This limit is checked at every invitation. Contact your QUANTI: account manager to adjust your plan if needed.


# Data Refresh

**Data Refresh** is QUANTI:'s scheduling feature. It lets you programmatically plan and automate the launch of your data sync processes on a recurring basis.

On the Free plan, syncs must be triggered manually. From the Pro plan onwards, Data Refresh automates this with a daily schedule. The Enterprise plan extends this to hourly scheduling.

| Plan       | Data Refresh    |
| ---------- | --------------- |
| Free       | Manual only     |
| Pro        | Daily           |
| Growth     | Daily           |
| Expert     | Daily           |
| Enterprise | Daily or Hourly |


# Real-time Analytics

**Real-time Analytics** is QUANTI:'s event capture feature. It provides a JavaScript tag you can deploy on your website or app to track online and offline user events such as page views, clicks, conversions, and custom events, and stream them directly into BigQuery tables.

This makes your event data available in QUANTI: alongside all your other marketing data, enabling unified analysis across channels.


# Pre-built Report

A **Pre-built Report** is a ready-to-use table automatically created in your data warehouse when a [Connected Account](/key-concepts/concepts/connected-account) syncs. Each Pre-built Report corresponds to a specific data structure delivered by the connector, such as a table of ad campaigns, a table of daily performance metrics, or a table of audience segments.


# Use Case

A **Use Case** is a pre-configured analysis built on top of your [Pre-built Reports](/key-concepts/concepts/pre-built-report). Where Pre-built Reports give you raw data tables, a Use Case combines and structures that data into a ready-to-use analytical model. Examples include a cross-channel performance dashboard, a budget pacing analysis, or a customer journey report.

Use Cases are designed to answer specific business questions out of the box, without requiring any SQL or data modeling knowledge.


# Extra Analytics Capacity

**Extra Analytics Capacity** is an add-on that extends the compute quota included in your plan, allowing you to run additional resource-intensive SQL queries.

It is designed for use cases that require heavy computation such as large aggregations, complex joins, or high-frequency queries, without requiring a plan upgrade.


# Semantic Layer

The **Semantic Layer** is QUANTI:'s data modeling layer. It lets you define business metrics, KPIs, and dimensions on top of your raw data, creating a shared and consistent vocabulary across your organization.

Instead of writing the same SQL logic in every report, you define it once in the Semantic Layer and reuse it everywhere. This ensures that "Revenue" or "Active Users" always means the same thing, regardless of who is querying the data.

The Semantic Layer builder is included in all QUANTI: plans.


# Marketing Mix Modeling (MMM)

**Marketing Mix Modeling** is a statistical analysis technique that measures the contribution of each marketing channel to your overall business results, including sales, revenue and conversions. It takes into account both online and offline factors such as seasonality, pricing, or promotions.

Unlike attribution models that rely on user-level tracking, MMM works at an aggregated level, making it privacy-safe and resilient to cookie deprecation.

In QUANTI:, MMM is available as an Enterprise feature, fully integrated with your data warehouse.


# Tracking Templates

Recommended URL patterns for ad click reconciliation across platforms

## What is a tracking template?

A **tracking template** is a URL parameter added to the destination URL of your ads. When a user clicks on an ad, the ad platform automatically replaces dynamic placeholders in the template with the actual values for that click — campaign ID, ad group ID, creative ID, etc. — and appends the result to the landing page URL.

For example, a click on a Google Ads campaign might produce a URL like:

```
https://www.example.com/page?qid=qid_gad_c12345678_g987654_a11223344
```

This `qid` parameter is then read by any analytics tool collecting data on that page load.

***

## Why does QUANTI: use tracking templates?

QUANTI: connects your ad platform data (spend, impressions, clicks) with your on-site session and conversion data. To join these two data sources, QUANTI: needs a common key — the `qid` value carried in the URL.

The `qid` parameter is designed to work with any analytics data collection tool connected to QUANTI:. It is captured in two ways depending on your setup:

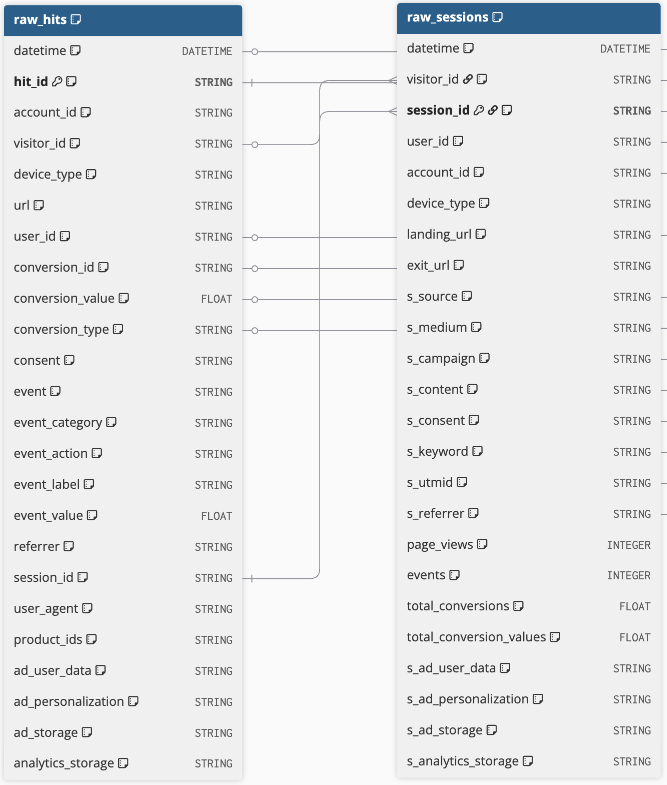
* **QUANTI: Real-Time Analytics tag** — the tag reads the `qid` directly from the URL and stores it alongside the session in the `raw_hits` and `raw_sessions` tables.
* **Third-party analytics tools** (GA4, Piano Analytics, Piwik PRO, and others) — when `qid` is included in the landing page URL, these tools capture it as a URL parameter within their own data. QUANTI: can then read it from your analytics connector data and use it as the reconciliation key.

In both cases, QUANTI: can match each session or conversion back to its exact campaign, ad group, and creative — across all ad platforms, in a single data model.

Without a tracking template, cross-platform attribution relies on UTM parameters alone, which do not carry granular ad IDs and cannot link a session to a specific creative or ad group.

***

## Template structure

All QUANTI: templates follow the same naming convention:

```
qid_{platform}_c{campaign_id}_g{ad_group_id}_a{ad_id}
```

Where `c`, `g`, and `a` stand for **campaign**, **group**, and **ad** respectively. When a field is not available for a given platform, the placeholder is left empty.

The `{platform}` prefix is a 3-letter code that identifies the ad source — for example `gad` for Google Ads, `fbk` for Meta, `lkd` for LinkedIn.

***

## Templates by platform

## Affilae

```
qid_aff_c{affiliateTrackingId}_g_a
```

***

## Amazon Ads

```
qid_amz_c[campaign.id]_g[ad_group.id]_a
```

***

## Awin

```
qid_awn_c{publisherId}_g_a
```

***

## Commission Junction

```
qid_cmj_c{pubCid}_g{pid}_a
```

***

## Criteo

```
qid_crt_c{{campaign_id}}_g{{adset_id}}_a
```

***

## DV360

```
qid_dv3_c${CAMPAIGN_ID}_g_a
```

***

## Effinity

```
qid_efi_c{id_programme}_g{id_affilie}_a{id_link}
```

***

## Google Ads

```
qid_gad_c{campaignid}_g{adgroupid}_a{creative}
```

Reference: [Google Ads ValueTrack parameters](https://developers.google.com/google-ads/api/docs/reporting/valuetrack-mapping)

***

## LinkedIn Ads

```
qid_lkd_c_CAMPAIGN_GROUP_ID_g_CAMPAIGN_ID_a_CREATIVE_ID
```

***

## Meta Ads

```
qid_fbk_c{{campaign.id}}_g{{adset.id}}_a{{ad.id}}
```

Reference: [Meta dynamic URL parameters](https://www.facebook.com/business/help/2360940870872492)

***

## Microsoft Advertising

```
qid_bga_c{CampaignId}_g{AdGroupId}_a{AdId}
```

Reference: [Microsoft Ads URL tracking parameters](https://help.ads.microsoft.com/#apex/ads/en/56799/2)

***

## Outbrain

```
qid_otb_c{{campaign_id}}_g{{publisher_id}}_a
```

***

## Pinterest Ads

```
qid_pin_c{campaignid}_g{adgroupid}_a{adid}
```

***

## Rakuten Advertising

```
qid_rak_c_g_a
```

***

## RTB House

```
qid_rtb_c{{subcampaignhash}}_g{{user_segment_id}}_a{{creative_hash}}
```

***

## Snapchat

```
qid_snp_c{{campaign.id}}_g{{adSet.id}}_a{{ad.id}}
```

***

## Stylight

```
qid_stl_c_g_a
```

***

## Taboola

```
qid_tbl_c{campaign_id}_g_a
```

***

## TikTok Ads

```
qid_tik_c__CAMPAIGN_ID__g__AID__a__CID
```

***

## Wonderpush

```
qid_wdp_c{{ campaign.id }}_g_a
```


# Data insertion strategies

## Introduction

When synchronizing data from your source platforms to your data warehouse, a fundamental question arises: **how should new data interact with existing data?**

The answer lies in choosing the appropriate **insertion strategy**. This choice determines whether data is added, replaced, or updated, and has direct consequences on data quality, storage costs, and analytical capabilities.

The three insertion strategies Quanti uses:

{% tabs %}
{% tab title="INSERT Mode" %}

* Append new data without deleting anything.

Use case: when you want to keep a full audit trail of every record as ingested, and duplicates are acceptable or deduplicated later.

Advantages: simple, append-only; minimal risk of accidental data loss.

Limitations: can lead to duplicate rows, larger storage needs, and more complex downstream deduplication logic.
{% endtab %}

{% tab title="REPLACE Mode" %}

* Delete existing data within a defined scope, then insert new data.

Use case: when entire partitions or ranges (e.g., a day, a month) should be replaced atomically with refreshed data.

Advantages: ensures the target scope contains only the refreshed data; simpler to reason about for partitioned refreshes.

Limitations: risk of data loss if the replacement is partial or incorrect; can be more disruptive and require careful scoping.
{% endtab %}

{% tab title="UPSERT Mode" %}

* Update existing rows or insert new ones based on the Primary Key.

Use case: when records must be kept up-to-date without duplicating primary-keyed entities.

Advantages: preserves existing rows while applying updates; balances data preservation and correctness.

Limitations: requires a defined primary key and support from the target system; may be more expensive or complex than append-only.
{% endtab %}
{% endtabs %}

{% hint style="info" %}
Quanti automatically selects the most appropriate insertion method for each table in its connectors. The preferred method is **UPSERT Mode**, which offers the best balance between data preservation and updates. However, depending on the nature of the data and business requirements, **INSERT** or **REPLACE** methods may be more suitable.
{% endhint %}

{% hint style="danger" %}
**⚠️ Critical consideration: Performance impact on dimension tables**

Dimension tables are typically NOT partitioned (unlike fact tables). This means historized dimension tables require scanning the ENTIRE table to find the latest version of each entity, causing large increases in query cost, storage, and degraded performance.

Example consequences:

* Table size growth: 10,000 rows → 500,000 rows (50 changes/campaign/year)
* Query scans: 10,000 rows → 500,000 rows (50x more expensive)
* Monthly cost example: \~$5 → \~$250 (50x increase)

Why this doesn't affect fact tables:

* Fact tables are partitioned by date (`_quanti_date`) and queries typically include date filters so partition pruning reduces scanned data.
  {% endhint %}

## Why this matters

Understanding insertion strategies is crucial to:

* Comprehend the behavior of your data over time
* Anticipate how updates and corrections are handled
* Identify potential risks (duplicates, data loss, performance issues)
* Make informed decisions when configuring custom connectors
* Troubleshoot data inconsistencies effectively

## What you'll learn

This section provides a detailed explanation of each insertion method, including:

* How each method works technically
* When to use each method
* Advantages and limitations
* Concrete examples with fact and dimension tables
* Impact on data warehouse performance and costs


# Insert mode : Insert without deleting

## How it works

**INSERT Mode** follows a simple principle: **new data is appended to existing data without any deletion**.

Each synchronization adds rows to the table, regardless of whether similar or identical data already exists.

**Technical implementation:**

INSERT Mode uses straightforward `INSERT` SQL statements **without any `WHERE` clause**. This means:

* No need to scan existing data to check for duplicates
* No complex filtering or comparison operations
* Direct insertion into the table

**Visual representation:**

```
Existing data: [A, B, C]
New data:      [D, E]
Result:        [A, B, C, D, E]
```

**Concrete example with a fact table:**

```
Initial state (campaign_stats table):
| date       | campaign_id | impressions | clicks | _quanti_loaded_at   |
|------------|-------------|-------------|--------|---------------------|
| 2025-01-15 | camp_123    | 1000        | 50     | 2025-01-16 08:00:00 |
| 2025-01-15 | camp_456    | 800         | 30     | 2025-01-16 08:00:00 |

After synchronization (same reference date):
| date       | campaign_id | impressions | clicks | _quanti_loaded_at   |
|------------|-------------|-------------|--------|---------------------|
| 2025-01-15 | camp_123    | 1000        | 50     | 2025-01-16 08:00:00 |
| 2025-01-15 | camp_456    | 800         | 30     | 2025-01-16 08:00:00 |
| 2025-01-15 | camp_123    | 1050        | 52     | 2025-01-17 09:00:00 | ← new row
| 2025-01-15 | camp_456    | 820         | 31     | 2025-01-17 09:00:00 | ← new row
```

**Key characteristics:**

* No deletion operations
* No updates to existing rows
* Each synchronization adds new rows
* Table grows continuously

***

{% hint style="success" %}
**Advantages**

* ✅ Minimal insertion costs
  * **No `WHERE` clause in INSERT queries** = no need to scan existing data
  * Significantly faster insertion compared to UPSERT or REPLACE
  * Lower processing costs during synchronization
  * **Cost transfer: from processing to storage** — it's always cheaper to store data than to process it
* ✅ Maximum data preservation
  * No risk of accidentally losing historical data
  * Every synchronization is safely recorded
  * Ideal for audit trails and compliance requirements
* ✅ Simplicity and performance
  * Fastest insertion method (no DELETE or UPDATE operations)
  * Minimal impact on database resources
  * No locks on existing data
* ✅ Natural append-only pattern
  * Aligns with immutable data principles
  * Perfect for event-driven architectures
  * Easy to implement and understand
* ✅ Reconstruction of uniqueness via \_quanti\_loaded\_at
  * The `_quanti_loaded_at` field records the exact timestamp of row insertion
  * **Enables recreating table uniqueness retrospectively** before transformation steps
  * You can always identify the most recent version of each record
  * Facilitates building deduplicated views or materialized tables downstream
    {% endhint %}

{% hint style="warning" %}
**Disadvantages**

* ❌ Significant table growth
  * Storage volume increases with every synchronization
  * Even if source data hasn't changed, new rows are added
  * **Trade-off: lower processing costs → higher storage costs** (but storage remains cheaper)
  * Can lead to very large tables quickly
* ❌ High risk of duplicates
  * If the same data is synchronized twice, it appears twice in the table
  * No built-in deduplication mechanism at insertion time
  * Requires deduplication logic in transformation layer
* ❌ Complex queries required
  * Analytics queries must handle duplicates explicitly
  * Need to determine which row is the "correct" one using `_quanti_loaded_at`
  * Aggregations may produce incorrect results without proper filtering
* ❌ Not suitable for updates
  * Cannot reflect changes to existing records cleanly
  * If a campaign status changes, both old and new values coexist
  * Impossible to get a clean "current state" view without deduplication
    {% endhint %}

***

## Use cases

Ideal for:

* Event logs and activity streams

  ```
  Example: Click events, impression logs, user actions
  Reason: Events are immutable facts that should never be modified
  ```
* Transaction records

  ```
  Example: Payment transactions, order completions, API calls
  Reason: Each transaction is a unique occurrence in time
  ```
* Timestamped metrics with high granularity

  ```
  Example: Real-time sensor data, minute-level analytics
  Reason: Each timestamp represents a distinct measurement
  ```
* Raw data landing zones

  ```
  Example: Initial data ingestion before transformation (bronze layer)
  Reason: Preserve complete historical record of all incoming data
  Cost optimization: Cheaper insertion, deduplication handled in transformation
  ```

Not suitable for:

* Dimension tables (attributes)

  ```
  Problem: Multiple versions of the same entity without clear "current" state
  Example: A campaign with 10 status changes creates 10 rows
  ```
* Daily aggregated metrics that may be recalculated

  ```
  Problem: Duplicates make it impossible to know which values are correct
  Example: Same date appears multiple times with different values
  ```
* Master data or reference tables

  ```
  Problem: No way to update existing records
  Example: Cannot reflect changes to campaign names or budgets
  ```

***

## Best practices

{% stepper %}
{% step %}

#### Leverage \_quanti\_loaded\_at for deduplication

* Use `_quanti_loaded_at` systematically in transformation queries to identify the latest version.
* This field is the key to recreating uniqueness.
* Document the deduplication logic for data consumers.
  {% endstep %}

{% step %}

#### Implement deduplication in transformation layer

* Create deduplicated views or tables downstream.
* Use `ROW_NUMBER()` with `PARTITION BY` on primary key fields.
* Order by `_quanti_loaded_at DESC` to get the most recent version.
  {% endstep %}

{% step %}

#### Ensure true immutability

* Only use INSERT Mode for data that genuinely never changes once created.
* Verify that your source platform doesn't update historical records.
* If updates occur, INSERT mode will create duplicates without clear resolution.
  {% endstep %}

{% step %}

#### Monitor table growth

* Set up alerts for unexpected table size increases.
* Implement data retention policies if needed.
* Consider archiving or partitioning old data.
* Balance storage costs against processing cost savings.
  {% endstep %}

{% step %}

#### Document the choice

* Clearly communicate to data consumers why INSERT Mode is used.
* Provide example queries showing how to handle duplicates.
* Explain the data model and deduplication strategy.
  {% endstep %}
  {% endstepper %}

***

## Example: Recreating uniqueness with \_quanti\_loaded\_at

The `_quanti_loaded_at` field allows you to reconstruct table uniqueness before transformations.

Get the most recent version of each record:

```sql
SELECT *
FROM campaign_stats
QUALIFY ROW_NUMBER() OVER (
  PARTITION BY date, campaign_id  -- Primary Key fields
  ORDER BY _quanti_loaded_at DESC -- Most recent insertion first
) = 1
```

Create a deduplicated view:

```sql
CREATE VIEW campaign_stats_unique AS
SELECT 
  date,
  campaign_id,
  impressions,
  clicks,
  _quanti_loaded_at
FROM campaign_stats
QUALIFY ROW_NUMBER() OVER (
  PARTITION BY date, campaign_id
  ORDER BY _quanti_loaded_at DESC
) = 1
```

Aggregate unique events only:

```sql
SELECT 
  date,
  campaign_id,
  SUM(impressions) as total_impressions,
  SUM(clicks) as total_clicks
FROM (
  SELECT *
  FROM campaign_stats
  QUALIFY ROW_NUMBER() OVER (
    PARTITION BY date, campaign_id
    ORDER BY _quanti_loaded_at DESC
  ) = 1
)
GROUP BY date, campaign_id
```

***

## Cost optimization summary

**INSERT Mode = Lower processing costs + Higher storage costs**

| Aspect        | Impact            | Explanation                            |
| ------------- | ----------------- | -------------------------------------- |
| **Insertion** | ✅ Cheaper         | No `WHERE` clause = no data scanning   |
| **Storage**   | ❌ More expensive  | Table grows with every sync            |
| **Queries**   | ⚠️ More expensive | Need to scan more rows and deduplicate |
| **Overall**   | ✅ Net positive    | Storage is cheaper than compute        |

Best use case: Raw data ingestion layers where deduplication is handled downstream in transformation pipelines.


# Insertion method selection guide

## Introduction

Choosing the appropriate insertion method is crucial for data quality and costs. This guide helps you select the right method through a series of simple questions.

While **Quanti automatically selects the optimal method for standard connectors**, this guide is essential when configuring **custom connectors** or understanding Quanti's choices.

***

## Decision Guide: 4 Questions

{% stepper %}
{% step %}
**What type of data are you synchronizing?**

A) Events or transactions that never change once created

* Examples: clicks, impressions, page views, purchases, API calls
* → Go to [INSERT Mode](/key-concepts/data-insertion-strategies/insert-mode)

B) Metrics or measurements tied to a date

* Examples: daily impressions, daily spend, daily conversions
* → Go to Question 2

C) Attributes or properties of entities

* Examples: campaign names, product prices, customer information, account settings
* → Go to Question 3
  {% endstep %}

{% step %}
**Metrics - Does the source recalculate these metrics?**

Context: Many advertising platforms (Google Ads, Meta, etc.) recalculate metrics retroactively due to attribution windows, processing delays, or corrections.

A) YES - Metrics may be updated for past dates

* Examples: Google Ads conversions (7-day attribution), GA4 metrics (processing delays)
* → Go to [REPLACE Mode](#answer-replace-mode-for-facts)

B) NO - Metrics are final once created

* Examples: Real-time sensor data, minute-level logs
* → Go to [INSERT Mode](/key-concepts/data-insertion-strategies/insert-mode)

C) Unsure

* → Default to [REPLACE Mode](/key-concepts/data-insertion-strategies/replace-mode-delete-and-insert) (safer for most advertising/analytics platforms)
  {% endstep %}

{% step %}
**Attributes - Do you need to track how these attributes change over time?**

Context: Do you need to know the historical values? For example: "What was the campaign status on January 15th?"

A) YES - I need complete history of changes

* → Go to [UPSERT Mode WITH historization](/key-concepts/data-insertion-strategies/upsert-mode-update-and-insert)

B) NO - I only need the current state

* → Go to Question 4
  {% endstep %}

{% step %}
**Current state only - Do entities deleted from source need to be removed from your warehouse?**

Context: UPSERT Mode keeps all records (even if deleted from source), while REPLACE Mode removes them.

A) YES - Deleted entities must be removed immediately

* Example: Product catalog must exactly match current source state
* → Go to [REPLACE Mode for dimensions](/key-concepts/data-insertion-strategies/replace-mode-delete-and-insert)

B) NO - I want to keep deleted entities for historical reference

* Example: Keep deleted campaigns to preserve historical performance data
* → Go to [UPSERT Mode WITHOUT historization](/key-concepts/data-insertion-strategies/upsert-mode-update-and-insert) ⭐ **Recommended default**
  {% endstep %}
  {% endstepper %}

***

## Methods Comparison

| Aspect                       | INSERT Mode                    | REPLACE Mode                                                 | UPSERT Mode (no hist)          | UPSERT Mode (with hist)         |
| ---------------------------- | ------------------------------ | ------------------------------------------------------------ | ------------------------------ | ------------------------------- |
| **How it works**             | Append new rows                | Delete scope + Insert                                        | Update or Insert (based on PK) | Insert new version              |
| **Deletion scope**           | None                           | <p>• Facts: reference date<br>• Dimensions: entire table</p> | None                           | None                            |
| **Duplicate risk**           | ⚠️ High                        | ✅ None                                                       | ✅ None (hash optimization)     | ✅ None                          |
| **Storage cost**             | ❌ High (grows continuously)    | ✅ Stable                                                     | ✅ Stable                       | ❌ High (versions accumulate)    |
| **Query cost**               | ⚠️ High (deduplication needed) | ✅ Low (direct queries)                                       | ✅ Low (direct queries)         | ❌ Very High (scan all versions) |
| **Processing cost**          | ✅ Lowest (no WHERE clause)     | ⚠️ Medium (DELETE ops)                                       | ⚠️ Medium (MERGE + hash check) | ⚠️ Medium (MERGE + hash check)  |
| **Historical tracking**      | ⚠️ Manual (via timestamps)     | ❌ Lost                                                       | ❌ No                           | ✅ Complete                      |
| **Referential integrity**    | ⚠️ At risk (duplicates)        | ⚠️ At risk (deletions)                                       | ✅ Preserved                    | ✅ Preserved                     |
| **Hash optimization**        | ❌ N/A                          | ❌ N/A                                                        | ✅ Skips unchanged rows         | ✅ Skips unchanged rows          |
| **Query complexity**         | ❌ High (must deduplicate)      | ✅ Simple                                                     | ✅ Simple                       | ❌ High (must filter latest)     |
| **Handles source updates**   | ❌ Creates duplicates           | ✅ Replaces cleanly                                           | ✅ Updates cleanly              | ✅ Creates new version           |
| **Handles deleted entities** | N/A                            | ✅ Removes them                                               | ⚠️ Keeps them                  | ⚠️ Keeps them                   |

***

## When to use each method

Use cases and recommendations:

* Use INSERT Mode when:
  * Events are truly immutable (never updated by source)
  * Raw landing zone before transformation
  * High-granularity timestamped data
  * Example: click events, API logs, sensor readings
* Use REPLACE Mode when:
  * Facts: Source recalculates metrics (with lookback window)
  * Dimensions: Deleted entities must be removed immediately
  * Clean slate needed for each sync
  * Example: Google Ads metrics, product catalogs (exact match)
* Use UPSERT Mode (no historization) when:
  * Default choice for dimension tables ⭐
  * Need to reflect updates while preserving data
  * Want to keep deleted entities for historical reference
  * Table size or query volume makes historization too expensive
  * Example: campaigns, customers, products (90% of dimensions)
* Use UPSERT Mode (with historization) when:
  * Table is small (< 10,000 rows)
  * Query volume is low
  * Strong compliance/audit requirement
  * Understand and accept the query cost implications
  * Example: small account hierarchies, limited configuration tables

***


# Replace mode : Delete and insert

## How it works

REPLACE Mode follows a two-step process: delete existing data within a defined scope, then insert new data.

This ensures clean data for each synchronization by removing old values before writing new ones.

Technical implementation:

{% stepper %}
{% step %}

#### Delete (step 1)

Use a DELETE statement with a WHERE clause to remove data within the sync scope.
{% endstep %}

{% step %}

#### Insert (step 2)

Use an INSERT statement to add the new data.
{% endstep %}
{% endstepper %}

The key distinction is the deletion scope, which differs based on table type.

Visual representation:

```
Step 1 - DELETE: Remove data matching the scope
Step 2 - INSERT: Add new data
Result: Only new data remains in the scope
```

***

## Deletion scope by table type

The scope of deletion is critical to understand in REPLACE Mode:

### Fact tables (metrics)

Scope: Only the reference date being synchronized

Example with a daily metrics table:

```
Existing data:
| date       | campaign_id | impressions | clicks |
|------------|-------------|-------------|--------|
| 2025-01-14 | camp_123    | 900         | 45     |
| 2025-01-15 | camp_123    | 1000        | 50     | ← will be deleted
| 2025-01-15 | camp_456    | 800         | 30     | ← will be deleted
| 2025-01-16 | camp_123    | 1100        | 55     |

Synchronization for 2025-01-15 with new data:
DELETE WHERE date = '2025-01-15'  -- Only this date

New data inserted:
| date       | campaign_id | impressions | clicks |
|------------|-------------|-------------|--------|
| 2025-01-15 | camp_123    | 1050        | 52     |
| 2025-01-15 | camp_456    | 820         | 31     |

Final result:
| date       | campaign_id | impressions | clicks |
|------------|-------------|-------------|--------|
| 2025-01-14 | camp_123    | 900         | 45     | ← preserved
| 2025-01-15 | camp_123    | 1050        | 52     | ← replaced
| 2025-01-15 | camp_456    | 820         | 31     | ← replaced
| 2025-01-16 | camp_123    | 1100        | 55     | ← preserved
```

### Dimension tables (attributes)

Scope: The entire table

Example with a campaign attributes table:

```
Existing data:
| campaign_id | name              | status | budget |
|-------------|-------------------|--------|--------|
| camp_123    | Summer Campaign   | ACTIVE | 5000   | ← will be deleted
| camp_456    | Winter Campaign   | PAUSED | 3000   | ← will be deleted
| camp_789    | Spring Campaign   | ACTIVE | 4000   | ← will be deleted

Synchronization with new data:
DELETE FROM campaigns  -- Entire table deleted

New data inserted (current state from source):
| campaign_id | name              | status | budget |
|-------------|-------------------|--------|--------|
| camp_123    | Summer Campaign   | PAUSED | 5500   | ← updated values
| camp_456    | Winter Campaign   | PAUSED | 3000   | ← same values
| camp_890    | Fall Campaign     | ACTIVE | 6000   | ← new campaign

Final result:
| campaign_id | name              | status | budget |
|-------------|-------------------|--------|--------|
| camp_123    | Summer Campaign   | PAUSED | 5500   |
| camp_456    | Winter Campaign   | PAUSED | 3000   |
| camp_890    | Fall Campaign     | ACTIVE | 6000   |

Note: camp_789 is gone (deleted from source)
```

***

{% hint style="success" %}

### Advantages

✅ Clean data guaranteed

* No duplicates possible within the sync scope
* Each synchronization provides a clean slate
* Data consistency ensured for each reference date

✅ Handles source corrections

* If source platform recalculates metrics, new values replace old ones
* Perfect for metrics that may be adjusted retroactively
* Ideal when combined with lookback windows

✅ Snapshot accuracy for dimensions

* Dimension tables always reflect the current state from source
* Deleted entities in source are automatically removed
* No stale or obsolete records

✅ Predictable table size

* Fact tables: size is stable per partition (one date = fixed row count)
* Dimension tables: size reflects current source entity count
* No uncontrolled growth

✅ Simple queries

* No need for deduplication logic
* Direct access to the most recent data
* Straightforward aggregations
  {% endhint %}

***

##

{% hint style="warning" %}

### Disadvantages

❌ Complete loss of historical data on dimensions

* Previous attribute values are permanently deleted
* Cannot track how a campaign status evolved over time
* No audit trail of changes
* Impossible to answer "what was the value on X date?"

❌ Risk during partial failures

* If deletion succeeds but insertion fails, data is lost
* Requires robust error handling and transaction management
* Backup/recovery strategies essential

❌ Higher processing costs

* DELETE operations require scanning data (WHERE clause evaluation)
* More expensive than INSERT mode
* Impact increases with table size

❌ Performance impact on large dimension tables

* Deleting entire table can be slow
* Insertion of large datasets takes time
* Can create locks during synchronization

❌ No historical analysis for dimensions

* Cannot perform time-based analysis on attribute changes
* Cannot reconstruct past states
* Limited analytical capabilities for business intelligence
  {% endhint %}

## Use cases

Ideal for:

📊 Fact tables with recalculated metrics

```
Example: Daily advertising metrics (impressions, clicks, conversions)
Reason: Platforms recalculate metrics with attribution windows
Benefit: Lookback window ensures latest values replace old ones
```

📊 Dimension tables requiring current snapshot only

```
Example: Current campaign configurations, active product catalog
Reason: Only current state matters, history not needed
Benefit: Always reflects exact source state, deleted items removed
```

📊 Aggregated data that may be reprocessed

```
Example: Daily summary tables, pre-aggregated reports
Reason: Source may recalculate aggregations
Benefit: Clean replacement ensures accuracy
```

📊 Data quality fixes

```
Example: Correcting malformed data, reprocessing with fixes
Reason: Need to replace incorrect data completely
Benefit: Clean slate for each sync scope
```

Not suitable for:

❌ Dimension tables requiring historical tracking

```
Problem: All previous values are lost permanently
Example: Cannot track campaign status changes over time
Alternative: Use UPSERT mode with historization
```

❌ High-frequency synchronizations on large tables

```
Problem: Delete + insert on large tables is expensive
Example: Hourly syncs on million-row dimension tables
Alternative: Use UPSERT mode or optimize sync frequency
```

❌ Event logs or immutable transactions

```
Problem: Events should never be deleted
Example: Click events, payment transactions
Alternative: Use INSERT mode
```

❌ Compliance or audit requirements

```
Problem: Complete data history may be legally required
Example: Financial transactions, medical records
Alternative: Use UPSERT mode or INSERT mode with archival
```

***

## Best practices

{% stepper %}
{% step %}

#### Understand your deletion scope clearly

* Fact tables: only reference date partition affected
* Dimension tables: entire table replaced
* Document this behavior for data consumers
  {% endstep %}

{% step %}

#### Combine with appropriate lookback windows

* Use lookback to capture source platform corrections
* Balance data accuracy vs. processing costs
* Typical: 3-7 days for advertising platforms
  {% endstep %}

{% step %}

#### Implement robust error handling

* Use transactions when possible
* Monitor for partial failures
* Have rollback/recovery procedures ready
  {% endstep %}

{% step %}

#### Consider partitioning strategy

* Ensure fact tables are partitioned by `_quanti_date`
* Verify partition pruning is working correctly
* Monitor partition-level costs
  {% endstep %}

{% step %}

#### Evaluate historical data needs

* If history is needed for dimensions, use UPSERT instead
* For fact tables, REPLACE is often appropriate
* Document the trade-off decision
  {% endstep %}

{% step %}

#### Monitor synchronization performance

* Track DELETE + INSERT operation times
* Alert on failures or slowdowns
* Optimize if sync windows become problematic
  {% endstep %}

{% step %}

#### Backup critical dimension tables

* Before migration to REPLACE mode, backup historical data
* Consider archiving snapshots periodically
* Implement retention policies if needed
  {% endstep %}
  {% endstepper %}

***

## Example: REPLACE with lookback window

Scenario: Google Ads metrics with 7-day attribution window

```
Day 1 (2025-01-15): Initial sync
| date       | campaign_id | conversions |
|------------|-------------|-------------|
| 2025-01-15 | camp_123    | 10          |

Day 8 (2025-01-22): Sync with 7-day lookback
- Source platform attributes 3 additional conversions to 2025-01-15
- Lookback window retrieves data for 2025-01-15 through 2025-01-22
- REPLACE mode deletes 2025-01-15 data
- New value inserted:

| date       | campaign_id | conversions |
|------------|-------------|-------------|
| 2025-01-15 | camp_123    | 13          | ← updated (10 + 3)
| 2025-01-16 | camp_123    | 15          |
| ...        | ...         | ...         |
| 2025-01-22 | camp_123    | 12          |
```

Without REPLACE mode: You'd have duplicate rows for 2025-01-15 with different conversion values.

With REPLACE mode: Clean data with the most accurate values.

***

## Comparison: Fact tables vs Dimension tables

| Aspect                  | Fact Tables              | Dimension Tables            |
| ----------------------- | ------------------------ | --------------------------- |
| **Deletion scope**      | Reference date only      | Entire table                |
| **Data preserved**      | Other dates untouched    | Nothing preserved           |
| **Historical tracking** | ✅ Yes (by date)          | ❌ No                        |
| **Typical size**        | Very large               | Small to medium             |
| **Sync frequency**      | Daily                    | Daily to weekly             |
| **Performance impact**  | Low (partition-level)    | Medium to High (full table) |
| **Use case**            | Metrics with corrections | Current state snapshots     |


# Upsert mode : Update and insert

## How it works

**UPSERT Mode** combines UPDATE and INSERT operations: **existing rows (identified by their Primary Key) are updated, and new rows are inserted. No data is deleted.**

This is Quanti's **preferred insertion method** as it provides the best balance between data preservation and accuracy.

{% stepper %}
{% step %}

#### Technical implementation

UPSERT Mode uses a `MERGE` statement (or equivalent) that:

* Matches rows based on Primary Key fields (via `_quanti_id`)
* Checks if data has actually changed (via `_quanti_hash` comparison)
* Updates or inserts matched rows only if data changed
* Inserts unmatched rows as new records
  {% endstep %}

{% step %}

#### Change detection optimization

Quanti uses two technical fields to optimize operations:

* **`_quanti_id`**: Composite identifier created by concatenating all Primary Key fields (fields with `quantiId: true`)
* **`_quanti_hash`**: Hash of all table fields, used as a data fingerprint

When a row with matching `_quanti_id` is found, Quanti compares the `_quanti_hash`:

* If **different** → data has changed → UPDATE.
* If **identical** → data unchanged → **SKIP** (no operation performed)

This prevents unnecessary insertions when source data hasn't changed, significantly reducing storage costs and processing time.
{% endstep %}
{% endstepper %}

**Visual representation:**

```
Existing data based on PK:
  Row A (PK=1): [old values] hash: abc123
  Row B (PK=2): [old values] hash: def456

New data:
  Row A (PK=1): [new values] hash: xyz789  ← PK matches, hash different → UPDATE
  Row B (PK=2): [old values] hash: def456  ← PK matches, hash identical → SKIP
  Row C (PK=3): [new values] hash: ghi012  ← PK new → INSERT

Result:
  Row A (PK=1): [new values] hash: xyz789  ← updated
  Row B (PK=2): [old values] hash: def456  ← unchanged (no operation)
  Row C (PK=3): [new values] hash: ghi012  ← inserted
```

**Concrete example with a dimension table:**

```
Existing data (campaigns table):
| campaign_id | name            | status | budget | _quanti_hash | _quanti_loaded_at   |
|-------------|-----------------|--------|--------|--------------|---------------------|
| camp_123    | Summer Campaign | ACTIVE | 5000   | abc123       | 2025-01-15 10:00:00 |
| camp_456    | Winter Campaign | PAUSED | 3000   | def456       | 2025-01-15 10:00:00 |

Primary Key: (campaign_id)

New data from synchronization:
| campaign_id | name            | status | budget |
|-------------|-----------------|--------|--------|
| camp_123    | Summer Campaign | PAUSED | 5500   | → hash: xyz789 (different)
| camp_456    | Winter Campaign | PAUSED | 3000   | → hash: def456 (identical)
| camp_789    | Fall Campaign   | ACTIVE | 6000   | → hash: ghi012 (new)

Result:
| campaign_id | name            | status | budget | _quanti_hash | _quanti_loaded_at   |
|-------------|-----------------|--------|--------|--------------|---------------------|
| camp_123    | Summer Campaign | PAUSED | 5500   | xyz789       | 2025-01-20 14:00:00 | ← updated
| camp_456    | Winter Campaign | PAUSED | 3000   | def456       | 2025-01-15 10:00:00 | ← skipped (unchanged)
| camp_789    | Fall Campaign   | ACTIVE | 6000   | ghi012       | 2025-01-20 14:00:00 | ← inserted
```

**Impact example:**\
If you sync 10,000 campaigns daily and only 500 change each day, Quanti will only perform operations on those 500 rows, skipping the 9,500 unchanged rows entirely.

{% hint style="danger" %}
**⚠️ Critical consideration: Performance impact on dimension tables**

Dimension tables are typically NOT partitioned (unlike fact tables). This means historized dimension tables require scanning the ENTIRE table to find the latest version of each entity, causing large increases in query cost, storage, and degraded performance.

Example consequences:

* Table size growth: 10,000 rows → 500,000 rows (50 changes/campaign/year)
* Query scans: 10,000 rows → 500,000 rows (50x more expensive)
* Monthly cost example: \~$5 → \~$250 (50x increase)

Why this doesn't affect fact tables:

* Fact tables are partitioned by date (`_quanti_date`) and queries typically include date filters so partition pruning reduces scanned data.
  {% endhint %}

***

## Critical characteristic: No deletion

**⚠️ UPSERT Mode NEVER deletes rows from your table.**

This is a fundamental difference from REPLACE Mode.

What happens when entities are deleted from source: the corresponding rows remain in your table (they are not removed by UPSERT). This preserves referential integrity and audit trails but can create orphaned or stale records over time.

***

## UPSERT mode for historization

UPSERT Mode can be configured to **preserve historical values** rather than updating rows in place. This creates a new row for each change while keeping the old values.

**Example of historization :**

```
Existing data (campaigns table):
| campaign_id | name            | status | budget | _quanti_loaded_at   |
|-------------|-----------------|--------|--------|---------------------|
| camp_123    | Summer Campaign | ACTIVE | 5000   | 2025-01-15 10:00:00 |
| camp_456    | Winter Campaign | PAUSED | 3000   | 2025-01-15 10:00:00 |

New data from synchronization:
| campaign_id | name            | status | budget |
|-------------|-----------------|--------|--------|
| camp_123    | Summer Campaign | PAUSED | 5500   | ← status changed

Result WITH historization:
| campaign_id | name            | status | budget | _quanti_loaded_at   |
|-------------|-----------------|--------|--------|---------------------|
| camp_123    | Summer Campaign | ACTIVE | 5000   | 2025-01-15 10:00:00 | ← old version kept
| camp_456    | Winter Campaign | PAUSED | 3000   | 2025-01-15 10:00:00 |
| camp_123    | Summer Campaign | PAUSED | 5500   | 2025-01-20 14:00:00 | ← new version inserted
```

With historization, the `_quanti_loaded_at` field becomes crucial for identifying the most recent version of each entity.

**Querying with historization:**

```sql
-- Get current state (most recent version of each campaign)
SELECT *
FROM campaigns
QUALIFY ROW_NUMBER() OVER (
  PARTITION BY campaign_id
  ORDER BY _quanti_loaded_at DESC
) = 1
```

***

## When to historize

**✅ Historize when:**

* Compliance or audit requirements mandate complete history
* Business analysis requires tracking attribute changes over time
* Dimension table is small (< 10,000 rows) and changes infrequently
* Query volume on this table is low

**❌ Avoid historization when:**

* Dimension table is large (> 100,000 rows) or changes frequently
* High query volume on this table
* Only current state matters for business needs
* Storage and query costs are a concern
* No specific requirement for historical tracking

***

## How to Configure Historization

Historization in UPSERT Mode is controlled through **Primary Key configuration** during the connector setup (Mapping step). By selecting which fields form your table's unique identifier, you control which changes create new historical rows versus updating existing ones.

#### The Primary Key Principle

When configuring your table mapping, you select which fields are part of the **Primary Key** by checking their boxes in the Mapping step. This choice directly determines historization behavior.

**Key concept:**

* Fields **checked as Primary Key** → Changes to these fields create **new rows** (historization)
* Fields **not checked** → Changes to these fields **update existing rows** (no historization)

**What is a Primary Key?** The Primary Key is the combination of fields that uniquely identifies each row in your table. For example, for a campaigns table, `campaign_id` uniquely identifies each campaign. If you want to track how that campaign changes over time, you can add more fields to the Primary Key (like `date` or `status`), which will create a new row for each distinct combination.

#### Example 1: Standard setup (no historization)

**Scenario:** Keep only the current state of each campaign

**Mapping configuration:**

```
Table: campaigns

Field Name      | Type    | Primary Key
----------------|---------|-------------
campaign_id     | STRING  | ☑ (checked)
name            | STRING  | ☐
status          | STRING  | ☐
budget          | NUMERIC | ☐
```

**Primary Key selected:** `campaign_id` only

**Behavior:**

```
Initial data:
| campaign_id | name            | status | budget |
|-------------|-----------------|--------|--------|
| camp_123    | Summer Campaign | ACTIVE | 5000   |

Sync with status change:
| campaign_id | name            | status | budget |
|-------------|-----------------|--------|--------|
| camp_123    | Summer Campaign | PAUSED | 5000   |

Result (Primary Key matches → row is UPDATED):
| campaign_id | name            | status | budget |
|-------------|-----------------|--------|--------|
| camp_123    | Summer Campaign | PAUSED | 5000   | ← updated in place
```

**Result:** Only current state is kept. No history of the status change.

***

#### Example 2: Track changes over time with date

**Scenario:** Create a daily snapshot to track how campaign attributes evolve

**Mapping configuration:**

```
Table: campaigns

Field Name      | Type    | Primary Key
----------------|---------|-------------
campaign_id     | STRING  | ☑ (checked)
date            | DATE    | ☑ (checked)  ← Added to Primary Key
name            | STRING  | ☐
status          | STRING  | ☐
budget          | NUMERIC | ☐
```

**Primary Key selected:** `campaign_id` + `date`

**Behavior:**

```
Initial data (2025-01-15):
| campaign_id | date       | name            | status | budget |
|-------------|------------|-----------------|--------|--------|
| camp_123    | 2025-01-15 | Summer Campaign | ACTIVE | 5000   |

Sync with status change (2025-01-20):
| campaign_id | date       | name            | status | budget |
|-------------|------------|-----------------|--------|--------|
| camp_123    | 2025-01-20 | Summer Campaign | PAUSED | 5000   |

Result (Primary Key different → new row INSERTED):
| campaign_id | date       | name            | status | budget |
|-------------|------------|-----------------|--------|--------|
| camp_123    | 2025-01-15 | Summer Campaign | ACTIVE | 5000   | ← kept
| camp_123    | 2025-01-20 | Summer Campaign | PAUSED | 5000   | ← new row
```

**Result:** Full history preserved. You can see the campaign's status on any date.

***

#### Example 3: Track only status changes

**Scenario:** Create a new row only when the status changes, but update other fields in place

**Mapping configuration:**

```
Table: campaigns

Field Name      | Type    | Primary Key
----------------|---------|-------------
campaign_id     | STRING  | ☑ (checked)
status          | STRING  | ☑ (checked)  ← Include field to track changes
name            | STRING  | ☐
budget          | NUMERIC | ☐
```

**Primary Key selected:** `campaign_id` + `status`

**Behavior:**

```
Initial data:
| campaign_id | status | name            | budget |
|-------------|--------|-----------------|--------|
| camp_123    | ACTIVE | Summer Campaign | 5000   |

Sync 1 - Budget change only:
| campaign_id | status | name            | budget |
|-------------|--------|-----------------|--------|
| camp_123    | ACTIVE | Summer Campaign | 5500   |

Result (Primary Key matches → row UPDATED):
| campaign_id | status | name            | budget |
|-------------|--------|-----------------|--------|
| camp_123    | ACTIVE | Summer Campaign | 5500   | ← updated

Sync 2 - Status change:
| campaign_id | status | name            | budget |
|-------------|--------|-----------------|--------|
| camp_123    | PAUSED | Summer Campaign | 5500   |

Result (Primary Key different → new row INSERTED):
| campaign_id | status | name            | budget |
|-------------|--------|-----------------|--------|
| camp_123    | ACTIVE | Summer Campaign | 5500   | ← kept
| camp_123    | PAUSED | Summer Campaign | 5500   | ← new row
```

**Result:**

* Status changes → new rows (tracked over time)
* Name/budget changes → update existing row (not tracked)

{% hint style="danger" %}
**⚠️ Critical consideration: Performance impact on dimension tables**

Dimension tables are typically NOT partitioned (unlike fact tables). This means historized dimension tables require scanning the ENTIRE table to find the latest version of each entity, causing large increases in query cost, storage, and degraded performance.

Example consequences:

* Table size growth: 10,000 rows → 500,000 rows (50 changes/campaign/year)
* Query scans: 10,000 rows → 500,000 rows (50x more expensive)
* Monthly cost example: \~$5 → \~$250 (50x increase)

Why this doesn't affect fact tables:

* Fact tables are partitioned by date (`_quanti_date`) and queries typically include date filters so partition pruning reduces scanned data.
  {% endhint %}

***

{% hint style="success" %}

### Advantages

* ✅ No data loss — Existing rows that don't appear in new data are preserved
* ✅ Handles updates gracefully — Changes to existing entities are reflected immediately, no duplicates
* ✅ Supports historization — Can track attribute changes over time (with performance considerations)
* ✅ Flexible and robust — Works for both fact and dimension tables; resilient to partial source data
* ✅ Optimized with hash comparison — Skips unchanged rows entirely (\_quanti\_hash comparison)
  {% endhint %}

***

{% hint style="warning" %}

### Disadvantages

* ❌ Moderate processing costs — `MERGE` operations require PK matching and scanning
* ❌ Table growth with historization — Storage costs increase with each change
* ❌ Complex queries with historization — Need to filter latest version using `_quanti_loaded_at`
* ❌ Primary Key dependency — Requires accurate PK definition (`_quanti_id`)
* ❌ Cannot remove deleted entities — Orphaned records remain unless manually cleaned
  {% endhint %}

***

## Use cases

Ideal for:

* Dimension tables (campaigns, ad groups, products, customers) — reflect updates while preserving referential integrity (avoid historization on large, frequently-changing dimension tables)
* Master data and reference tables (account hierarchies, org structures)
* Fact tables where updates are expected (order status, conversion tracking) — partitioning mitigates historization impact
* Tables requiring compliance/audit trails (user permissions, config changes)
* Mixed scenarios (new + updates + unchanged), e.g., product catalogs

Not suitable for:

* Pure event streams or logs (events should be INSERT-only)
* Tables requiring explicit deletion of entities (use REPLACE mode)
* Large dimension tables with high change frequency + historization (consider REPLACE or snapshots)

***

***

## Historization vs. No Historization

<table><thead><tr><th width="169.67578125">Aspect</th><th align="right">With Historization</th><th align="right">Without Historization</th></tr></thead><tbody><tr><td>Update behavior</td><td align="right">New row inserted</td><td align="right">Existing row updated in place</td></tr><tr><td>Historical tracking</td><td align="right">✅ Full history preserved</td><td align="right">❌ Only current state</td></tr><tr><td>Table growth</td><td align="right">📈 Grows with each change</td><td align="right">📊 Stable (one row per entity)</td></tr><tr><td>Query complexity</td><td align="right">⚠️ Need to filter latest version</td><td align="right">✅ Direct access to current state</td></tr><tr><td>Storage cost</td><td align="right">❌ Higher (multiple versions)</td><td align="right">✅ Lower (single version)</td></tr><tr><td>Query cost (dimension tables)</td><td align="right">❌❌ VERY HIGH (full table scans)</td><td align="right">✅ Low</td></tr><tr><td>Audit capability</td><td align="right">✅ Complete audit trail</td><td align="right">❌ No audit trail</td></tr><tr><td>Temporal analysis</td><td align="right">✅ "State at time X" queries</td><td align="right">❌ Not possible</td></tr><tr><td>Performance impact</td><td align="right">❌❌ Severe on dimensions</td><td align="right">✅ Minimal</td></tr><tr><td>Use case</td><td align="right">Small tables, compliance, rare queries</td><td align="right">Most dimension tables</td></tr></tbody></table>

***


# Data Concepts

## Introduction

Before configuring your connectors and leveraging your data, it is essential to master a few **fundamental concepts** that structure how your tables and synchronizations work.

{% hint style="info" %}
Why start with concepts?

Understanding these notions is essential to:

* **Properly leverage** the data delivered by Quanti
* **Interpret** the structure of your tables and their evolution
* **Identify** potential risks (duplicates, loss of history, inconsistencies)
* **Make the right choices** when configuring custom connectors
* **Communicate effectively** with technical teams
  {% endhint %}

Without this understanding, you risk misinterpreting your data or making technical decisions that are unsuitable for your business needs.

This page provides you with the foundations necessary to manipulate and analyze your data with confidence.


# Date & Partitioning

The **reference date** (or synchronization date) defines the **temporal scope** of each synchronization.

## How it works

Quanti processes queries and insertions **date by date**. For each synchronization, a reference date is defined (for example `2025-01-15`), and all data for that day is processed together.

## Practical example

If you synchronize advertising metrics for **January 15, 2025**:

* Reference date = `2025-01-15`
* All data for that day is retrieved from the source platform
* This data is then inserted into your data warehouse with this reference date

## Partitioning and optimization

On **fact tables (metrics)**, Quanti uses this reference date to partition tables via the `_quanti_date` field.

How does it work?

```
campaign_stats table partitioned on _quanti_date

Partition 2025-01-13: [data from 01/13]
Partition 2025-01-14: [data from 01/14]
Partition 2025-01-15: [data from 01/15]  ← only this partition is affected
Partition 2025-01-16: [data from 01/16]
```

During a synchronization for `2025-01-15`, only the corresponding partition is targeted:

* SQL queries scan **only the affected partition**
* Insert/delete operations are **isolated** to this partition
* Other partitions are neither read nor modified

{% hint style="success" %}
Partitioning by date via `_quanti_date` allows you to:

* **Optimize performance**: SQL queries scan only strictly necessary data + *with where quanti*\_date \[>= <=, <, > =} is used
* **Reduce costs**: less data scanned = reduced billing on your data warehouse
* **Speed up synchronizations**: operations are faster because targeted to a data subset
* **Facilitate maintenance**: ability to reprocess a specific day without impacting other dates
* **Determine the deletion scope** in certain insertion methods (REPLACE Mode): only data for this date is affected
  {% endhint %}

{% hint style="info" %}
Partitioning by `_quanti_date` is primarily used on **fact tables** (metrics, events) where the date notion is intrinsic to the data. **Dimension tables** (attributes) are generally not partitioned because they represent a global state rather than a time series.
{% endhint %}


# Lookback window

The **lookback window** defines the **time period** that a connector will retrieve data for during each synchronization, relative to the reference date.

{% hint style="info" %}
Why use a lookback window?

Data on source platforms (Google Ads, Meta, etc.) is not always immediately finalized. Several factors can cause retroactive changes:

* **Data processing delays**: metrics may be updated hours or days after the actual event
* **Attribution adjustments**: conversions can be attributed retroactively to earlier clicks
* **Platform corrections**: source platforms may correct or recalculate historical data
* **Time zone differences**: events near midnight may be reassigned to the correct date
  {% endhint %}

{% stepper %}
{% step %}

#### How it works

Instead of only synchronizing data for the reference date, the connector retrieves data for a **period including past days** (the lookback window) to capture retroactive updates.
{% endstep %}

{% step %}

#### Example with a 7-day lookback window

Today's date: 2025-01-22\
Reference date: 2025-01-15\
Lookback window: 7 days

Data retrieved for dates:

* 2025-01-15 (reference date)
* 2025-01-14
* 2025-01-13
* 2025-01-12
* 2025-01-11
* 2025-01-10
* 2025-01-09 (reference date - 6 days)

All data for these 7 days is retrieved and synchronized, ensuring any retroactive updates are captured.
{% endstep %}

{% step %}

#### Practical example

Initial sync on 01/16:

```
| date       | campaign_id | clicks |
| 2025-01-15 | camp_123    | 100    |
```

Sync on 01/20 with 7-day lookback:

```
| date       | campaign_id | clicks |
| 2025-01-15 | camp_123    | 105    | ← updated (5 additional clicks attributed retroactively)
```

{% endstep %}

{% step %}

#### Impact by insertion method

The lookback window interacts differently with each insertion method:

* **REPLACE Mode**: Previous data within the lookback window is deleted and replaced with fresh data from the source.
* **UPSERT Mode**: Rows are updated with new values, preserving history if configured.
* **INSERT Mode**: May create duplicates if the same data is retrieved multiple times (not recommended with lookback).
  {% endstep %}

{% step %}

#### Typical lookback window values

| Platform Type                            | Common Lookback | Reason                                 |
| ---------------------------------------- | --------------- | -------------------------------------- |
| Advertising platforms (Google Ads, Meta) | 3-7 days        | Attribution windows, conversion delays |
| Analytics platforms (GA4)                | 1-3 days        | Processing delays, session completion  |
| CRM/Sales (Salesforce, HubSpot)          | 1-2 days        | Data entry delays, batch updates       |
| E-commerce (Shopify, WooCommerce)        | 1-2 days        | Order updates, refunds                 |
| {% endstep %}                            |                 |                                        |

{% step %}

#### Trade-offs

<table><thead><tr><th width="160.20703125">Critère</th><th>Longer Lookback Window</th><th>Shorter Lookback Window</th></tr></thead><tbody><tr><td><strong>Data completeness</strong></td><td>✅ More complete and accurate data</td><td>⚠️ Risk of missing retroactive updates</td></tr><tr><td><strong>Retroactive changes</strong></td><td>✅ Captures all platform corrections</td><td>❌ May miss late attribution or corrections</td></tr><tr><td><strong>Synchronization time</strong></td><td>❌ Longer processing time</td><td>✅ Faster synchronizations</td></tr><tr><td><strong>Data warehouse costs</strong></td><td>❌ Higher (more partitions scanned/written)</td><td>✅ Lower (fewer partitions affected)</td></tr><tr><td><strong>Data consistency</strong></td><td>✅ More reliable for reporting</td><td>⚠️ Potential inconsistencies over time</td></tr><tr><td><strong>Use case</strong></td><td>Critical metrics, attribution analysis</td><td>High-volume data, stable metrics</td></tr></tbody></table>
{% endstep %}

{% step %}

#### Best practices

* Configure the lookback window based on the **platform's attribution window**.
* Monitor data stability: if values change significantly after several days, increase the lookback.
* For critical metrics, prefer a longer lookback window to ensure data accuracy.
* For high-volume tables with stable data, a shorter lookback may be sufficient.
  {% endstep %}

{% step %}

#### Configuration in Quanti

The lookback window is configured at the connector level and can be adjusted based on your data quality requirements and platform-specific behavior.
{% endstep %}
{% endstepper %}


# Primary key

The **Primary Key (PK)** is the set of fields that **uniquely** identify a row in your table.

**Concrete examples:**

**Daily metrics table** (fact table)

```
Primary Key: (date, campaign_id, ad_id)
```

| date       | campaign\_id | ad\_id  | impressions | clicks |
| ---------- | ------------ | ------- | ----------- | ------ |
| 2025-01-15 | camp\_123    | ad\_456 | 1000        | 50     |
| 2025-01-15 | camp\_123    | ad\_789 | 800         | 30     |

Each combination (date + campaign\_id + ad\_id) identifies a unique row.

**Campaign attributes table** (dimension table)

```
Primary Key: (campaign_id)
```

| campaign\_id | name            | status | budget |
| ------------ | --------------- | ------ | ------ |
| camp\_123    | Summer Campaign | ACTIVE | 5000   |
| camp\_456    | Winter Campaign | PAUSED | 3000   |

Each campaign\_id identifies a unique campaign.

{% hint style="info" %}
Why is this important?

The Primary Key concept allows you to define which table attributes identify each row as unique. This is essential for:

* **Determining the behavior of the UPSERT method**: should an existing row be updated or should a new row be inserted?
* **Avoiding duplicates** in your tables
* **Guaranteeing the uniqueness of each row and data integrity**, two essential concepts in data management
  {% endhint %}


# Primary Destination

QUANTI: supports multiple data warehouse destinations. Choose the option that best fits your infrastructure and plan.

* [Managed BigQuery](/primary-destination/primary-destination/managed-bigquery)
* [BYOD BigQuery](/primary-destination/primary-destination/byod-bigquery)
* [BYOD Snowflake](/primary-destination/primary-destination/byod-snowflake)
* [BYOD ClickHouse](/primary-destination/primary-destination/byod-clickhouse)


# Managed BigQuery

With **Managed BigQuery**, QUANTI: provisions and manages a Google BigQuery data warehouse on your behalf. No GCP account or infrastructure setup is required on your end.

Your data is loaded, stored, and made available for analysis directly within this managed environment. QUANTI: handles availability, maintenance, and configuration so you can focus on your data.

Managed BigQuery is available on all plans.

{% hint style="info" %}
Storage and compute capacity vary by plan. Contact us for details.
{% endhint %}


# BYOD BigQuery

**BYOD BigQuery** (Bring Your Own Data Warehouse) lets you connect QUANTI: to your own Google BigQuery instance. Your data is loaded directly into your GCP project. You retain full ownership of your data and infrastructure.

BYOD BigQuery is suited for organizations that already operate on GCP, want to keep their data within their own cloud environment, or need to consolidate QUANTI: data alongside existing datasets.

BYOD BigQuery is available on all plans.


# BYOD Snowflake

**BYOD Snowflake** (Bring Your Own Data Warehouse) lets you connect QUANTI: to your own Snowflake instance. Your data is loaded directly into your Snowflake environment. You retain full ownership of your data and infrastructure.

BYOD Snowflake is suited for organizations already running on Snowflake that want to centralize their marketing data within their existing environment.

{% hint style="warning" %}
BYOD Snowflake is available on the **Enterprise** plan only.
{% endhint %}


# BYOD ClickHouse

**BYOD ClickHouse** (Bring Your Own Data Warehouse) lets you connect QUANTI: to your own ClickHouse instance. Your data is loaded directly into your ClickHouse database, leveraging its performance for high-volume analytical workloads.

BYOD ClickHouse is suited for organizations that rely on ClickHouse for large-scale data processing and want to integrate their marketing data into that environment.

{% hint style="warning" %}
BYOD ClickHouse is available on the **Enterprise** plan only.
{% endhint %}


# GCP / Big Query

How to give rights to a Service Account in GCP. Follow our setup guide to connect QUANTI: to Google Cloud Platform.

***

As part of creating a project unmanaged by Quanti (i.e., a project for which you already have a data warehouse), it is necessary to authorize a service account that will deposit the data into your data warehouse.

{% hint style="warning" %}
Quanti: only needs access to your GCP to deposit the data you requested. The service account we will use will be granted only the necessary level of permissions to use the BigQuery service.
{% endhint %}

## Prerequisites

To connect QUANTI: to Google Cloud Plaform (GCP), you need an [GCP](https://cloud.google.com/gcp) account.

***

## Setup instructions

### 1. Project creation

When creating a new unmanaged project, you are asked to specify the Google Cloud Platform project ID. You can find it by clicking in the selection field on the header of your Google Cloud Platform interface. Enter your projet ID in the designated field on Quanti: UI.

<figure><img src="https://1847929239-files.gitbook.io/~/files/v0/b/gitbook-x-prod.appspot.com/o/spaces%2FoRN0sxIyI0UJdSqkwdBu%2Fuploads%2Fgit-blob-f105e8b878cd9b3fa2018665c221b52424af10f0%2Fbigquery1.png?alt=media" alt="Project ID from BigQuery Interface" width="563"><figcaption><p>Project ID from BigQuery Interface</p></figcaption></figure>

### 2. Service Account configuration

When the creation is done, you will redirect on the dashboard projet. In your arrival, a pop-in will opens and give instructions to continue : "Add the Service Account to your IAM Project".

1. Go on IAM & Admin product on GCP interface. Click on icon Menu < IAM & Admin < IAM\ <br>

   <figure><img src="https://1847929239-files.gitbook.io/~/files/v0/b/gitbook-x-prod.appspot.com/o/spaces%2FoRN0sxIyI0UJdSqkwdBu%2Fuploads%2Fgit-blob-ff2cb737cf7d42f6f594d5c4ecf7a3a03590f06b%2Fbigquery2.png?alt=media" alt="Access to the BigQuery IAM interface" width="375"><figcaption><p>Access to the BigQuery IAM interface</p></figcaption></figure>
2. Click GRANT ACCESS button.\ <br>

   <figure><img src="https://1847929239-files.gitbook.io/~/files/v0/b/gitbook-x-prod.appspot.com/o/spaces%2FoRN0sxIyI0UJdSqkwdBu%2Fuploads%2Fgit-blob-fb04893c155d42d2a05db00afa91713898618a35%2Fbigquery3.png?alt=media" alt="&#x22;Grant Access&#x22; button from BigQuery interface"><figcaption><p>"Grant Access" button from BigQuery interface</p></figcaption></figure>
3. Copy/ paste the service account email adresse, assign roles requested and click Save :
4. In QUANTI: interface, click on Check button to launch the connections tests.


# Dashboards

QUANTI: Dashboards let you turn your warehouse data into shareable, always-up-to-date visual reports — without writing a line of frontend code. You describe what you want to the AI assistant, it generates the dashboard, and the result is a live page that refreshes automatically each time it is opened.

Typical use cases: weekly performance summaries, connector-level KPI tracking, campaign comparison reports, catalogue health pages.


# Create & share a dashboard

***

## How it works

Dashboards in QUANTI: are **AI-generated**. You describe what you want to see — the metrics, the time range, the layout — and the AI assistant builds the dashboard for you. Under the hood, each dashboard is a declarative spec that binds SQL queries to visual blocks. You never write HTML or JavaScript.

Each dashboard:

* runs its queries **live** against your data warehouse when opened
* always shows **up-to-date data** (relative time windows, not hardcoded date ranges)
* is accessible via a **persistent URL** that can be shared with your team

***

## Creating a dashboard

To create a dashboard, open the AI assistant and describe what you want:

> *"Create a dashboard showing our last 30 days of Meta Ads performance — spend, CPC, CTR, and ROAS — with a daily trend chart and a campaign breakdown table."*

The assistant will:

1. Identify the relevant tables in your warehouse
2. Estimate the query cost before building
3. Generate the dashboard and return its URL

You can ask for changes at any time — the assistant will update the existing dashboard rather than creating a new one, preserving its URL and sharing settings.

{% hint style="info" %}
The more specific your request, the better the result. Mention the metrics you care about, the time window, and how you want data grouped (by campaign, by channel, by day…).
{% endhint %}

***

## Dashboard structure

A dashboard is organised into **pages** (tabs). Each page contains **blocks** laid out vertically.

### Block types

**KPI cards**

Display a single key metric with an optional comparison to the previous period and a sparkline trend. Best used at the top of a page for the 3–4 most important numbers.

**Charts**

Visualise trends and comparisons. Available chart types: line, area, bar, stacked bar, pie, donut, scatter. Charts use relative time windows by default so they stay current.

**Tables**

Display detailed row-level data with optional sorting and filtering. Columns can be formatted as numbers, percentages, currencies, or badges.

**Card grids**

Display one card per data row — useful for catalogue views, campaign scorecards, or any ranking where each item deserves its own visual block. Cards can include images, colour-coded status badges, and multiple metrics.

**Editorial blocks**

Add context to your dashboard with headings, text (markdown), callout boxes (info, success, warning, error), and dividers.

***

## Time windows

Dashboards always use **relative time windows** — data is computed relative to today each time the dashboard is opened. This means a dashboard built today will still show the correct "last 30 days" in six months, without any manual update.

If you need a fixed period (e.g. "January 2026 only"), ask explicitly when creating the dashboard.

***

## Sharing & permissions

Dashboards can be shared with any member of your QUANTI: workspace. Only the dashboard **owner** can manage sharing.

To share a dashboard, ask the AI assistant:

> *"Share dashboard \[name or URL] with <user@example.com> as viewer."*

Two roles are available:

| Role   | Can view | Can edit |
| ------ | :------: | :------: |
| Viewer |     ✅    |     ❌    |
| Editor |     ✅    |     ✅    |

The invited person receives a notification on their QUANTI: home page. They do not need to be a member of the project — only a member of the workspace.

{% hint style="warning" %}
Sharing a dashboard does not grant access to the underlying data warehouse. The dashboard displays pre-rendered query results only.
{% endhint %}

***

## Modifying a dashboard

To update an existing dashboard, ask the AI assistant to modify it by name or URL. The assistant reads the current state of the dashboard before making any changes, so you can ask for incremental updates:

> *"Add a weekly breakdown by country to the Meta Ads dashboard."* *"Replace the bar chart with a stacked bar, grouped by campaign type."*

The dashboard URL, sharing settings, and page structure are preserved across updates.


# Analytics connectors

You'll find below all the connectors supported by Quanti:


# Adobe Analytics

Follow our setup guide to connect Adobe Analytics to QUANTI:

<a href="https://dbdiagram.io/e/69cd3699fb2db18e3b5a416b/69cd36b5fb2db18e3b5a42d9" class="button primary" data-icon="table-tree">Prebuilt reports and definition</a>

***

## Prerequisites

To connect Adobe Analytics to QUANTI, you need:

* An [Adobe Analytics](https://business.adobe.com/products/analytics/adobe-analytics.html) account
* Access to [Adobe Developer Console](https://developer.adobe.com/console) to create an OAuth Server-to-Server project and retrieve your API credentials

***

## Setup instructions

{% stepper %}
{% step %}
**Retrieve your API credentials**

In [Adobe Developer Console](https://developer.adobe.com/console):

1. Create a new project (or open an existing one)
2. Click **Add API** and select **Adobe Analytics**
3. Choose **OAuth Server-to-Server** as the authentication method
4. Note your **Client ID** and **Client Secret**

Your **Global Company ID** is found in Adobe Analytics under **Admin > Company Settings**.
{% endstep %}

{% step %}
**Authorize your account**

In QUANTI, enter the credentials retrieved in the previous step:

* **Client ID**
* **Client Secret**
* **Global Company ID**
  {% endstep %}

{% step %}
**Select Report Suites**

Choose the Adobe Analytics Report Suites you want to sync.
{% endstep %}

{% step %}
**Select pre-built reports**

Select the pre-built reports you want to activate, and/or create your own custom reports. To help you configure custom reports, refer to the **Custom reports** chapter below.
{% endstep %}

{% step %}
**Connector information**

* **Connector Name**: Name your connector. It must be unique.
* **Dataset ID**: Define the ID of the dataset. It must not exist yet, as it will be created and data will be sent there.
  {% endstep %}
  {% endstepper %}

***

## Pre-built reports

* **campaign\_performance**: Visits, visitors, bounces, revenue, orders, and pageviews per tracking code (campaign).
* **pages\_performance**: Pageviews, visitors, visits, exits, and bounces per page.

***

<a href="https://dbdiagram.io/e/69cd3699fb2db18e3b5a416b/69cd36b5fb2db18e3b5a42d9" class="button primary" data-icon="table-tree">Prebuilt reports and definition</a>

***

## Custom reports

Adobe Analytics custom reports let you query any combination of dimensions and metrics available in your Report Suite via the [Adobe Analytics Reporting API 2.0](https://developer.adobe.com/analytics-apis/docs/2.0/).

#### Find available dimensions and metrics

The full reference for available dimensions and metrics is the official Adobe Analytics API documentation: 👉 [developer.adobe.com/analytics-apis/docs/2.0/](https://developer.adobe.com/analytics-apis/docs/2.0/)

Dimensions follow the pattern `variables/<name>` (e.g. `variables/campaign`, `variables/page`) and metrics follow `metrics/<name>` (e.g. `metrics/visits`, `metrics/pageviews`).

{% hint style="info" %}
**Use an AI assistant to speed up the configuration.** Describe the report you want to reproduce — as you see it in the Adobe Analytics interface — to an AI assistant (Claude, ChatGPT…). For example:

> *"I want to build a custom Adobe Analytics report showing visits, bounces and revenue by marketing channel. What dimension and metrics should I use in the QUANTI JSON format `{ "dimension": "", "metrics": [] }` ?"*

The AI will identify the correct `dimension` value and the exact `metrics` array for you.
{% endhint %}

#### Configure the custom report

In QUANTI, at the **Select pre-built reports** step, click **Add custom report**. Fill in the following JSON:

```json
{
  "dimension": "",
  "metrics": []
}
```

* **`dimension`** *(required)*: The Adobe Analytics dimension ID (e.g. `"variables/campaign"`, `"variables/page"`, `"variables/browser"`)
* **`metrics`** *(required)*: Array of metric IDs to retrieve (e.g. `["metrics/visits", "metrics/pageviews", "metrics/bounces"]`)

#### Map your fields (Schema)

After configuring the query, the **Schema** step lets you define how fields are stored in your data warehouse:

* Adjust the **Type** (STRING, INTEGER, FLOAT…) for each field
* Check **Unique identifiers** to mark dimension fields as part of the primary key — they collectively form the unique identifier of each row

Once all fields are mapped, click **Save** to create the custom report table.


# AppsFlyer

Follow our setup guide to connect AppsFlyer to QUANTI.

AppsFlyer is a mobile attribution and analytics platform. This connector collects your app performance data via the AppsFlyer Pull API: aggregate LTV reports by media source, campaign and geography, as well as raw event-level data for installs, in-app events, uninstalls and reinstalls.

<a href="https://dbdiagram.io/e/6a466e9b4ac62e474c17bc7a/6a466f2b36d348d120547e7f" class="button primary" data-icon="table-tree">Prebuilt reports and definitions</a>

***

## Prerequisites

* An active AppsFlyer account with at least one app configured
* **Account Admin** role (required to retrieve the API Token V2)
* For `installs`, `in_app_events`, and `uninstalls`: a plan that includes **raw data access**
* For `reinstalls`: raw data access **and** explicit activation by your AppsFlyer CSM (contact AppsFlyer support to enable this endpoint)

***

## Setup instructions

{% stepper %}
{% step %}

#### Enter your API Token V2

In AppsFlyer, go to **Security center** > **Manage API tokens** and copy your API Token V2 (a JWT string of 700+ characters). Only account admins can access this page.

Paste the token in QUANTI and click **Continue**.
{% endstep %}

{% step %}

#### Select your apps

QUANTI lists all apps accessible from your AppsFlyer account. Select the apps you want to sync. Each app is identified by its App ID (e.g. `com.example.android` for Android, `id123456789` for iOS).

Apps without real traffic (e.g. internal test apps) can be included — their tables will simply be empty.
{% endstep %}

{% step %}

#### Select prebuilt reports

Choose which tables to activate. Reports are organized into two groups:

* **Aggregate reports** (`daily`, `geo_daily`, `partners_daily`, `partners`, `geo`): summary LTV metrics, no raw data plan required.
* **Raw data reports** (`installs`, `in_app_events`, `uninstalls`, `reinstalls`): user-level data, requires raw data access on your AppsFlyer plan.
  {% endstep %}

{% step %}

#### Connector information

* **Connector Name**: Give your connector a unique name
* **Sync frequency**: Daily (default) or weekly
* **Lookback window**: 7 days by default (up to 30)
* **Historical data**: Up to 24 months of history
  {% endstep %}
  {% endstepper %}

***

## Prebuilt reports

### Aggregate reports

These tables are sourced from the AppsFlyer Aggregate Pull API. Each row represents LTV metrics — the cumulative lifetime value of users installed on a given date, aggregated by media source, campaign and optional dimensions. The reference date is always the **install date**, not the activity date.

* **daily**: Daily LTV performance by media source and campaign — impressions, clicks, CTR, installs, conversions, conversion rate, sessions, loyal users, total cost, eCPI, total revenue, ROI, ARPU LTV. One row per `date × app_id × view_type × agency × media_source × campaign × conversion_type`. Refreshed with `delete_insert`.
* **partners\_daily**: Same grain and metrics as `daily`, sourced from a separate endpoint (`partners_by_date_report`). The documented difference is that `daily` excludes in-app events from its revenue columns. For non-e-commerce apps the two tables are equivalent. Refreshed with `delete_insert`.
* **geo\_daily**: Same as `partners_daily` with an additional `country_code` dimension — the most granular aggregate table available. One row per `date × app_id × view_type × agency × country_code × media_source × campaign × conversion_type`. Refreshed with `delete_insert`.
* **partners**: Cumulative lifetime metrics by media source and campaign (no date dimension). Represents the all-time totals since the app's first install. A new full snapshot is appended at every run — always filter on `MAX(_quanti_loaded_at)` to get the latest state. Refreshed with `append`.
* **geo**: Same as `partners` with an additional `country_code` dimension. Refreshed with `append`.

### Raw data reports

These tables provide user-level event data. Each row represents a single event attributed to a non-organic user.

* **installs**: One row per install, with full attribution fields (media source, campaign, adset, ad, channel, keywords), device information (platform, device type, OS version, app version, SDK version), geographic data (country, city), user identifiers (AppsFlyer ID, customer user ID), LAT flag, and multi-touch attribution contributors. Refreshed with `delete_insert`.
* **in\_app\_events**: One row per in-app event performed by an attributed user (e.g. `af_purchase`, `af_login`, `ftd`). Includes `event_name`, `event_value` (a JSON-encoded string containing event-specific parameters), `event_revenue`, `event_revenue_currency`, `event_revenue_usd`, attribution dimensions inherited from the original install. Refreshed with `delete_insert`.
* **uninstalls**: One row per detected uninstall for attributed users. Detection is based on silent push notifications — `event_time` reflects the detection date, not the actual deletion date. Attribution fields are inherited from the original install. Refreshed with `delete_insert`.
* **reinstalls**: One row per reinstall of a user who had previously uninstalled the app and was re-attributed to a UA campaign. Includes both `install_time` (reinstall date) and `original_install_time` (first ever install date). Users present in `reinstalls` also appear in `installs` — avoid cross-table deduplication on `appsflyer_id`. Refreshed with `delete_insert`.

{% hint style="warning" %}
**`installs`, `in_app_events`, and `uninstalls` require raw data access.** If your AppsFlyer subscription does not include raw data reports, AppsFlyer returns an HTTP 400 or 403 error and these tables remain empty. This is expected behavior — no action is needed on your end.
{% endhint %}

{% hint style="warning" %}
**`reinstalls` requires an additional activation step.** Beyond raw data access, the reinstalls endpoint must be explicitly enabled by your AppsFlyer CSM. If it has not been activated, AppsFlyer returns an HTTP 400 error (`"Your current subscription package doesn't include raw data reports"`) and the table remains empty. Contact your AppsFlyer Customer Success Manager to request activation.
{% endhint %}

***

<a href="https://dbdiagram.io/e/6a466e9b4ac62e474c17bc7a/6a466f2b36d348d120547e7f" class="button primary" data-icon="table-tree">Prebuilt reports and definitions</a>

***

## Notes

**`total_cost`, `roi`, `total_revenue` — Cost API required**

These columns are `NULL` for all accounts that have not activated the Cost API or ROI360 in AppsFlyer. This is expected for non-e-commerce apps (utilities, GPS, etc.) that do not track in-app revenue or sync ad spend.

**`view_type` — user\_acquisition vs retargeting**

The `view_type` field distinguishes two attribution perimeters:

* `user_acquisition`: classic acquisition traffic (new users, `reattr=false`).
* `retargeting`: re-engagement and re-attribution traffic (`reattr=true`).

The **Unified** view in the AppsFlyer dashboard corresponds to `user_acquisition` + `retargeting` combined. Rows with `view_type = retargeting` often have `NULL` metrics if no retargeting campaign is active.

**Impression and click gap vs AppsFlyer dashboard**

A structural gap of 3%–6% on impressions and clicks is expected on iOS campaigns (primarily Facebook Ads). This is due to the absence of SKAN/SSOT deduplication in the Pull API Aggregate standard used by this connector. The AppsFlyer Unified dashboard applies this deduplication internally. Install counts are unaffected and match exactly. This gap cannot be resolved without activating the SSOT Data Locker with AppsFlyer.

**`partners` and `geo` — snapshot tables**

These two tables accumulate one full snapshot per run. To avoid double-counting, always filter on the most recent snapshot before querying:

```sql
SELECT * FROM `your_dataset.partners`
WHERE _quanti_loaded_at = (SELECT MAX(_quanti_loaded_at) FROM `your_dataset.partners`)
```

**`event_value` in `in_app_events`**

The `event_value` column is a JSON-encoded string. Extract specific fields using `JSON_VALUE`:

```sql
SELECT
  event_name,
  CAST(JSON_VALUE(event_value, '$.af_revenue') AS FLOAT64) AS revenue,
  JSON_VALUE(event_value, '$.af_currency') AS currency
FROM `your_dataset.in_app_events`
WHERE event_name = 'af_purchase'
```


# Google Analytics 4

Follow our setup guide to connect your Google Analytics 4 connector with QUANTI:

<a href="https://dbdiagram.io/e/67a9ceb2263d6cf9a09b868e/67a9d214263d6cf9a09c02c9" class="button primary" data-icon="table-tree">Prebuilt reports and definition</a>

***

## Prerequisites

Before connecting Google Analytics 4 to QUANTI, ensure you have:

* **Google Account**: A valid Google account with access to Google Analytics 4
* **GA4 Property Access**: At least Viewer access to the GA4 property(ies) you want to connect
* **Active GA4 Property**: Your property must have active data collection to retrieve insights

***

## Setup Instructions

{% stepper %}
{% step %}

#### Authorize Google Connection

* Click on **Connect to Google**
* You will be redirected to Google's authorization page
* Log in with your Google account credentials
* Review and accept the requested permissions
* Click **Allow** to grant QUANTI access to your Google Analytics 4 data
  {% endstep %}

{% step %}

#### **Connector Information**

* **Connector Name**: Define a unique name for your connector
* **Dataset ID**: Specify the BigQuery dataset ID where tables will be created
  * The dataset will be created automatically if it doesn't exist
* Click **Next**
  {% endstep %}

{% step %}

#### Configure Connector

* **Connector Name**: Enter a unique name for this connector
* **Dataset ID**: Define the BigQuery dataset ID where data will be stored (must not exist yet, will be created automatically)
* Click **Next**
  {% endstep %}

{% step %}

#### Select Accounts & Properties

* You'll see a list of your accessible GA4 accounts and properties
* Select the account(s) and property(ies) you want to connect to QUANTI
* You can select multiple properties to track data from different sources
* Click **Next**
  {% endstep %}

{% step %}

#### Select pre-built reports

* Review the available pre-built reports (see section below for details)
* All reports are selected by default — you can deselect reports you don't need
* You can also create your own custom reports by clicking **Add custom report** (refer to the **Custom reports** chapter below)
* Click **Next**
  {% endstep %}

{% step %}

#### Finish Setup

* Define a sync period and a lookback window
* Click **Save**
* For the first sync, you have the following options:
  * **Activate auto-sync** for recurring syncs based on your sync settings by clicking the switch button
  * **Launch a historical data recovery** by choosing your desired dates in the historical data tab
  * **Launch a manual sync** immediately by clicking the **Sync now** button
* Wait for the sync to complete
* Navigate to your data warehouse to verify that tables are populated
* Check the connector dashboard for sync status and any potential errors
  {% endstep %}
  {% endstepper %}

***

## Pre-built reports

### Dimension Tables (Configuration & History)

* **accounts**: List of accessible Google Analytics 4 accounts with basic information and settings.
* **conversion\_events**: List of conversion events configured in GA4 with counting methods.
* **custom\_dimensions**: List of custom dimensions configured in GA4 with their scope and parameter names.
* **google\_ads\_links**: List of Google Ads links configured in GA4 properties.
* **properties**: List of GA4 properties with their configuration settings.

```mermaid
erDiagram
    accounts {
        string name PK
        string display_name PK
        string gmp_organization PK
        string region_code PK
        timestamp create_time PK
        timestamp update_time
    }
    conversion_events {
        string name PK
        string event_name PK
        string property PK
        string counting_method PK
        timestamp create_time
    }
    custom_dimensions {
        string name PK
        string display_name PK
        string parameter_name PK
        string property PK
        string scope PK
    }
    google_ads_links {
        string name PK
        string property PK
        string customer_id PK
        string creator_email_address PK
        boolean ads_personalization_enabled PK
        timestamp update_time PK
        timestamp create_time
    }
    properties {
        string name PK
        string account PK
        string display_name PK
        string parent PK
        string property_type PK
        string service_level PK
        string currency_code PK
        string time_zone PK
        timestamp create_time
        timestamp update_time
    }
```

### Attribution & Campaign Performance

* **data\_driven\_key\_events\_report**: Key events attributed to marketing campaigns with data-driven attribution model.
* **data\_driven\_transaction\_ids**: Transaction-level data with data-driven attribution to campaigns.
* **session\_acquisition\_report**: Session metrics by acquisition source, medium, and campaign.
* **first\_user\_acquisition\_report**: New user metrics by first acquisition source and campaign.
* **conversion\_attribution\_stats**: Attributed conversions and revenue compared across DATA\_DRIVEN and LAST\_CLICK models, with ad spend metrics (cost, clicks, impressions, CPA).

```mermaid
erDiagram
    data_driven_key_events_report {
        date date
        string campaign_id PK
        string campaign_name PK
        string event_name PK
        string manual_ad_content PK
        string manual_term PK
        string source_medium PK
        string source_platform PK
        float key_events
        float total_revenue
        int total_users
    }
    data_driven_transaction_ids {
        date date
        string campaign_id PK
        string campaign_name PK
        string manual_ad_content PK
        string manual_creative_format PK
        string manual_term PK
        string source_medium PK
        string source_platform PK
        string transaction_id PK
        float key_events
        float purchase_revenue
    }
    session_acquisition_report {
        date date
        string session_campaign_id PK
        string session_campaign_name PK
        string session_manual_ad_content PK
        string session_manual_term PK
        string session_source_medium PK
        string session_source_platform PK
        string sessionmanual_creative_format PK
        string sessionmanual_marketing_tactic PK
        int ecommerce_purchases
        int engaged_sessions
        int event_count
        float events_per_session
        float key_events
        float purchase_revenue
        int sessions
        float total_revenue
        int total_users
        int user_engagement_duration
    }
    first_user_acquisition_report {
        date date
        string first_user_campaign_id PK
        string first_user_campaign_name PK
        string first_user_manual_ad_content PK
        string first_user_manual_creative_format PK
        string first_user_manual_marketing_tactic PK
        string first_user_manual_term PK
        string first_user_source_medium PK
        string first_user_source_platform PK
        int ecommerce_purchases
        int engaged_sessions
        int event_count
        float events_per_session
        float key_events
        float purchase_revenue
        int sessions
        float total_revenue
        int total_users
        int user_engagement_duration
    }
    conversion_attribution_stats {
        date date
        string attribution_model PK
        string campaign_name PK
        string channel_group PK
        string medium PK
        string primary_channel_group PK
        string source PK
        string source_medium PK
        string source_platform PK
        float conversions_by_conversion_date
        float conversions_by_interaction_date
        float attributed_revenue_by_conversion_date
        float attributed_revenue_by_interaction_date
        float ad_cost
        int ad_clicks
        int ad_impressions
        float ad_cost_per_click
        float ad_cost_per_conversion_by_conversion_date
        float ad_cost_per_conversion_by_interaction_date
    }
```

### Traffic & Source Analysis

* **daily\_global\_report**: Daily aggregated statistics across all traffic sources (overview).
* **daily\_source\_medium\_report**: Daily statistics by source/medium combination.
* **daily\_source\_medium\_campaign\_report**: Daily statistics by source/medium/campaign combination.
* **ai\_traffic\_stats**: Session acquisition filtered to AI assistant referral traffic (medium = ai-assistant), broken down by source (chatgpt.com, gemini.google.com, etc.).
* **session\_acquisition\_by\_geo\_report**: Session acquisition report broken down by country, language and campaign.

```mermaid
erDiagram
    daily_global_report {
        date date
        int conversions
        int engaged_sessions
        float engagement_rate
        int sessions
        float total_revenue
        int total_users
    }
    daily_source_medium_report {
        date date
        string session_source_medium PK
        int conversions
        int engaged_sessions
        float engagement_rate
        int sessions
        float total_revenue
        int total_users
    }
    daily_source_medium_campaign_report {
        date date
        string session_source_medium PK
        string session_campaign_name PK
        string session_campaign_id
        int conversions
        int engaged_sessions
        float engagement_rate
        int sessions
        float total_revenue
        int total_users
    }
    ai_traffic_stats {
        date date
        string channel_group PK
        string medium PK
        string source PK
        int engaged_sessions
        float key_events
        float purchase_revenue
        int sessions
        float total_revenue
        int total_users
    }
    session_acquisition_by_geo_report {
        date date
        string country PK
        string language PK
        string session_campaign_id PK
        string session_campaign_name PK
        string session_manual_ad_content PK
        string session_manual_term PK
        string session_source_medium PK
        string session_source_platform PK
        int engaged_sessions
        float engagement_rate
        float key_events
        float purchase_revenue
        int sessions
        float total_revenue
        int total_users
    }
```

### Content & Engagement

* **events\_report**: Event-level metrics showing user interactions and key events.
* **pages\_path\_report**: Page-level metrics by URL path.
* **pages\_screen\_name\_report**: Page/screen metrics by title and name.
* **unified\_screen\_class\_report**: Screen class metrics for mobile apps and web pages.
* **landing\_page\_device\_report**: Daily performance metrics by landing page path and device category (desktop, mobile, tablet). Includes sessions, engaged sessions, total users, screen/page views, event count, key events, total revenue, and session source/medium and campaign ID. Useful for analyzing how entry pages perform across different devices and traffic sources.

```mermaid
erDiagram
    events_report {
        date date
        string event_name PK
        int event_count
        float event_count_per_user
        float total_revenue
        int total_users
    }
    pages_path_report {
        date date
        string page_path PK
        string page_title PK
        float bounce_rate
        int event_count
        float key_events
        int screen_page_views
        float screen_page_views_per_session
        int sessions
        float total_revenue
        int total_users
        int user_engagement_duration
    }
    pages_screen_name_report {
        date date
        string page_path PK
        string page_title PK
        string unified_screen_name PK
        float bounce_rate
        int event_count
        float key_events
        int screen_page_views
        float screen_page_views_per_session
        int sessions
        float total_revenue
        int total_users
        int user_engagement_duration
    }
    unified_screen_class_report {
        date date
        string unified_screen_class PK
        float average_session_duration
        float bounce_rate
        int conversions
        int screen_page_views
        float total_revenue
        int total_users
        float user_engagement_duration
    }
    landing_page_device_report {
        date date
        string device_category PK
        string landing_page PK
        string session_campaign_id PK
        string session_source_medium PK
        int engaged_sessions
        int event_count
        float key_events
        int screen_page_views
        int sessions
        float total_revenue
        int total_users
    }
```

### E-commerce

* **ecommerce\_item\_report**: Product-level metrics including views, views in list, cart additions, and purchases.
* **ecommerce\_purchase\_item\_report**: Purchase transaction details by item and transaction ID.

```mermaid
erDiagram
    ecommerce_item_report {
        date date
        string item_brand PK
        string item_category PK
        string item_category2 PK
        string item_category3 PK
        string item_category4 PK
        string item_category5 PK
        string item_id PK
        string item_name PK
        float item_revenue
        int items_added_to_cart
        int items_checked_out
        int items_purchased
        int items_viewed
        int items_viewed_in_list
    }
    ecommerce_purchase_item_report {
        date date
        string item_id PK
        string transaction_id PK
        float item_revenue
        int items_purchased
    }
```

### Technology & Devices

* **tech\_device\_report**: User metrics by device category, model, and operating system.
* **tech\_browser\_report**: User metrics by browser type.
* **funnel\_tech\_report**: Funnel steps (event\_name) crossed with technical segments (platform, OS version, browser version, screen resolution, device model) to detect conversion drop-offs isolated to a specific technical segment.

```mermaid
erDiagram
    tech_device_report {
        date date
        string device_category PK
        string device_model PK
        string mobile_device_branding PK
        string mobile_device_model PK
        string operating_system PK
        string operating_system_version PK
        int engaged_sessions
        int event_count
        float key_events
        int sessions
        int total_users
    }
    tech_browser_report {
        date date
        string browser PK
        int engaged_sessions
        float engagement_rate
        int event_count
        float key_events
        int new_users
        float total_revenue
        int total_users
    }
    funnel_tech_report {
        date date
        string browser PK
        string browser_version PK
        string device_category PK
        string event_name PK
        string mobile_device_model PK
        string operating_system_with_version PK
        string platform PK
        string screen_resolution PK
        int event_count
        float key_events
        float total_revenue
        int total_users
    }
```

***

<a href="https://dbdiagram.io/e/67a9ceb2263d6cf9a09b868e/67a9d214263d6cf9a09c02c9" class="button primary" data-icon="table-tree">Prebuilt reports and definition</a>

***

## Custom reports

GA4 custom reports let you query any combination of dimensions and metrics from your GA4 property via the [Google Analytics Data API](https://developers.google.com/analytics/devguides/reporting/data/v1).

#### Find available dimensions and metrics

The reference for all available dimensions and metrics is the official GA4 explorer: 👉 [ga-dev-tools.google/ga4/dimensions-metrics-explorer/](https://ga-dev-tools.google/ga4/dimensions-metrics-explorer/)

The explorer also shows **field compatibility** — not all dimensions and metrics can be combined in the same query.

{% hint style="info" %}
**Use an AI assistant to speed up the configuration.** Rather than browsing the explorer manually, describe the report you want to reproduce — as you see it in the GA4 interface — to an AI assistant (Claude, ChatGPT…). For example:

> *"I want a custom GA4 report showing sessions, engaged sessions and total revenue by source, medium and device category. What dimensions and metrics should I use in the QUANTI JSON format `{ "dimensions": "", "metrics": "" }` ?"*

The AI will identify the correct API names and fill in the JSON for you.
{% endhint %}

#### Configure the custom report

In QUANTI, at the **Select pre-built reports** step, click **Add custom report**. Fill in the following JSON:

```json
{
  "dimensions": "",
  "metrics": ""
}
```

* **`dimensions`** *(required)*: Comma-separated list of GA4 dimension API names (e.g. `"sessionSource,sessionMedium,deviceCategory"`)
* **`metrics`** *(required)*: Comma-separated list of GA4 metric API names (e.g. `"sessions,engagedSessions,totalRevenue"`)

> ⚠️ The GA4 API limits custom reports to **9 dimensions maximum**. Not all dimension/metric combinations are compatible — refer to the explorer to verify compatibility before configuring.

#### Map your fields (Schema)

After configuring the query, the **Schema** step lets you define how fields are stored in your data warehouse:

* Adjust the **Type** (STRING, INTEGER, FLOAT…) for each field
* Check **Unique identifiers** to mark dimension fields as part of the primary key — they collectively form the unique identifier of each row

Once all fields are mapped, click **Save** to create the custom report table.

***

## Notes

* **Data Refresh**: Google Analytics 4 data is typically updated once per day
* **Historical Limitations**: GA4 API has limitations on historical data retrieval. Some metrics may only be available from the property creation date
* **Sampling**: For large datasets, GA4 may apply sampling. QUANTI automatically manages sampling thresholds
* **API Rate Limits**: Google enforces rate limits on API requests. QUANTI automatically manages these limits to ensure reliable data extraction
* **Data Processing Time**: GA4 data can take 24-48 hours to be fully processed after collection
* **Custom Dimensions**: Custom dimensions must be created in GA4 before they can be used in QUANTI queries

***

## Limits

* **Custom Query Dimensions**: The Google Analytics 4 API limits custom queries to **9 dimensions maximum**, so choose them carefully
* **API Quota**: Google Analytics 4 API has daily quotas. QUANTI automatically manages these quotas across syncs
* **Date Range**: Historical data availability depends on your GA4 property retention settings (default: 14 months for standard properties)

***

## Troubleshooting

<details>

<summary>Connection Issues</summary>

* Verify that your Google account has proper access to the GA4 property
* Ensure you've granted all required permissions during authorization
* Check that the GA4 property is active and collecting data
* Verify that API access is enabled for your GA4 property

</details>

<details>

<summary>Missing Data</summary>

* Some metrics may not be available for all dimension combinations
* Historical data older than your retention period will not be available
* Data processing can take 24-48 hours - recent data may be incomplete
* Custom dimensions must be configured in GA4 before syncing

</details>

<details>

<summary>Sync Errors</summary>

* **API Quota Exceeded**: Wait for quota reset (24 hours) or reduce sync frequency
* **Invalid Dimension/Metric Combination**: Some dimensions and metrics cannot be used together - consult GA4 documentation
* **Sampling Applied**: For very large date ranges, GA4 may apply sampling - consider splitting into smaller date ranges

</details>

<details>

<summary>Need Help?</summary>

Contact QUANTI support at <support@quanti.io> or consult our comprehensive documentation at [https://docs.quanti.io](https://docs.quanti.io/)

</details>


# FAQ

Frequently asked questions about Google Analytics 4

***

### Why do I see `(data not available)` or `(not set)` as source values in my acquisition report?

**`(data not available)`** — This value appears when GA4 has not yet finalized attribution processing for recent sessions. Google typically takes 2 to 3 days to fully process acquisition data. During that window, affected rows are returned with `(data not available)` as a placeholder and are corrected retroactively once processing is complete.

For this correction to apply in your BigQuery table, two conditions must be met:

* The connector must have a **lookback window of at least 3 days**
* The insertion method must be **REPLACE or UPSERT** — with an INSERT-only setup, rows containing `(data not available)` are never overwritten

**`(not set)`** — GA4 has no attribution information for these sessions at all. This is permanent and will not change over time. Common causes: direct traffic (URL typed manually or via bookmark), referrer blocked by the browser, or events imported without acquisition context.

Neither value originates from Quanti — the connector returns data exactly as exposed by the GA4 Data API.


# Matomo

Follow our setup guide to connect your Matomo connector with QUANTI:

<a href="https://dbdiagram.io/e/689b41c01d75ee360a3d6e88/689b474e1d75ee360a3e98a0" class="button primary" data-icon="table-tree">Prebuilt reports and definition</a>

***

## Prerequisites

To connect Matomo to QUANTI:, you need a [Matomo](https://fr.matomo.org/login/) account.

***

## Setup instructions

### Find your Auth token

1. Go to Matomo settings Settings Cog Icon > Personal > Security.
2. At the bottom of the page, click on Create new token.<br>

   <figure><img src="https://1847929239-files.gitbook.io/~/files/v0/b/gitbook-x-prod.appspot.com/o/spaces%2FoRN0sxIyI0UJdSqkwdBu%2Fuploads%2F4HO8jWkgPLOyadqY81BI%2Fimage.png?alt=media&amp;token=22a84412-d7e5-47dc-80bc-5edae82cd38b" alt=""><figcaption></figcaption></figure>
3. Confirm your account password.
4. Enter the purpose for this token.
5. Choose if the token should only be valid for secure requests (Matomo 5 and newer).
6. Click on Create new token.

### Connector configuration

1. Authentication
   1. Enter the Auth token you retrieved in the previous step.
   2. Enter the Matomo URL that allows you to access your reports. This should be in the form: <https://data.yourwebsite.com>.
2. Connector information
   1. Connector Name: Name your connector. It must be unique.
   2. Dataset ID: Define the ID of the dataset. It must not already exist, as it will be created and data will be sent there.
3. Select your Advertiser Id: Choose your Advertiser ID.
4. Select the pre-built reports you want to synchronize, and/or create your own custom reports. To help you configure custom reports, refer to the **Custom reports** chapter below.

***

## Prebuilt reports

### Visitor

**visitor\_country**: Website visits, user actions and conversions segmented by the visitor's country. Dimensions: date, country. Metrics: visits, users, actions, bounces, conversions, converted\_visits, total\_visit\_length, revenue.

**visitor\_device\_type**: Website activity broken down by device type (desktop, mobile, tablet). Dimensions: date, device\_type. Metrics: visits, users, actions, bounces, conversions, converted\_visits, total\_visit\_length, revenue.

**visitor\_language**: Engagement metrics segmented by the visitor's browser language. Dimensions: date, language. Metrics: visits, users, actions, bounces, converted\_visits, total\_visit\_length, revenue.

***

### Behaviour

**behaviour\_page**: Page-level engagement — entrances, exits, pageviews and time spent per URL. Dimensions: date, page\_title, page\_url. Metrics: pageviews, entrances, entry\_actions, entry\_bounces, exits, total\_time\_spent, visits\_following\_search.

**behaviour\_event**: Event tracking by category — event counts, unique events and total/average event value. Dimensions: date, event\_category. Metrics: events, unique\_events, event\_value\_sum, event\_value\_avg.

***

### Acquisition

**acquisition\_campaign**: Visitor metrics grouped by marketing campaign name. Dimensions: date, campaign\_name. Metrics: visits, users, actions, bounces, conversions, converted\_visits, total\_visit\_length, revenue.

**acquisition\_channel\_type**: Website performance aggregated by high-level marketing channel (organic, paid, social, direct…). Dimensions: date, channel\_type. Metrics: visits, users, actions, bounces, conversions, converted\_visits, total\_visit\_length, revenue.

**acquisition\_referrer**: Visits and conversions by referring source, type and URL. Dimensions: date, referrer, referrer\_type. Metrics: visits, users, actions, bounces, conversions, converted\_visits, total\_visit\_length, revenue.

***

```mermaid
erDiagram
    visitor_country {
        DATE    _quanti_date PK
        STRING  country PK
        DATE    date
        INTEGER visits
        INTEGER users
        INTEGER actions
        INTEGER bounces
        INTEGER conversions
        FLOAT   revenue
        STRING  website_id
    }
    visitor_device_type {
        DATE    _quanti_date PK
        STRING  device_type PK
        DATE    date
        INTEGER visits
        INTEGER users
        INTEGER actions
        INTEGER bounces
        INTEGER conversions
        FLOAT   revenue
        STRING  website_id
    }
    visitor_language {
        DATE    _quanti_date PK
        STRING  language PK
        DATE    date
        INTEGER visits
        INTEGER users
        INTEGER actions
        INTEGER bounces
        FLOAT   revenue
        STRING  website_id
    }
    behaviour_page {
        DATE    _quanti_date PK
        STRING  page_title PK
        STRING  page_url PK
        DATE    date
        INTEGER pageviews
        INTEGER entrances
        INTEGER exits
        INTEGER total_time_spent
        STRING  website_id
    }
    behaviour_event {
        DATE    _quanti_date PK
        STRING  event_category PK
        DATE    date
        INTEGER events
        INTEGER unique_events
        FLOAT   event_value_sum
        FLOAT   event_value_avg
        STRING  website_id
    }
    acquisition_campaign {
        DATE    _quanti_date PK
        STRING  campaign_name PK
        DATE    date
        INTEGER visits
        INTEGER users
        INTEGER conversions
        FLOAT   revenue
        STRING  website_id
    }
    acquisition_channel_type {
        DATE    _quanti_date PK
        STRING  channel_type PK
        DATE    date
        INTEGER visits
        INTEGER users
        INTEGER conversions
        FLOAT   revenue
        STRING  website_id
    }
    acquisition_referrer {
        DATE    _quanti_date PK
        STRING  referrer PK
        STRING  referrer_type PK
        DATE    date
        INTEGER visits
        INTEGER users
        INTEGER conversions
        FLOAT   revenue
        STRING  website_id
    }
```

***

<a href="https://dbdiagram.io/e/689b41c01d75ee360a3d6e88/689b474e1d75ee360a3e98a0" class="button primary" data-icon="table-tree">Prebuilt reports and definition</a>

***

## Custom reports

Matomo custom reports let you query any endpoint of the [Matomo Reporting API](https://developer.matomo.org/api-reference/reporting-api) and bring the result directly into your data warehouse.

#### Find available methods and fields

Each custom report is built around a **Matomo API method** (e.g. `VisitsSummary.get`, `Events.getCategory`). The method determines which fields are returned.

The reference for all available methods and their fields is the official Matomo Reporting API documentation: 👉 [developer.matomo.org/api-reference/reporting-api](https://developer.matomo.org/api-reference/reporting-api)

{% hint style="info" %}
**Use an AI assistant to speed up the configuration.** Rather than browsing the full API reference manually, describe the report you want to reproduce — as you see it in the Matomo interface — to an AI assistant (Claude, ChatGPT…). For example:

> *"I want to build a custom Matomo report showing event categories with the number of events and their total value. What API method and fields should I use in the QUANTI JSON format `{ "report": "", "flat": "1", "fields": "" }` ?"*

The AI will identify the correct `report` value and the exact `fields` string for you.
{% endhint %}

#### Configure the custom report

In QUANTI, at the **Select pre-built reports** step, click **Add custom report**. Fill in the following JSON:

```json
{
  "report": "",
  "flat": "1",
  "fields": ""
}
```

* **`report`** *(required)*: The Matomo API method name (e.g. `"VisitsSummary.get"`, `"Events.getCategory"`)
* **`flat`**: Set to `"1"` to flatten nested JSON structures — recommended for most reports
* **`fields`** *(optional)*: Comma-separated list of field names to retrieve. If omitted, all fields returned by the method are ingested — useful for a first run to discover what arrives in BigQuery

#### Common report examples

| Report           | `report` value              | Key `fields`                                                         |
| ---------------- | --------------------------- | -------------------------------------------------------------------- |
| Visit summary    | `VisitsSummary.get`         | `nb_visits,nb_uniq_visitors,nb_actions,bounce_rate,avg_time_on_site` |
| Event categories | `Events.getCategory`        | `label,nb_events,sum_event_value,avg_event_value`                    |
| Campaigns        | `Referrers.getCampaigns`    | `label,nb_visits,nb_actions,bounce_rate,revenue`                     |
| Channel types    | `Referrers.getReferrerType` | `label,nb_visits,nb_actions,avg_time_on_site,bounce_rate`            |

#### Map your fields (Schema)

After configuring the query, the **Schema** step lets you define how fields are stored in your data warehouse:

* Set the **field type** (STRING, INTEGER, FLOAT, DATE…) for each field
* Check **Unique identifiers** to mark dimension fields as part of the primary key (e.g. `date`, `label`, `website_id`) — they collectively form the unique identifier of each row

Once all fields are mapped, click **Save** to create the custom report table.


# Piano Analytics

Follow our setup guide to connect Piano to QUANTI:

<a href="https://dbdiagram.io/e/684ae2df1dff20a534ca7171/684ae3f71dff20a534ca9d5f" class="button primary" data-icon="table-tree">Prebuilt reports and definition</a>

{% hint style="warning" %}
**Piano Analytics limits the number of rows returned per query to 1,500,000.**\
We split our queries by day and by account, but it's important to understand that if a single query for one account exceeds 1,500,000 rows, the API returns an error.\
As a result, the query fails, and the data is not inserted into our system.

To avoid this, make sure to use the filtering feature to reduce the number of returned rows and stay within the API limits.
{% endhint %}

## Prerequisites

To connect Piano to QUANTI, you need a [Piano](https://piano.io/fr/?utm_source=quanti.io\&utm_medium=partnership\&utlm_campaign=campaign=ecommerce-data-connector) account.

## Setup instructions

### Find your credentials

{% stepper %}
{% step %}

#### Access your profile parameters

Go on your profile parameters to the top-right corner : See profile < API Key<br>

<figure><img src="https://content.gitbook.com/content/oRN0sxIyI0UJdSqkwdBu/blobs/hqdCjY5RZGfUh6wAaMRh/piano1.png" alt="Access path to API keys on Piano interface"><figcaption><p>Access path to API keys on Piano interface<br></p></figcaption></figure>
{% endstep %}

{% step %}

#### Create a new API Key

Create a new API Key clicking on the blue button "Create a new API Key".<br>

<figure><img src="https://content.gitbook.com/content/oRN0sxIyI0UJdSqkwdBu/blobs/jhVHZ5WVoeQxZ1tVW7Zd/piano2.png" alt="Button to generate a new API key on Piano interface" width="263"><figcaption><p>Button to generate a new API key</p></figcaption></figure>
{% endstep %}

{% step %}

#### Give it a name and a description

Give it a name and a description. Let the box ticked and save it.<br>

<figure><img src="https://content.gitbook.com/content/oRN0sxIyI0UJdSqkwdBu/blobs/mW7yOOmtAX5AMA9T1zH0/piano3.png" alt="Description pop-in of API key in Piano interface" width="563"><figcaption><p>Description pop-in of API key</p></figcaption></figure>
{% endstep %}

{% step %}

#### Note the API credentials

Make a note of the API credentials. You will need it to configure QUANTI.
{% endstep %}
{% endstepper %}

### Find your Website ID

Your **Website ID** is in the url when you are connected to your Piano account. This is the value of the parameter **site**.

`https://explorer.atinternet-solutions.com/core/#/overview/overview/020202?period.shortcut=yesterday&period.granularity=3&site=`**`612329`**`&graph.options.defaultlist=minmax&graph.options.comparisonlist=nocomparison&graph.options.eventloglist=eventlog&isIgnoreNullProperties=false`

### Connector configuration

{% stepper %}
{% step %}

#### Authorize your account

1. Access Key and Secret Key retrieved following the steps above.
2. Site ID retrieved following the steps above.
   {% endstep %}

{% step %}

#### Connector information

1. Connector Name : Name your connector. It must be unique.
2. Dataset ID : Define the ID of the dataset. It must not exist yet, as it will be created and data will be sent there.
   {% endstep %}

{% step %}

#### Create reports

Select the pre-built reports you want to activate, and/or create your own custom reports. To help you configure custom reports, refer to the 'Custom reports' chapter below.
{% endstep %}
{% endstepper %}

## Pre-built reports

All prebuilt tables are metric tables partitioned by `_quanti_date` (delete-insert per day).

### Content & Navigation

* **content\_pages**: Contains daily records of user interactions for each website page, enabling content-level performance tracking.
* **traffic\_sources**: Describes how users arrive on the site, with detailed information about traffic origin, campaigns, and referrers.
* **internal\_search**: Internal site search performance — keywords searched and result page consulted, with unique visitor counts.
* **marketing\_campaigns**: Consolidated traffic and conversion view by marketing campaign (UTM source, campaign name, content, term).

### Commerce & Conversions

* **transaction\_source**: Stores transactional data along with marketing attribution fields, providing insight into the source and context of each purchase.
* **product\_cart\_funnel**: Product and cart funnel — product page views, add/remove-to-cart and purchases by product ID and category. Complements `transaction_source`, which only captures the final transaction.

### Audience & Behaviour

* **geo\_breakdown**: Audience and revenue breakdown by geographic zone (country, region, city).
* **device\_tech**: Audience breakdown by device type, operating system, browser family and screen resolution.
* **visitor\_loyalty**: Visitor loyalty metrics — new vs returning visitors split by `visitor_new_return` dimension.

### Advertising

* **onsite\_ads\_performance**: Onsite advertising and self-promotion performance (impressions, clicks) by campaign, type, placement, format and advertiser.
* **publisher\_ad\_revenue**: Third-party advertising revenue for publishers — clicks by advertiser, format and placement.

### Media

* **video\_engagement**: Video and audio content engagement (plays, completion, time watched) by media name, type (video / audio / live) and channel.

## Custom reports

{% hint style="warning" %}
**Piano Analytics limits the number of rows returned per query to 1,500,000.**\
We split our queries by day and by account, but it's important to understand that if a single query for one account exceeds 1,500,000 rows, the API returns an error.\
As a result, the query fails, and the data is not inserted into our system.

To avoid this, make sure to use the filtering feature to reduce the number of returned rows and stay within the API limits.
{% endhint %}

{% stepper %}
{% step %}

#### Retrieve your field names from Piano Analytics

The easiest way to identify the field names expected by the Piano API is to use the **Data Query** tool directly in the Piano Analytics interface.

* In Piano Analytics, navigate to **Data Query** (top-right corner, icon with 4 squares)

<figure><img src="https://1847929239-files.gitbook.io/~/files/v0/b/gitbook-x-prod.appspot.com/o/spaces%2FoRN0sxIyI0UJdSqkwdBu%2Fuploads%2F3s2l0X7uoNpNdx8LX0As%2Fimage.png?alt=media&amp;token=db742f57-4c57-4aa7-993e-985519849838" alt=""><figcaption></figcaption></figure>

* Build the report you want to extract via the QUANTI connector by selecting your dimensions and metrics

<figure><img src="https://1847929239-files.gitbook.io/~/files/v0/b/gitbook-x-prod.appspot.com/o/spaces%2FoRN0sxIyI0UJdSqkwdBu%2Fuploads%2F8QiRJ96Q1E2tqEfptYzy%2Fimage.png?alt=media&amp;token=46ce616d-3203-42d5-a592-c6a3f3d9cec4" alt=""><figcaption></figcaption></figure>

* Once your report is configured, click the **copy/paste button** in the top-right corner, then select **Copy the API body (POST)**<br>

<figure><img src="https://1847929239-files.gitbook.io/~/files/v0/b/gitbook-x-prod.appspot.com/o/spaces%2FoRN0sxIyI0UJdSqkwdBu%2Fuploads%2Fdm7gNJKlUVWwutWW5CE3%2Fimage.png?alt=media&amp;token=9de1da70-13c1-4276-b6a7-52a4d4b07e99" alt=""><figcaption></figcaption></figure>

* A pop-in appears with the full API body. Retrieve:
  * The content of the `columns` object → this will populate the `fields` array in your JSON
  * The content of the `filter` object (if any) → this will populate the `filter` field in your JSON

<figure><img src="https://1847929239-files.gitbook.io/~/files/v0/b/gitbook-x-prod.appspot.com/o/spaces%2FoRN0sxIyI0UJdSqkwdBu%2Fuploads%2FiZcVt0TximrPPxpAfrSE%2Fimage.png?alt=media&amp;token=568ea087-ec8a-4c5b-be99-14d50ad5e430" alt=""><figcaption></figcaption></figure>
{% endstep %}

{% step %}

#### Configure the custom report query

In QUANTI, at the **Create reports** step, click **Add custom report**. A pop-in opens with two steps: **Query** and **Schema**.

In the **Query** step:

* Give your report a name in the **Query name** field — this name will become the table name in your data warehouse

{% hint style="danger" %}
The name chosen for your custom report is the one that names your table in the data warehouse.
{% endhint %}

* Fill in the **Query configuration (JSON)** with the following structure:

```json
{
  "fields": [],
  "sort": [],
  "filter": ""
}
```

* **`fields`** *(required)*: Paste the field names retrieved from Piano Analytics. Each field name must be a quoted string, separated by commas.\
  Example: `"fields": ["src", "page", "m_visits", "m_page_loads"]`
* **`sort`** *(optional)*: List of fields to sort by. Can be left empty.
* **`filter`** *(optional)*: Paste the filter expression copied from the Piano API body. Can be left as an empty string if no filter is needed.

Once your JSON is filled in, click **Next**.
{% endstep %}

{% step %}

#### Map your fields (Schema)

The second step of the pop-in is the **Schema** mapping. QUANTI infers the type of each field and displays them in a table.

For each field, you can:

* Adjust the **Type** (STRING, INTEGER, FLOAT, etc.)
* Check **Unique identifiers** to mark the field as part of the primary key — this should include all dimension fields of your report, as they collectively form the unique identifier of each row
* Check **Metric** to flag a field as a numeric metric

Once all fields are correctly mapped, click **Save** to create the custom report table.
{% endstep %}
{% endstepper %}

{% hint style="info" %}
**Limits**

* Max 50 dimensions and metrics per Custom Report
* Piano Analytics limits the number of rows returned per query to 1,500,000 — use filters to stay within this limit
  {% endhint %}


# Piano Analytics

Follow our setup guide to connect Piano to QUANTI:

<a href="https://dbdiagram.io/e/684ae2df1dff20a534ca7171/684ae3f71dff20a534ca9d5f" class="button primary" data-icon="table-tree">Prebuilt reports and definition</a>

{% hint style="warning" %}
**Piano Analytics limits the number of rows returned per query to 1,500,000.**\
We split our queries by day and by account, but it’s important to understand that if a single query for one account exceeds 1,500,000 rows, the API returns an error.\
As a result, the query fails, and the data is not inserted into our system.

To avoid this, make sure to use the filtering feature to reduce the number of returned rows and stay within the API limits.
{% endhint %}

***

## <mark style="background-color:yellow;">Prerequisites</mark>

To connect Piano to QUANTI, you need an [Piano](https://piano.io/fr/?utm_source=quanti.io\&utm_medium=partnership\&utlm_campaign=campaign=ecommerce-data-connector) account.

***

## <mark style="background-color:yellow;">Setup instructions</mark>

### Find your credentials

1. Go on your profile parameters to the top-right corner : See profile < API Key<br>

   <figure><img src="https://content.gitbook.com/content/oRN0sxIyI0UJdSqkwdBu/blobs/hqdCjY5RZGfUh6wAaMRh/piano1.png" alt="Access path to API keys on Piano interface"><figcaption><p>Access path to API keys on Piano interface<br></p></figcaption></figure>
2. Create a new API Key clicking on the blue button "Create a new API Key".\ <br>

   <figure><img src="https://content.gitbook.com/content/oRN0sxIyI0UJdSqkwdBu/blobs/jhVHZ5WVoeQxZ1tVW7Zd/piano2.png" alt="Button to generate a new API key on Piano interface" width="263"><figcaption><p>Button to generate a new API key</p></figcaption></figure>
3. Give it a name and a description. Let the box ticked and save it.\ <br>

   <figure><img src="https://content.gitbook.com/content/oRN0sxIyI0UJdSqkwdBu/blobs/mW7yOOmtAX5AMA9T1zH0/piano3.png" alt="Description pop-in of API key in Piano interface" width="563"><figcaption><p>Description pop-in of API key</p></figcaption></figure>
4. Make a note of the API credentials. You will need it to configure QUANTI:.

### Find your Website ID

Your **Website ID** is in the url when you are connected to your Piano account. This is the value of the parameter **site**.

`https://explorer.atinternet-solutions.com/core/#/overview/overview/020202?period.shortcut=yesterday&period.granularity=3&site=`**`612329`**`&graph.options.defaultlist=minmax&graph.options.comparisonlist=nocomparison&graph.options.eventloglist=eventlog&isIgnoreNullProperties=false`

### Connector configuration

1. Authorize your account
   1. Access Key and Secret Key retrieved following the steps above.
   2. Site ID retrieved following the steps above.
2. Connector information
   1. Connector Name : Name your connector. It must be unique.
   2. Dataset ID : Define the ID of the dataset. It must not exist yet, as it will be created and data will be sent there.
3. Create queries : Create your own custom queries. To help you, refer to the 'Custom Query' chapter below."

***

## <mark style="background-color:yellow;">Prebuilt reports</mark>

* **content\_pages**: Contains daily records of user interactions for each website page, enabling content-level performance tracking.
* **traffic\_sources**: Describes how users arrive on the site, with detailed information about traffic origin, campaigns, and referrers.
* **transaction\_source**: Stores transactional data along with marketing attribution fields, providing insight into the source and context of each purchase.

***

<a href="https://dbdiagram.io/e/684ae2df1dff20a534ca7171/684ae3f71dff20a534ca9d5f" class="button primary" data-icon="table-tree">Prebuilt reports and definition</a>

***

### \<mark style="background-color:yellow;">Custom reports\</mark>

{% hint style="warning" %} **Piano Analytics limits the number of rows returned per query to 1,500,000.**\
We split our queries by day and by account, but it's important to understand that if a single query for one account exceeds 1,500,000 rows, the API returns an error.\
As a result, the query fails, and the data is not inserted into our system.

To avoid this, make sure to use the filtering feature to reduce the number of returned rows and stay within the API limits. {% endhint %}

{% stepper %} {% step %}

#### Retrieve your field names from Piano Analytics

The easiest way to identify the field names expected by the Piano API is to use the **Data Query** tool directly in the Piano Analytics interface.

* In Piano Analytics, navigate to **Data Query** (top-right corner, icon with 4 squares)
* Build the report you want to extract via the QUANTI connector by selecting your dimensions and metrics
* Once your report is configured, click the **copy/paste button** in the top-right corner, then select **Copy the API body (POST)**

`[📸 Screenshot — Copy the API body (POST) button location]`

* A pop-in appears with the full API body. Retrieve:
  * The content of the `columns` object → this will populate the `fields` array in your JSON
  * The content of the `filter` object (if any) → this will populate the `filter` field in your JSON

{% endstep %}

{% step %}

#### Configure the custom report query

In QUANTI, at the **Create reports** step, click **Add custom report**. A pop-in opens with two steps: **Query** and **Schema**.

In the **Query** step:

* Give your report a name in the **Query name** field — this name will become the table name in your data warehouse

{% hint style="danger" %} The name chosen for your custom report is the one that names your table in the data warehouse. {% endhint %}

* Fill in the **Query configuration (JSON)** with the following structure:

json

```json
{
  "fields": [],
  "sort": [],
  "filter": ""
}
```

* **`fields`** *(required)*: Paste the field names retrieved from Piano Analytics. Each field name must be a quoted string, separated by commas.\
  Example: `"fields": ["src", "page", "m_visits", "m_page_loads"]`
* **`sort`** *(optional)*: List of fields to sort by. Can be left empty.
* **`filter`** *(optional)*: Paste the filter expression copied from the Piano API body. Can be left as an empty string if no filter is needed.

`[📸 Screenshot — Query configuration pop-in (step 1 : Query)]`

Once your JSON is filled in, click **Next**.

{% endstep %}

{% step %}

#### Map your fields (Schema)

The second step of the pop-in is the **Schema** mapping. QUANTI infers the type of each field and displays them in a table.

`[📸 Screenshot — Schema mapping step (step 2 : Schema)]`

For each field, you can:

* Adjust the **Type** (STRING, INTEGER, FLOAT, etc.)
* Check **Quanti ID** to mark the field as a primary key identifier — this should include all dimension fields of your report, as they collectively form the unique identifier of each row
* Check **Quanti Date** to mark the field used as the partition date
* Check **Metric** to flag a field as a numeric metric

Once all fields are correctly mapped, click **Save** to create the custom report table.

{% endstep %} {% endstepper %}

{% hint style="info" %} **Limits**

* Max 50 dimensions and metrics per Custom Report
* Piano Analytics limits the number of rows returned per query to 1,500,000 — use filters to stay within this limit {% endhint %}

***

## <mark style="background-color:yellow;">Limits</mark>

* Max 50 dimensions and metrics per Custom Query
* Piano Analytics limits the number of rows returned per query to 1,500,000.\
  We split our queries by day and by account, but it’s important to understand that if a single query for one account exceeds 1,500,000 rows, the API returns an error.\
  As a result, the query fails, and the data is not inserted into our system.

  To avoid this, make sure to use the filtering feature to reduce the number of returned rows and stay within the API limits.


# Piwik PRO

Follow our setup guide to connect your Piwik Pro Analytics connector with QUANTI:

<a href="https://dbdiagram.io/e/6827015c1227bdcb4e9c1c36/6827026b1227bdcb4e9c4b5b" class="button primary" data-icon="table-tree">Prebuilt reports and definition</a>

***

## <mark style="background-color:yellow;">Prerequisites</mark> <a href="#pre-requisites" id="pre-requisites"></a>

To connect Piwik Pro to QUANTI:, you need an [Piwik Pro](https://piwik.pro/?pk_campaign=ecommerce-data-connector\&pk_source=quanti.io\&pk_medium=partnership) account.

***

## <mark style="background-color:yellow;">Setup instructions</mark>

### Find your API credentials

1. Go on your profile parameters : **Menu** > **Profile** > **API Keys**

<div align="center" data-full-width="false"><figure><img src="https://1847929239-files.gitbook.io/~/files/v0/b/gitbook-x-prod.appspot.com/o/spaces%2FoRN0sxIyI0UJdSqkwdBu%2Fuploads%2Fgit-blob-c0da697698896c16b3f0c7da0cd1f137b3171440%2Fpiwik1.png?alt=media" alt="Piwik account admin access" width="241"><figcaption><p>Piwik account admin access</p></figcaption></figure></div>

2. To generate a new API Key, please click on the "Create a Key" button, which is highlighted in blue.
3. Name your instance and carefully record the API credentials. These are essential for the configuration of QUANTI.

<div data-full-width="false"><figure><img src="https://1847929239-files.gitbook.io/~/files/v0/b/gitbook-x-prod.appspot.com/o/spaces%2FoRN0sxIyI0UJdSqkwdBu%2Fuploads%2Fgit-blob-88515e9acdcc765492a99f0587027590321ed1c6%2Fpiwik2.png?alt=media" alt="API credentials from Piwik Pro analytics admin" width="563"><figcaption><p>API credentials from Piwik Pro analytics admin</p></figcaption></figure></div>

### Find your Website ID

1. To locate your Website ID while using Piwik Pro Analytics, navigate to your Piwikpro account. Your Website ID is displayed in the URL during your session.
2. This is the information contained between term '/analytics/' and '/dashboard/' in the url.

Example : "`5678h0td6-f434-4ggt-932j-b8767cd8d5d2`".

### Connector configuration

1. Authorize your account
   1. Access Key and Secret Key retrieved following the steps above.
   2. Domain displayed on your search bar when you are connected to your Piwik Account.
   3. Website ID retrieved following the steps above.
2. Connector information
   1. Connector Name : Name your connector. It must be unique.
   2. Dataset ID : Define the ID of the dataset. It must not exist yet, as it will be created and data will be sent there.
3. Create queries : Create your own custom queries. To help you, refer to the 'Custom Query' chapter below."

***

## <mark style="background-color:yellow;">Prebuilt reports</mark>

* **acquisition\_stats**: Detailed statistics on the performance of acquisition campaigns, covering traffic sources, keywords, and user behavior (sessions, conversions, revenue, etc.).
* **audience\_browser\_device\_stats**: Statistics on audience behavior segmented by browser, device type, and language, including sessions, bounces, conversions, and revenue.
* **pages\_stats**: Page-level performance statistics, including views, time on page, bounce and exit rates.

***

<a href="https://dbdiagram.io/e/6827015c1227bdcb4e9c1c36/6827026b1227bdcb4e9c4b5b" class="button primary" data-icon="table-tree">Prebuilt reports and definition</a>

***

## <mark style="background-color:yellow;">Custom query</mark>

You have to create your own reports. To help you in this step, we recommand to use "Personalized report" tool on Piwik Pro Analytics interface.

<figure><img src="https://1847929239-files.gitbook.io/~/files/v0/b/gitbook-x-prod.appspot.com/o/spaces%2FoRN0sxIyI0UJdSqkwdBu%2Fuploads%2Fgit-blob-ee4722b794ba44f0a54a8b85547264b42cc45285%2Fpiwik3.png?alt=media" alt="Piwik Pro > custom reports" width="375"><figcaption><p>Piwik Pro > custom reports</p></figcaption></figure>

* Create a new report.
* Select your fields (Dimensions and metrics).

<figure><img src="https://1847929239-files.gitbook.io/~/files/v0/b/gitbook-x-prod.appspot.com/o/spaces%2FoRN0sxIyI0UJdSqkwdBu%2Fuploads%2Fgit-blob-376745d722c664ab21c0e76a88b7fa6ede086793%2Fpiwik4.png?alt=media" alt="Piwik Pro > custom reports > add a new report" width="375"><figcaption><p>Piwik Pro > custom reports > add a new report</p></figcaption></figure>

* Save your report.
* In the filters bar, click on the button '...' (3 dots) and click on "See API call"

<figure><img src="https://1847929239-files.gitbook.io/~/files/v0/b/gitbook-x-prod.appspot.com/o/spaces%2FoRN0sxIyI0UJdSqkwdBu%2Fuploads%2Fgit-blob-cb337ed5d982dd2ada79f676adb4435379a80e3a%2Fpiwik5.png?alt=media" alt="" width="375"><figcaption></figcaption></figure>

* A pop-in opens : make a note of the fields's name. You will need it to configure your custom request on QUANTI:

<figure><img src="https://1847929239-files.gitbook.io/~/files/v0/b/gitbook-x-prod.appspot.com/o/spaces%2FoRN0sxIyI0UJdSqkwdBu%2Fuploads%2Fgit-blob-f5a91ba51031a93ef5fe18003a5de0e113382cf3%2Fpiwik6.png?alt=media" alt="" width="375"><figcaption><p>API call detailed</p></figcaption></figure>

* At the step "Create queries", click on the button "Add custom query".
* Name your custom request : It will be the table name.
* Copy / Paste your dimensions and metrics keys from your Piwikpro personalized report. You have to separate your fields with commas without spaces.

{% hint style="danger" %}
The name chosen for your custom query is the one that name your table
{% endhint %}


# Real-Time Analytics

QUANTI:'s Real-Time Analytics connector captures online and offline user events via a JavaScript tag and streams them directly into BigQuery tables.

* [Tag setup](/connectors/analytics-connectors/tag-tracker/tag-setup)
* [Tag data model](/connectors/analytics-connectors/tag-tracker/tag-data-model)


# Tag setup

Follow our setup guide to interger the QUANTI: tag

***

## <mark style="background-color:purple;">Prerequisites</mark>

To connect QUANTI: Tag, it's recommended to have a Tag Manager.

***

## <mark style="background-color:purple;">Setup instructions</mark>

<mark style="background-color:purple;">Event tracker information</mark>

1. **Event tracker name** : Give a distinctive name allowing its scope to be easily understood.\
   Example pattern: {{site}} - {{country}}
2. **Dataset ID** : Name of the dataset where load datas.

<mark style="background-color:purple;">Tag information</mark>

1. **Allowed domains :** Fully matched regex of included domains names.\
   Regex's example : `(payment|www)\.quanti\.io` include hits from `www.quanti.io` domain and from sub-domain `payment.quanti.io`
2. **Excluded referrers** : Fully matched regex of the domains whose traffic you don’t want to identify as referrals. A blacklisted referrer lead to recalculate s\_source and s\_medium values on your raw\_sessions and raw\_conversions tables.

```bash
s_referrer = {{blacklisted domain}}
→ s_source = (direct)
→ s_medium = (none)
```

{% hint style="info" %}
In this field, you can add your different domains (including payment platforms) to exclude internal trafic.
{% endhint %}

3. **Session timeout** : A session is initiated when an app is opened in the foreground or when a webpage is loaded. It ends after a period of user inactivity. The default timeout is 30 minutes but can be adjusted here. The timeout duration can be expressed in seconds (s), minutes (m), or hours (h).
4. **Session restart on new UTM** : If true, each time a new utm\_source is detected in the URL during a session, a new session is automatically created — meaning a new session\_id value is generated. The new UTM values are then used to characterize the source of this new session.

### After saving

* A account ID is created.
* Datasets and tables are automatically created.
* Javascript code and Server side template is now available.

***

## <mark style="background-color:purple;">Client-side Tag install</mark>

Quanti: Tag is an Event-based Tag.\
It can be integrated on a [client-side](#client-side-installation) server or a [server-side](#server-side-installation) server.

### JS Library

The JS library has to triggered first before events.

{% code overflow="wrap" %}

```javascript
<script type="text/javascript">
  window._quantiDataLayer = window._quantiDataLayer || [];
  function _quantiTag() {
    _quantiDataLayer.push(arguments);
  }
  _quantiTag('trackerUrl', "{{trackerUrl}}"); // Provided by Quanti
  _quantiTag('domain', "{{.domain.com}}"); // To customize
  _quantiTag('accountId', {{Account ID}}); // Provided by Quanti
</script>
<script async src="https://cdn.jsdelivr.net/gh/quantiio/quanti-tag-js@v1.0.1/dist/src.min.js"></script>
```

{% endcode %}

`TrackerUrl`, `Domain` , `accountId` has to personalize. Refer to your "Generated JS Code" on your "Tag Details" screen.

### page\_view

```javascript
_quantiTag('hit', 'page_view', {
    {{custom_object}}
});
```

### event

```javascript
_quantiTag('hit', 'event', {
    {{custom_object}}
});
```

#### {{Custom\_object}} fields reference

{% hint style="info" %}
`{custom_object}` is optional.
{% endhint %}

Example of `{{custom_object}}` for a page\_view hit (Also valid for event hit).

```javascript
_quantiTag('hit', 'page_view', {
    user_id : "",
    conversion_id : "",
    conversion_value : "",
    conversion_type : "",
    consent : "",
    event_category : "",
    event_action : "",
    event_label : "",
    event_value : "",
    product_ids : ""
});
```

***

## <mark style="background-color:purple;">Server-side Tag install</mark>

To install the server-side tag, simply use the GTM template available for download here :

{% file src="/files/52Nm4kYh6MPNCoNOrrq2" %}

***

## <mark style="background-color:purple;">Fields configuration</mark>

<table data-full-width="true"><thead><tr><th width="175">Name</th><th width="109">Type</th><th width="119">Overridable</th><th width="170">Exemple Value</th><th>Description</th></tr></thead><tbody><tr><td>user_id</td><td>STRING</td><td>Yes</td><td>example@yopmail.com</td><td>The ID used to recognize a logged-in user</td></tr><tr><td>conversion_id</td><td>STRING</td><td>Yes</td><td>ABCD1234</td><td>The unique ID of a conversion</td></tr><tr><td>conversion_value</td><td>STRING</td><td>Yes</td><td>123.45</td><td>The monetary value of the conversion</td></tr><tr><td>conversion_type</td><td>STRING</td><td>Yes</td><td>purchase</td><td>The conversion type</td></tr><tr><td>consent</td><td>STRING</td><td>Yes</td><td>analytics:yes;marketing:yes;retargeting:no</td><td>User consent collected</td></tr><tr><td>event_category</td><td>STRING</td><td>Yes</td><td>video</td><td>Typically the object that was interacted with</td></tr><tr><td>event_action</td><td>STRING</td><td>Yes</td><td>play</td><td>The type of interaction</td></tr><tr><td>event_label</td><td>STRING</td><td>Yes</td><td>spring campaign</td><td>Usefull to categorize events</td></tr><tr><td>event_value</td><td>STRING</td><td>Yes</td><td>42.23</td><td>Numeric value associated with the event</td></tr><tr><td>product_ids</td><td>STRING</td><td>Yes</td><td>[ { "product_id":"ID123", "price":"123.34", "quantity":"2", "amount":"246.68" } ]</td><td>products table with custom fields</td></tr><tr><td>datetime</td><td>STRING</td><td>Yes</td><td>2023-11-06T05:53:11</td><td>Datetime of the hit automatically set the tag but overridable if needed*</td></tr><tr><td>visitor_id</td><td>STRING</td><td>Yes</td><td>1hehirh3h0.d003ebc3</td><td>Visitor ID automatically set by the tag but overridable if needed*</td></tr><tr><td>session_id</td><td>STRING</td><td>Yes</td><td>45d01d5a-4df9-457d-9c6c-af7d707756f2</td><td>Visit ID automatically set by the tag but overridable if needed*</td></tr><tr><td>device_type</td><td>STRING</td><td>Yes</td><td>mobile</td><td>hit device type automatically set by the tag but overridable if needed*</td></tr><tr><td>url</td><td>STRING</td><td>Yes</td><td>https://www.shoes.com</td><td>The page that loaded the hit automatically set by the tag but overridable if needed*</td></tr><tr><td>referrer</td><td>STRING</td><td>Yes</td><td>https://www.google.com</td><td>The page from which the visitor comes automatically set by the tag but overridable if needed*</td></tr><tr><td>user_agent</td><td>STRING</td><td>Yes</td><td>Mozilla/5.0 (iPad; CPU OS 17_0_3 like Mac OS X) AppleWebKit/605.1.15 (KHTML, like Gecko)</td><td>Informations of your browser automatically set by the tag but overridable if needed*</td></tr><tr><td>ad_user_data</td><td>STRING</td><td>Yes</td><td>granted or denied</td><td>Controls the sending of user-identifiable data for advertising purposes.</td></tr><tr><td>ad_personalization</td><td>STRING</td><td>Yes</td><td>granted or denied</td><td>Controls the use of data for personalized advertising (e.g., remarketing, audience targeting).</td></tr><tr><td>ad_storage</td><td>STRING</td><td>Yes</td><td>granted or denied</td><td>Controls the use of local storage for advertising purposes (e.g., marketing cookies).</td></tr><tr><td>analytics_storage</td><td>STRING</td><td>Yes</td><td>granted or denied</td><td>Controls the use of storage for analytics data.</td></tr></tbody></table>

{% hint style="info" %}
\*Informations automatically available through the browser and retrievable in JavaScript in a client-side configuration must be manually retrieved in a server-side configuration.
{% endhint %}


# Tag data model


# advanced\_attribution

The advanced attribution table is a “conversion” scope table. It records all conversions made and attributes them to the sessions that participated.

<a href="https://dbdiagram.io/e/67bf2e04263d6cf9a08d27a6/67c08ae8263d6cf9a0b33078" class="button primary" data-icon="table-tree">Prebuilt reports and definition</a>

***

## <mark style="background-color:purple;">Syncing</mark>

The advanced attribution table is a view.

{% file src="/files/qqXkZDa1GdDyGEWxj0H9" %}

***

## Description

### Technical Definition of a conversion

From a technical perspective for Quanti, a conversion is a hit where the value of the `conversion_id` parameter is not `null`, `undefined`, or *empty*. One of these conditions must be satisfied to add a new row in the advanced attribution table.

### Primary keys explanations

The advanced attribution table's primary keys are `hit_id` and `s_session_id` :

* We have made the decision to insert a field named `hit_id` into the table, which precisely identifies the hit that registered the conversion from `raw_hits`. This ensures the table's integrity by addressing a potential issue with the uniqueness of `conversion_id`. `hit_id` is technically more precise than the `conversion_id`.
* The `s_session_id` is the second primary key of the table and allows linking a session to a conversion. Multiple sessions can participate in the same conversion, and the same session can participate in multiple conversions.

In this table, a single `conversion_id` can be used across multiple rows because it may have been generated by a series of sessions (One row in the table = one session for a given conversion). Similarly, a `session_id` can also be used on multiple rows because it might have originated several conversions. However, what is essentially maintained is the presence of a unique `session_id` per conversion.

### Attibution rules

We have 2 ways to catch up on sessions and assess their contribution to achieving a conversion :

* By **visitor\_id** : We log all previous sessions that have the same `visitor_id` as the session during which the conversion occurred.
* By **user\_id** : We log all previous sessions that have the same `user_id` as the session during which the conversion occurred.

The values `null`, `undefined`, or *empty* for `visitor_id` and `user_id` are obviously excluded from the attribution calculation rules.

### The paths

Now that you've understood that the table consists of a list of sessions that contributed to achieving conversion(s), it's crucial to know how you can distinguish them from a chronological perspective and especially how you are going to analyze the paths taken by your visitors and calculate the contribution of each session. There is evidently the "s\_datetime" field which gives the exact date and time of the session's start, but we have made the task easier for you by implementing two fields:

* `max_index`: Indicates the total number of contributive sessions related to a conversion. The value of this field is the same for each session (row) for a given conversion.
* `path_index`: indicates the chronological position of the session among all the contributory sessions leading to a conversion.

For a conversion tracking multiple contributive sessions, you will therefore have in `path_index` numbers ranging from 1 to the number representing the total number of sessions. Then, on each line in `max_index`, you will find the maximum number that represents the total number of sessions.

<figure><img src="https://1847929239-files.gitbook.io/~/files/v0/b/gitbook-x-prod.appspot.com/o/spaces%2FoRN0sxIyI0UJdSqkwdBu%2Fuploads%2FjFSMzGgGDbE67GilHqzL%2FBigQuery-%E2%80%93-Quanti-%E2%80%93-Console-Google-Cloud.png?alt=media&amp;token=0202d23b-4291-479c-ae93-0264a849e1d0" alt="Example of filling in the path_index and max_index fields"><figcaption><p>Example of filling in the <code>path_index</code> and <code>max_index</code> fields</p></figcaption></figure>

## <mark style="background-color:purple;">Fields definition</mark>

### hit\_id

**Unique hit identifier** automatically created by Quanti: which **registering** the conversion.

### s\_session\_id

**Unique session identifier** automatically created by Quanti: which linked the conversion.

{% hint style="info" %}
Learn more about [session\_id](/connectors/analytics-connectors/tag-tracker/tag-data-model/raw_sessions#session_id).
{% endhint %}

### s\_visitor\_id

**Unique visitor identifier** automatically created by Quanti: which linked the conversion.

{% hint style="info" %}
Learn more about [visitor\_id](/connectors/analytics-connectors/tag-tracker/tag-data-model/raw_sessions#visitor_id).
{% endhint %}

### c\_user\_id

**Unique user identifier** from the client / contact base which linked the conversion.

### c\_conversion\_id

**Unique conversion identifier** from the client generated by the site and specify in the tag.

### c\_conversion\_type

The type of the conversion generated by the site and specify in the tag.

### c\_conversion\_value

Monetary value of the conversion generated by the site and specify in the tag.

### c\_date

DATE type field indicating the generation date of the conversion.

### c\_datetime

DATETIME type field indicating the generation date of the conversion.

### s\_date

DATE type field indicating the date of the session.

### s\_source

The s\_source field is the value of **utm\_source** parameter of the session arose from `raw_sessions` table.

{% hint style="info" %}
Learn more about [s\_source](/connectors/analytics-connectors/tag-tracker/tag-data-model/raw_sessions#s_source).
{% endhint %}

### s\_medium

The s\_medium field is the value of **utm\_medium** parameter of the session arose from `raw_sessions` table.

{% hint style="info" %}
Learn more about [s\_medium](/connectors/analytics-connectors/tag-tracker/tag-data-model/raw_sessions#s_medium).
{% endhint %}

### s\_campaign

The s\_campaign field is the value of **utm\_campaign** parameter of the session arose from `raw_sessions` table.

{% hint style="info" %}
Learn more about [s\_campaign](/connectors/analytics-connectors/tag-tracker/tag-data-model/raw_sessions#s_campaign).
{% endhint %}

### s\_content

The s\_content field is the value of **utm\_content** parameter of the session arose from `raw_sessions` table.

{% hint style="info" %}
Learn more about [s\_content](/connectors/analytics-connectors/tag-tracker/tag-data-model/raw_sessions#s_content).
{% endhint %}

### s\_keyword

The s\_keyword field is the value of **utm\_term** parameter of the session arose from `raw_sessions` table.

{% hint style="info" %}
Learn more about [s\_keyword](/connectors/analytics-connectors/tag-tracker/tag-data-model/raw_sessions#s_keyword).
{% endhint %}

### s\_utm\_id

The s\_utm\_id field is the value of **utm\_id** parameter of the session arose from `raw_sessions` table.

{% hint style="info" %}
Learn more about [s\_utm\_id](/connectors/analytics-connectors/tag-tracker/tag-data-model/raw_sessions#s_utm_id).
{% endhint %}

### s\_consent

The s\_consent field is the value of **s\_consent** field of the session arose from `raw_sessions` table.

{% hint style="info" %}
Learn more about [s\_consent](/connectors/analytics-connectors/tag-tracker/tag-data-model/raw_sessions#s_consent).
{% endhint %}

### s\_referrer

The s\_referrer field is the value of **s\_referrer** field of the session arose from `raw_sessions` table.

{% hint style="info" %}
Learn more about [s\_referrer](/connectors/analytics-connectors/tag-tracker/tag-data-model/raw_sessions#s_referrer).
{% endhint %}

### s\_ad\_user\_data

The s\_ad\_user\_data field is the value of **s\_ad\_user\_data** field of the session arose from `raw_sessions` table.

{% hint style="info" %}
Learn more about [s\_ad\_user\_data](#s_ad_user_data).
{% endhint %}

### s\_ad\_personalization

The s\_ad\_personalization field is the value of **s\_ad\_personalization** field of the session arose from `raw_sessions` table.

{% hint style="info" %}
Learn more about [s\_ad\_personalization](#s_ad_personalization).
{% endhint %}

### s\_ad\_storage

The s\_ad\_storage field is the value of **s\_ad\_storage** field of the session arose from `raw_sessions` table.

{% hint style="info" %}
Learn more about [s\_ad\_storage](#s_ad_storage).
{% endhint %}

### s\_analytics\_storage

The s\_analytics\_storage field is the value of **s\_analytics\_storage** field of the session arose from `raw_sessions` table.

{% hint style="info" %}
Learn more about [s\_analytics\_storage](#s_analytics_storage).
{% endhint %}

### path\_index

Chronological position of the session among all the contributory sessions leading to a conversion.\
The value "1" represents the session that is the furthest away chronologically from the conversion. The session closest to the conversion (being the one during which the conversion took place) will have the highest number and will be equal to the value of the field `max_index` defined below.

### max\_index

The total number of contributive sessions related to the conversion (define by hit\_id value). The value of this field is the same for each session (row) for a given conversion.

### lookback\_window

The total number of days between the conversion date and the session date.

### is\_last\_clic

Boolean field indicating if the session (the row) is the session that led to the conversion. Technically, this is the session for which `path_index` = `max_index`.

### is\_last\_clic\_non\_direct

Boolean field indicating if the session (the row) is the session that led to the conversion after excluding all sessions with a s\_source value `(direct)` and a s\_medium value `(none)`. Technically, this is the session for which `path_index` is the highest (After excluding (Direct) sources).\
If the conversion is carried out in a single session with s\_source value `(direct)` and a s\_medium value `(none)`, then this single session is considered as the LCND.\
If the conversion is conducted through multiple sessions but all of them have the s\_source value `(direct)` and the s\_medium value `(none)`, then the most recent one of these is considered the LCND.

### is\_post\_clic\_30

Boolean field indicating if the session (the row) occurred within the 30 days preceding the conversion. Technically, this is the difference between `s_date` and `c_date`.

### is\_post\_clic\_60

Boolean field indicating if the session (the row) occurred within the 60 days preceding the conversion. Technically, this is the difference between `s_date` and `c_date`.

### is\_post\_clic\_90

Boolean field indicating if the session (the row) occurred within the 90 days preceding the conversion. Technically, this is the difference between `s_date` and `c_date`.

### is\_post\_clic\_120

Boolean field indicating if the session (the row) occurred within the 120 days preceding the conversion. Technically, this is the difference between `s_date` and `c_date`.

### is\_post\_clic\_180

Boolean field indicating if the session (the row) occurred within the 180 days preceding the conversion. Technically, this is the difference between `s_date` and `c_date`.

### is\_first\_clic\_30

Boolean field indicating if the earliest session of the path is occurred within the 30 days preceding the conversion. Technically, this is the difference between `s_date` and `c_date` and it concern only session with a path\_index = 1.

### is\_first\_clic\_60

Boolean field indicating if the earliest session of the path is occurred within the 60 days preceding the conversion. Technically, this is the difference between `s_date` and `c_date` and it concern only session with a path\_index = 1.

### is\_first\_clic\_90

Boolean field indicating if the earliest session of the path is occurred within the 90 days preceding the conversion. Technically, this is the difference between `s_date` and `c_date` and it concern only session with a path\_index = 1.

### is\_first\_clic\_120

Boolean field indicating if the earliest session of the path is occurred within the 120 days preceding the conversion. Technically, this is the difference between `s_date` and `c_date` and it concern only session with a path\_index = 1.

### is\_first\_clic\_180

Boolean field indicating if the earliest session of the path is occurred within the 180 days preceding the conversion. Technically, this is the difference between `s_date` and `c_date` and it concern only session with a path\_index = 1.


# raw\_hits

The raw\_hits table is a "hit" scope table. This means it records all incoming tag calls (page\_view or event).

***

## <mark style="background-color:purple;">Syncing</mark>

Hits appear in the `raw_hits` table once the session to which they belong has expired, which occurs after a **30-minute** period of inactivity following the last hit.

***

[Tables and definition](https://dbdiagram.io/e/67bf2e04263d6cf9a08d27a6/67c08ae8263d6cf9a0b33078) :link:

<figure><img src="https://dbdiagram.io/e/65c0ca08ac844320ae7740d3/67a5e256263d6cf9a06049b8" alt=""><figcaption></figcaption></figure>

<figure><img src="https://1847929239-files.gitbook.io/~/files/v0/b/gitbook-x-prod.appspot.com/o/spaces%2FoRN0sxIyI0UJdSqkwdBu%2Fuploads%2FI9XB178deNtddm8KoNBS%2Fimage.png?alt=media&amp;token=0f2ebbb1-2b8d-442a-a91c-7611a6383647" alt=""><figcaption><p>Source : <a href="https://dbdiagram.io/e/67bf2e04263d6cf9a08d27a6/67c08ae8263d6cf9a0b33078">https://dbdiagram.io/e/67bf2e04263d6cf9a08d27a6/67c08ae8263d6cf9a0b33078</a></p></figcaption></figure>

***

## <mark style="background-color:purple;">Fields definition</mark>

### datetime

Date and time when the hit was recorded. Automatically created by Quanti: but overridable if is needed.

### hit\_id

Unique hit identifier. Automatically created by Quanti:.

### session\_id

Unique session (can be also called visit) identifier. A session is a set of events from the same visitor. It ends when the tag does not record any events for 30 minutes. `session_id` is automatically created by Quanti: from the value of a cookie placed on the user's browser by the tag. A visitor can make multiple sessions. `session_id` can be modified. it means you can override by pushing your own value in the tag

### visitor\_id

Unique visitor identifier. Automatically created by Quanti: from the value of a cookie placed on the user's browser by the tag. One visitor = One browser. A `visitor_id` can be associated to multiple `hit_id` and `session_id`. It can be overridable if is needed like in a server-side setup.

### user\_id

Unique user identifier. This identifier has to be specify in the tag. Typically the value is based on a hashed version of the user's email address (using SHA256, for example).

{% hint style="info" %}
A user (identified by a user\_id) can have several devices, and therefore several browsers (identified by several visitors\_id). They can have multiple sessions (identified by multiple session\_id) during which they navigate from page to page and record multiple events, event and page\_view (identified by multiple hit\_id).
{% endhint %}

<figure><img src="https://1847929239-files.gitbook.io/~/files/v0/b/gitbook-x-prod.appspot.com/o/spaces%2FoRN0sxIyI0UJdSqkwdBu%2Fuploads%2FfbegccdXhugM89mc05h1%2Fuserr.jpg?alt=media&amp;token=0ed24afd-b09c-41c8-8bbe-a3938b298a1e" alt="Explanation of the Different Types of Identifiers"><figcaption><p>Explanation of the Different Types of Identifiers</p></figcaption></figure>

### device\_type

The type of device automatically recovered by the tag when the hit was recorded. 3 possible values : desktop, mobile, or tablet. It can be overridable if is needed like in a server-side setup.

### url

The current URL of the page automatically recovered by the tag the hit was recorded but overridable if is needed like in a server-side setup.

### conversion\_id

Unique conversion identifier. This identifier is generally generated by your site / back-end and it has to be specify in the tag. It makes possible to identify each conversion. This field is logically populated only on the hit that recorded the conversion.

### conversion\_value

Monetary value of the conversion generated by the site and specify in the tag. This field is logically populated only on the hit that recorded the conversion.

### conversion\_type

The type of the conversion generated by the site and specify in the tag. It can be a lead, a purchase, a secondary conversion, etc. This field is logically populated only on the hit that recorded the conversion.

### consent

The value of consent expressed by the user upon arrival on the site and retained throughout their navigation. It generated by the site and specify in the tag. This field can be used to do statistics on the consent users by filling it with a list of vendors or typologies of cookies accepted by the user.

### event

The type of event. This can be an '**event**' or a '**pageView**' depending on what was specified in the tag when the hit was recorded.

### event\_category

A parameter useful to categorize events. Typically the object that was interacted with. It has to be specify in the tag.

### event\_action

A parameter useful to categorize events. Typically the type of interaction. It has to be specify in the tag.

### event\_label

A parameter useful to categorize events. Typically label given to the event. It has to be specify in the tag.

### event\_value

Numeric value associated with the event. It has to be specify in the tag.

### account\_id

Unique account identifier given by Quanti: during tag creation. It can't be modified.

### referrer

The referrer is the visitor's originating page. In other words, it is the page that precedes the tag call. Automatically recovered by the tag during the hit but overridable if is needed like in a server-side setup.

### user\_agent

Technical informations about your browser. Automatically recovered by the tag during the hit but overridable if is needed like in a server-side setup.

### product\_ids

A parameter useful to recover informations about products. usually a JSON is pushed in this field

### ad\_user\_data

Controls the sending of user-identifiable data for advertising purposes.

### ad\_storage

Controls the use of data for personalized advertising (e.g., remarketing, audience targeting).

### ad\_personalization

Controls the use of local storage for advertising purposes (e.g., marketing cookies).

### analytics\_storage

Controls the use of storage for analytics data.


# raw\_sessions

The raw\_sessions table is a "session" scope table. It records every sessions of all users, which are defined by a succession of events within a given time.

***

## <mark style="background-color:purple;">Syncing</mark>

The new sessions appear in the `raw_sessions` table once the session has expired, which occurs after a **30-minute** period of inactivity following the last hit.

***

[Tables and definition](https://dbdiagram.io/e/67bf2e04263d6cf9a08d27a6/67c08ae8263d6cf9a0b33078) :link:

<figure><img src="https://1847929239-files.gitbook.io/~/files/v0/b/gitbook-x-prod.appspot.com/o/spaces%2FoRN0sxIyI0UJdSqkwdBu%2Fuploads%2FM2ptDSSnJtH0arjg4XnB%2Fimage.png?alt=media&amp;token=c170ec95-e6ad-4604-a343-585657a069cc" alt=""><figcaption><p>Source : <a href="https://dbdiagram.io/e/67bf2e04263d6cf9a08d27a6/67c08ae8263d6cf9a0b33078">https://dbdiagram.io/e/67bf2e04263d6cf9a08d27a6/67c08ae8263d6cf9a0b33078</a></p></figcaption></figure>

***

## <mark style="background-color:purple;">Fields definition</mark>

### datetime

Date and time of the start of the session. The datetime of a session is calculated from `raw_hits` table: Quanti: takes the datetime's value from session's first hit.

### session\_id

**Unique session identifier**. A session (also called visit) is a set of events from the same visitor within a given amount of time. It ends when the tag does not record any events for 30 minutes. **session\_id** is automatically created by Quanti:. A visitor can make multiple sessions. **session\_id** can be overridable

### visitor\_id

**Unique visitor identifier**. Automatically created by Quanti: based on the value of the cookie placed on the user's browser, by the tag itself. One visitor = one browser. A visitor can make multiple hits and sessions. Its value is overridable if needed.

### user\_id

**Unique user identifier** from the client / contact base. This identifier has to be specified in the tag. It is typically based on a hashed version of the user's email address (using **SHA256**, for example).\
The **user\_id** of a session is calculated from `raw_hits` table. Quanti: takes the last known value (different from `empty` or `null` values).

{% hint style="info" %}
A user (identified by a **user\_id**) can make sessions (identified by multiple **session\_id**) on multiple devices, and as a result, several browsers (identified by different **visitors\_id**). For each user, pages and events are recorded (identified by different **hit\_id**).
{% endhint %}

<figure><img src="https://1847929239-files.gitbook.io/~/files/v0/b/gitbook-x-prod.appspot.com/o/spaces%2FoRN0sxIyI0UJdSqkwdBu%2Fuploads%2FfbegccdXhugM89mc05h1%2Fuserr.jpg?alt=media&amp;token=0ed24afd-b09c-41c8-8bbe-a3938b298a1e" alt="Explanation of the Different Types of Identifiers"><figcaption><p>Explanation of the Different Types of Identifiers</p></figcaption></figure>

### device\_type

The type of the device used to navigate. 3 possible choices: **desktop**, **mobile**, or **tablet**. The device\_type of a session is calculated from the `raw_hits` table. For each session, the value is taken from the last hit.

### landing\_url

**First** page of a session. The landing\_url of a session is calculated from `raw_hits` table.

### exit\_url

Last page of a session. The exit\_url of a session is calculated from `raw_hits` table.

### s\_source

The s\_source field is the traffic source of a session. It is calculated from `raw_hits` table. Quanti: applies rules to determine its value based on information contained in the [url field](/connectors/analytics-connectors/tag-tracker/tag-data-model/raw_hits#url) and the [referrer field](/connectors/analytics-connectors/tag-tracker/tag-data-model/raw_hits#referrer) of session's **first** hit.

{% hint style="info" %}
To learn more about **Campaign parameters calculated rules**, read this [attribution calculated rules](/connectors/analytics-connectors/tag-tracker/tag-data-model/rules-for-calculated-attribution).
{% endhint %}

### s\_medium

The s\_medium field is the traffic medium of a session. It is calculated from `raw_hits` table. Quanti: applies rules to determine its value based on information contained in the [url field](/connectors/analytics-connectors/tag-tracker/tag-data-model/raw_hits#url) and [referrer field](/connectors/analytics-connectors/tag-tracker/tag-data-model/raw_hits#referrer) of session's first hit.

{% hint style="info" %}
To learn more about **Campaign parameters calculated rules**, read this [article](/connectors/analytics-connectors/tag-tracker/tag-data-model/rules-for-calculated-attribution).
{% endhint %}

### s\_campaign

The s\_campaign of a session is calculated from `raw_hits` table. Quanti: extract value of **utm\_campaign** parameter of session's first hit.

### s\_content

The s\_content of a session is calculated from `raw_hits` table. Quanti: extract value of **utm\_content** parameter of session's first hit.

### s\_keyword

The s\_keyword of a session is calculated from `raw_hits` table. Quanti: extract value of **utm\_term** parameter of session's first hit.

### s\_utm\_id

The s\_keyword of a session is calculated from `raw_hits` table. Quanti: extract value of **utm\_id** parameter of session's first hit.

### s\_consent

The value of consent given by the user upon arrival through your consent management platform. The s\_consent of a session is calculated from `raw_hits` table. Quanti: keeps the last value known from session's hits.

### s\_referrer

The referrer is the visitor's originating page, or in other words, the page that precedes the opening of the session. The s\_referrer of a session is calculated from `raw_hits` table: Quanti: takes the [referrer](/connectors/analytics-connectors/tag-tracker/tag-data-model/raw_hits#referrer)'s value from session's first hit.

### page\_views

The number of page views counted during the session.

### events

The number of events counted during the session.

### total\_conversions

The number of conversions counted during the session.

### total\_conversion\_values

The sum of conversions values counted during the session.

### account\_id

Unique account identifier given by Quanti: during tag creation. It can't be modified.

### s\_ad\_user\_data

Calculated from the `raw_hits` table. For each session, we keep the last known value.

### s\_ad\_personalization

Calculated from the `raw_hits` table. For each session, we keep the last known value.

### s\_ad\_storage

Calculated from the `raw_hits` table. For each session, we keep the last known value.

### s\_analytics\_storage

Calculated from the `raw_hits` table. For each session, we keep the last known value.


# Rules for calculated attribution

How Quanti: calculate traffic sources (cf. raw\_sessions table)

<figure><img src="https://1847929239-files.gitbook.io/~/files/v0/b/gitbook-x-prod.appspot.com/o/spaces%2FoRN0sxIyI0UJdSqkwdBu%2Fuploads%2FtHhK76KWlITQXPVu5a4N%2FAttribution%20rules%20(3).jpg?alt=media&amp;token=a0d066f9-e010-47f8-bfcc-cd91bb812023" alt=""><figcaption><p>Attribution rules</p></figcaption></figure>

## Search engine list

```
alice,alice.com
aol,aol.com
ask,ask.com
auone,search.auone.jp
avg,isearch.avg.com
babylon,search.babylon.com
baidu,baidu.com
biglobe,biglobe.ne.jp
bing,bing.com
centrum.cz,search.centrum.cz
cnn,cnn.com
comcast,search.comcast.net
conduit,search.conduit.com
daum,daum.net
dogpile,dogpile.com
duckduckgo,duckduckgo.com
ecosia,ecosia.org
eniro,eniro.se
firmy,firmy.cz
globo,globo.com
incredimail,search.incredimail.com
kvasir,kvasir.no
lycos,lycos.com
lycos,search.lycos.d
msn,money.msn.com
msn,msn.com
msn,local.msn.com
najdi,najdi.si
naver,naver.com
onet,szukaj.onet.pl
qwant,qwant.com
rakuten,rakuten.co.jp
rambler,rambler.ru
search-results,search-results.com
search.smt.docomo,search.smt.docomo.ne.jp
seznam,seznam.cz
so.com,so.com
sogou,sogou.com
startsiden,startsiden.no
terra,buscador.terra.com.br
ukr,search.ukr.net
virgilio,search.virgilio.it
yandex,yandex.com
yandex,yandex.ru
google,www.google.com
google,www.google.co.uk
google,www.google.fr
google,www.google.de
google,www.google.es
google,www.google.it
google,www.google.ca
google,www.google.com.au
google,www.google.co.jp
google,www.google.co.in
google,www.google.com.br
google,www.google.ru
google,www.google.cn
google,www.google.com.mx
google,www.google.co.za
google,www.google.com.ar
google,www.google.co.kr
google,www.google.nl
google,www.google.se
google,www.google.ch
google,www.google.be
google,www.google.at
google,www.google.co.nz
google,www.google.no
google,www.google.dk
google,www.google.fi
google,www.google.ie
google,www.google.pl
google,www.google.pt
google,www.google.gr
google,www.google.hu
google,www.google.cz
google,www.google.sk
google,www.google.ro
google,www.google.bg
google,www.google.hr
google,www.google.rs
google,www.google.si
google,www.google.com.tr
google,www.google.co.il
google,www.google.com.eg
google,www.google.com.sa
google,www.google.ae
google,www.google.co.id
google,www.google.com.my
google,www.google.com.sg
google,www.google.com.ph
google,www.google.co.th
google,www.google.com.vn
google,www.google.com.pk
google,www.google.com.bd
google,www.google.lk
google,www.google.com.np
google,www.google.com.ng
google,www.google.co.ke
google,www.google.com.gh
google,www.google.co.ug
google,www.google.co.tz
google,www.google.co.zw
google,www.google.co.zm
google,www.google.co.bw
google,www.google.com.na
google,www.google.co.mz
google,www.google.co.ao
google,www.google.cm
google,www.google.ci
google,www.google.sn
google,www.google.tn
google,www.google.dz
google,www.google.co.ma
google,www.google.com.ly
google,www.google.sd
google,www.google.iq
google,www.google.com.ir
google,www.google.com.af
google,www.google.kz
google,www.google.co.uz
google,www.google.tm
google,www.google.kg
google,www.google.com.tj
google,www.google.az
google,www.google.ge
google,www.google.am
google,www.google.com.ua
google,www.google.by
google,www.google.lt
google,www.google.lv
google,www.google.ee
google,www.google.md
google,www.google.is
google,www.google.lu
google,www.google.com.mt
google,www.google.com.cy
google,www.google.li
google,www.google.mc
google,www.google.sm
google,www.google.ad
google,www.google.va
google,www.google.gl
google,www.google.fo
google,www.google.ax
google,www.google.im
google,www.google.je
google,www.google.gg
google,www.google.ky
google,www.google.bm
google,www.google.bs
google,www.google.com.bb
google,www.google.tt
google,www.google.com.jm
google,www.google.ht
google,www.google.com.do
google,www.google.com.pr
google,www.google.com.cu
google,www.google.com.bz
google,www.google.com.gt
google,www.google.hn
google,www.google.com.sv
google,www.google.com.ni
google,www.google.co.cr
google,www.google.com.pa
google,www.google.com.co
google,www.google.co.ve
google,www.google.com.ec
google,www.google.com.pe
google,www.google.com.bo
google,www.google.com.py
google,www.google.com.uy
google,www.google.cl
google,www.google.gf
google,www.google.sr
google,www.google.gy
google,www.google.com.fk
google,www.google.com.tw
google,www.google.com.hk
google,www.google.com.mo
google,www.google.mu
google,www.google.com.bh
google,www.google.cd
google,www.google.cg
google,www.google.as
google,www.google.gp
google,www.google.tg
google,www.google.bf
google,www.google.ba
google,www.google.cv
google,www.google.ps
google,www.google.mn
google,www.google.nr
google,www.google.bi
google,www.google.jo
google,www.google.com.nf
google,www.google.dj
google,www.google.sc
yahoo,search.yahoo.com
yahoo,espanol.search.yahoo.com
yahoo,be.search.yahoo.com
yahoo,fr.search.yahoo.com
yahoo,br.search.yahoo.com
yahoo,ca.search.yahoo.com
yahoo,de.search.yahoo.com
yahoo,es.search.yahoo.com
yahoo,in.search.yahoo.com
yahoo,id.search.yahoo.com
yahoo,ie.search.yahoo.com
yahoo,it.search.yahoo.com
yahoo,malaysia.search.yahoo.com
yahoo,nl.search.yahoo.com
yahoo,no.search.yahoo.com
yahoo,at.search.yahoo.com
yahoo,ph.search.yahoo.com
yahoo,pl.search.yahoo.com
yahoo,qc.search.yahoo.com
yahoo,ro.search.yahoo.com
yahoo,ch.search.yahoo.com
yahoo,sg.search.yahoo.com
yahoo,za.search.yahoo.com
yahoo,fi.search.yahoo.com
yahoo,se.search.yahoo.com
yahoo,tr.search.yahoo.com
yahoo,uk.search.yahoo.com
yahoo,vn.search.yahoo.com
yahoo,gr.search.yahoo.com
yahoo,ru.search.yahoo.com
yahoo,ua.search.yahoo.com
yahoo,il.search.yahoo.com
yahoo,hk.search.yahoo.com
yahoo,tw.search.yahoo.com
```


# Custom Webhook

The **Custom Webhook** connector lets you ingest events from any third-party system via a dedicated HTTPS endpoint. QUANTI: automatically generates the receiving URL, infers the schema from your first test payload, and routes the data directly into your data warehouse.

Typical use cases: CRM events, application alerts, web forms, e-commerce notifications, exports from third-party platforms that do not have a native QUANTI: connector.

{% hint style="info" %}
To ingest data from the QUANTI: web tracking tag, use the dedicated **Real-Time Analytics** connector — it natively handles sessions, attribution, and consent.
{% endhint %}

***

## How it works

1. QUANTI: generates a **unique HTTPS endpoint** for your tenant
2. You configure your source's webhook to POST or GET payloads to that URL
3. On receipt of the first payload, QUANTI: **automatically infers the schema** (field names and types)
4. You validate the schema and the connector starts ingesting

Each received payload is inserted as-is into your data warehouse, without transformation. Fields are mapped directly from the JSON structure of the payload.

***

## Setup

{% stepper %}
{% step %}

### Name your tenant

Give your webhook connector a name (e.g. `crm-events`, `shop-notifications`). This name is used as the table name in your warehouse and cannot be changed after creation. Choose a name that is lowercase, alphanumeric, and uses hyphens as separators.
{% endstep %}

{% step %}

### Retrieve the endpoint URL

Once the connector is created, QUANTI: provides a dedicated HTTPS endpoint URL in the format:

```
https://webhook.quanti.io/<tenant-id>/<connector-slug>
```

This URL is unique to your connector. Copy it and paste it into the webhook configuration of your source system.
{% endstep %}

{% step %}

### Send a test payload

Trigger an event from your source or manually send a representative JSON payload using cURL or Postman:

```bash
curl -X POST https://webhook.quanti.io/<your-endpoint> \
  -H "Content-Type: application/json" \
  -d '{
    "event": "order.created",
    "order_id": "12345",
    "amount": 99.90,
    "currency": "EUR",
    "customer": {
      "email": "user@example.com",
      "country": "FR"
    }
  }'
```

A `200 OK` response confirms the payload was received. If you receive a `400`, check that the body is valid JSON and that the `Content-Type` header is set to `application/json`.
{% endstep %}

{% step %}

### Validate the inferred schema

QUANTI: displays the schema detected from your first payload. Review the inferred field names and types (STRING, NUMERIC, BOOLEAN, TIMESTAMP, RECORD…) and confirm to activate ingestion.

{% hint style="warning" %}
Schema inference is based on the **first payload received**. Make sure you send a representative payload containing all the fields you expect to receive. Optional fields that are absent from the first payload will be added automatically when they appear in subsequent events, but it is better to include them upfront.
{% endhint %}
{% endstep %}
{% endstepper %}

***

## Endpoint URL format

The endpoint URL generated by QUANTI: follows this structure:

```
https://webhook.quanti.io/{tenant-id}/{connector-slug}
```

| Segment          | Description                                  |
| ---------------- | -------------------------------------------- |
| `tenant-id`      | Unique identifier of your QUANTI: workspace  |
| `connector-slug` | The name you gave the connector during setup |

The URL is static and does not change. If you need to change the connector name, you must create a new connector.

***

## Payload format

| Property             | Value              |
| -------------------- | ------------------ |
| HTTP method          | `POST` or `GET`    |
| Content-Type         | `application/json` |
| Maximum payload size | 1 MB               |
| Encoding             | UTF-8              |

**Nested objects and arrays**

QUANTI: handles nested JSON structures. By default:

* **Nested objects** are flattened using dot notation (e.g. `customer.email`, `customer.country`)
* **Arrays of primitives** are stored as a JSON string in a single STRING column
* **Arrays of objects** are stored as a RECORD (REPEATED) column in BigQuery

If the flattening behaviour does not match your needs, you can override it in the schema configuration after the first payload is received.

***

## Schema management

### Adding new fields

If your source starts sending a new field that was not present in the initial payload, QUANTI: automatically adds the corresponding column to the warehouse table. No action is required.

### Changing field types

Type changes (e.g. a field that was STRING and becomes NUMERIC) are not applied automatically to avoid breaking downstream queries. If you need to change a column type, contact support or update the schema manually in the connector settings.

### Removing fields

Columns are never automatically removed from the warehouse table, even if a field stops appearing in payloads. Missing fields will simply produce `NULL` values in those rows.

### Minimum field presence threshold

QUANTI: applies a **minimum field presence threshold** to filter out incomplete or malformed payloads. A payload must contain at least **30% of the fields defined in the schema** to be accepted and written to the warehouse. Payloads below this threshold are silently dropped.

***

## HTTP response codes

| Code                      | Meaning                                                |
| ------------------------- | ------------------------------------------------------ |
| `200 OK`                  | Payload received and queued for ingestion              |
| `400 Bad Request`         | Payload is not valid JSON or Content-Type is missing   |
| `413 Payload Too Large`   | Payload exceeds the 1 MB limit                         |
| `503 Service Unavailable` | Temporary QUANTI: ingestion issue — retry with backoff |

{% hint style="info" %}
Your source system should be configured to retry on `5xx` responses. QUANTI: returns `200` immediately upon receipt, before the payload is written to the warehouse, so there is no risk of duplicate insertion from retries at the HTTP level.
{% endhint %}

***

## Data in the warehouse

Each received event generates one row in your BigQuery table. QUANTI: automatically adds the following system columns:

| Column                | Type      | Description                                          |
| --------------------- | --------- | ---------------------------------------------------- |
| `_quanti_received_at` | TIMESTAMP | UTC timestamp of receipt by the QUANTI: endpoint     |
| `_quanti_id`          | STRING    | Unique identifier generated for each event (UUID v4) |

All other columns correspond to the fields in your JSON payload. Nested object keys are flattened into column names using dot notation.

***

## Limitations

* **No lookback**: only events received after the connector is activated are stored. There is no backfill of historical events.
* **No deduplication**: if your source can send the same event multiple times, identical rows will be created. Handle idempotency in your downstream pipeline using `_quanti_id`.
* **No transformation**: payloads are written as-is. Field renaming, filtering, or enrichment must be done downstream in your warehouse.
* **Rate limit**: QUANTI: accepts up to **500 events per second** per connector. Contact support for higher throughput requirements.


# Custom connectors


# Email

Follow this setup guide to connect your email attachments to QUANTI:

## Prerequisites

Before setting up the Email connector, ensure you have:

* **CSV**: Supported file formats for data ingestion
* **Header row**: Your file must include column names in the first row
* **Clean data structure**: Consistent data types across rows for each column

## Setup Instructions

{% stepper %}
{% step %}
**Connector Information**

* **Connector Name**: Define a unique name for your connector
* **Dataset ID**: Specify the BigQuery dataset ID where tables will be created
  * The dataset will be created automatically if it doesn't exist

Click **Next**
{% endstep %}

{% step %}
**Sync Behavior**

Choose the data insertion method that fits your use case:

1. **Table Type**: Select your table type:
   * **Fact table**: A table containing metrics and date-based data (e.g., sales, events, transactions)
   * **Dimension table**: A table composed exclusively of descriptive attributes (e.g., products, customers, categories)
2. **Sync Method**: Choose your insertion method: [Learn more](/key-concepts/data-insertion-strategies).
   * [**INSERT**](/key-concepts/data-insertion-strategies/insert-mode): Add new rows without checking for duplicates (recommended for time-series data)
   * [**REPLACE**](/key-concepts/data-insertion-strategies/replace-mode-delete-and-insert): Delete rows within the table scope and reload new rows
   * [**UPSERT**](/key-concepts/data-insertion-strategies/upsert-mode-update-and-insert): Update existing rows or insert new ones based on primary key (requires unique identifier) - No rows deleted

{% hint style="info" %}
If you have difficulties determining the most accurate configuration for your case, [discover our guide](/key-concepts/data-insertion-strategies/insertion-method-selection-guide).
{% endhint %}

Click **Next**
{% endstep %}

{% step %}
**Mapping Configuration**

**Upload Sample File**

* Select a sample CSV file that matches the structure of your incoming files
* **Delimiter detection**: The connector automatically proposes a delimiter based on your file (comma, semicolon, tab, pipe, etc.)
* **Important**: The uploaded file is used **only for mapping configuration** - no data is inserted at this stage

**Table Configuration**

* **Destination table name**: Define your BigQuery table name (lowercase, underscores only)
* **Delimiter**: Automatically proposed based on your uploaded file, but it is recommended to verify the selection

**Field Mapping**

For each column detected in your sample file:

* **Destination field name**: Define the column name in BigQuery (lowercase, underscores recommended)
* **Data type**: Choose the appropriate type:
  * `STRING` - Text values, alphanumeric data
  * `INTEGER` - Whole numbers (e.g., 42, -10, 0)
  * `FLOAT` - Decimal numbers (e.g., 3.14, -0.5)
  * `BOOLEAN` - True/False values
  * `DATE` - Date only (format: YYYY-MM-DD)
  * `TIMESTAMP` - Date and time with timezone
  * `DATETIME` - Date and time without timezone

**Date Column** (mandatory for Fact tables)

* Select the date field for table partitioning
* This field is **mandatory** for all methods when **Fact table** was selected in Step 2
* Used for optimizing query performance and data organization
* Must be a valid date/timestamp field in your data

**Historize Changes**

* **Required** if UPSERT was selected in Step 2 (Sync Behavior)
* **Optional** for INSERT and REPLACE methods
* **Selected fields**: Values are historized (previous versions are kept)
* **Deselected fields**: Values are updated without keeping history

Click **Next**
{% endstep %}

{% step %}
**Finish Setup**

**Retrieve your dedicated email address:**

* Navigate to the **Overview** tab in the connector details page
* Copy the unique email address provided by QUANTI
* Send your CSV files as attachments to this address
  {% endstep %}
  {% endstepper %}

### Notes

* **File format**: Supports CSV only
* **Delimiter detection**: Automatic detection of comma, semicolon, tab, pipe, and other common delimiters, but it is recommended to verify
* **Processing time**: Files are processed within minutes of receipt
* **Email address**: Found in the **Overview** tab of your connector details page
* **Multiple files**: You can send multiple files in the same email - each will be processed independently

## Troubleshooting

<details>

<summary>Email not processing</summary>

* Verify you're sending to the correct email address (check **Overview** tab)
* Ensure file is attached (not embedded in email body)
* Check file format is CSV
* Check the delimiter is correct
* Check that a header row is present in the CSV file

</details>


# Google Sheets

Follow our setup guide to connect Google Sheet to QUANTI:

## Prerequisites

To connect a Google Sheet to QUANTI, you need to:

* Access a [Google Drive](https://drive.google.com/drive/u/0/home) account
* Have edit access to the Google Sheet you want to use
* Create a named range in your Google Sheet (see instructions below)

#### Named Range

Open your Google Sheet, then go to **Data** > **Named ranges** and create a named range.

**Steps to create a named range:**

{% stepper %}
{% step %}

1. Select the range you want to sync, **including the header row**
   {% endstep %}

{% step %}
2\. Go to **Data** > **Named ranges**
{% endstep %}

{% step %}
3\. Give it a name of your choice
{% endstep %}

{% step %}
4\. Ensure the selected range includes:

* The header row with a name for each column
* All data rows you want to sync
  {% endstep %}

{% step %}
5\. Click **Done**
{% endstep %}
{% endstepper %}

***

## Setup Instructions

{% stepper %}
{% step %}
**Authorize Google Connection**

* Click on **Connect to Google Sheets**
* You will be redirected to Google's authorization page
* Log in with your Google account credentials
* Review and accept the requested permissions
* Click **Allow** to grant QUANTI access to your Google Sheets

Click **Next**
{% endstep %}

{% step %}
**Connector Information**

* **Connector Name**: Name your connector. It must be unique.
* **Dataset ID**: Define the ID of the dataset. It must not exist yet, as it will be created and data will be sent there.

Click **Next**
{% endstep %}

{% step %}
**Select Google Sheet and Range**

* **Browse**: Use the Google Picker to select your Google Sheet from your Google Drive.
* **Named Range**: Select the named range you want to sync
  * The named range must be created beforehand in your Google Sheet
  * The first row of the range will be used as column headers

Click **Next**
{% endstep %}

{% step %}
**Sync Behavior**

Choose the data insertion method that fits your use case:

* **Table Type**: Select your table type:
  * **Fact table**: A table containing metrics and date-based data (e.g., sales, events, transactions)
  * **Dimension table**: A table composed exclusively of descriptive attributes (e.g., products, customers, categories)
* **Sync Method**: Choose your insertion method: [Learn more](https://docs.quanti.io/data-management/data-insertion-strategies).
  * [**INSERT**](https://docs.quanti.io/data-management/data-insertion-strategies/insert-mode): Add new rows without checking for duplicates (recommended for time-series data)
  * [**REPLACE**](https://docs.quanti.io/data-management/data-insertion-strategies/replace-mode-delete-and-insert): Delete rows within the table scope and reload new rows
  * [**UPSERT**](https://docs.quanti.io/data-management/data-insertion-strategies/upsert-mode-update-and-insert): Update existing rows or insert new ones based on primary key (requires unique identifier) - No rows deleted

{% hint style="info" %}
If you have difficulties determining the most accurate configuration for your case, [discover our guide](https://docs.quanti.io/data-management/data-insertion-strategies/insertion-method-selection-guide).
{% endhint %}

Click **Next**
{% endstep %}

{% step %}
**Mapping Configuration**

**Table Configuration**

* **Destination table name**: Define your BigQuery table name (lowercase, underscores only)

**Field Mapping**

For each column detected in your sample file:

* **Destination field name**: Define the column name in BigQuery (lowercase, underscores recommended)
* **Data type**: Choose the appropriate type:
  * `STRING` - Text values, alphanumeric data
  * `INTEGER` - Whole numbers (e.g., 42, -10, 0)
  * `FLOAT` - Decimal numbers (e.g., 3.14, -0.5)
  * `BOOLEAN` - True/False values
  * `DATE` - Date only (format: YYYY-MM-DD)
  * `TIMESTAMP` - Date and time with timezone
  * `DATETIME` - Date and time without timezone

**Date Column** (mandatory for Fact tables)

* Select the date field for table partitioning
* This field is **mandatory** for all methods when **Fact table** was selected in Step 2
* Used for optimizing query performance and data organization
* Must be a valid date/timestamp field in your data

**Historize Changes**

* **Required** if UPSERT was selected in Step 2 (Sync Behavior)
* **Optional** for INSERT and REPLACE methods
* **Selected fields**: Values are historized (previous versions are kept)
* **Deselected fields**: Values are updated without keeping history

Click **Next**
{% endstep %}

{% step %}
**Finish Setup**

* Save your sync settings
* You can now active the auto-sync or launch a sync now.
  {% endstep %}
  {% endstepper %}


# (S)FTP

## Prerequisites

Before setting up the (S)FTP connector, ensure you have:

* **FTP or SFTP server access**: Valid credentials to connect to your server
* **CSV files**: Supported file format for data ingestion
* **Header row**: Your files must include column names in the first row
* **Clean data structure**: Consistent data types across rows for each column

## Setup Instructions

{% stepper %}
{% step %}
**Authorize your (S)FTP Account**

Add your credentials to let QUANTI download your data:

* **Protocol**: Choose between FTP or SFTP
* **File Type**: Select CSV (all files will be processed as the selected file type)
* **Server Host Address**: Your server hostname or IP address (e.g., sftp.yourhostname.com)
* **Server Port**: Server port (default: 21 for FTP, 22 for SFTP)
* **Server Username**: Your FTP/SFTP username
* **Server Password**: Your FTP/SFTP password
* **Folder Path**: Provide the folder path for file retrieval (e.g., quanti/csv). Leave blank to use the root directory.
* **File Pattern** (optional): Regular expression to filter files (e.g., `^*\.csv$`). If left empty, all files in the folder path will be synchronized.

Click **Next**
{% endstep %}

{% step %}
**Connector Information**

* **Connector Name**: Define a unique name for your connector
* **Dataset ID**: Specify the BigQuery dataset ID where tables will be created
  * The dataset will be created automatically if it doesn't exist

Click **Next**
{% endstep %}

{% step %}
**Sync Behavior**

Choose the data insertion method that fits your use case:

{% stepper %}
{% step %}

#### Table Type

Select your table type:

* **Fact table**: A table containing metrics and date-based data (e.g., sales, events, transactions)
* **Dimension table**: A table composed exclusively of descriptive attributes (e.g., products, customers, categories)
  {% endstep %}

{% step %}

#### Sync Method

Choose your insertion method: [Learn more](broken://pages/98a3c505f3adcd58f037b12ac3c210d6ccf47a22).

* [**INSERT**](broken://pages/edb1d99b179d83ec12c96c92bbd27ff39d8d4a26): Add new rows without checking for duplicates (recommended for time-series data)
* [**REPLACE**](broken://pages/acae44baca6b724928963f1a92670818eabc69b4): Delete rows within the table scope and reload new rows
* [**UPSERT**](broken://pages/73d5a1fe2980d1ec035b1becc9f9675ba6d3268e): Update existing rows or insert new ones based on primary key (requires unique identifier) - No rows deleted
  {% endstep %}
  {% endstepper %}

{% hint style="info" %}
If you have difficulties determining the most accurate configuration for your case, [discover our guide](broken://pages/b42505faf73508973903be3bb34709373a294434).
{% endhint %}

Click **Next**
{% endstep %}

{% step %}
**Mapping Configuration**

**Upload Sample File**

* Select a sample CSV file that matches the structure of your incoming files
* **Delimiter detection**: The connector automatically proposes a delimiter based on your file (comma, semicolon, tab, pipe, etc.)
* **Important**: The uploaded file is used **only for mapping configuration** - no data is inserted at this stage

**Table Configuration**

* **Destination table name**: Define your BigQuery table name (lowercase, underscores only)
* **Delimiter**: Automatically proposed based on your uploaded file, but it is recommended to verify the selection

**Field Mapping**

For each column detected in your sample file:

* **Destination field name**: Define the column name in BigQuery (lowercase, underscores recommended)
* **Data type**: Choose the appropriate type:
  * `STRING` - Text values, alphanumeric data
  * `INTEGER` - Whole numbers (e.g., 42, -10, 0)
  * `FLOAT` - Decimal numbers (e.g., 3.14, -0.5)
  * `BOOLEAN` - True/False values
  * `DATE` - Date only (format: YYYY-MM-DD)
  * `TIMESTAMP` - Date and time with timezone
  * `DATETIME` - Date and time without timezone

**Date Column** (mandatory for Fact tables)

* Select the date field for table partitioning
* This field is **mandatory** for all methods when **Fact table** was selected in Step 2
* Used for optimizing query performance and data organization
* Must be a valid date/timestamp field in your data

**Historize Changes**

* **Required** if UPSERT was selected in Step 2 (Sync Behavior)
* **Optional** for INSERT and REPLACE methods
* **Selected fields**: Values are historized (previous versions are kept)
* **Deselected fields**: Values are updated without keeping history

Click **Next**
{% endstep %}
{% endstepper %}

## Notes

* **File format**: Supports CSV only
* **Folder Path**: Provide the folder path for file retrieval. Leave blank to use the root directory
* **File Pattern**: Optional regular expression to filter files. If left empty, all files in the folder path will be synchronized
* **Delimiter detection**: Automatic proposal based on your uploaded file, but it is recommended to verify the selection
* **Processing time**: Files are processed according to your sync schedule
* **Multiple files**: All CSV files matching the pattern in the configured path are processed
* **Connection security**: SFTP is recommended for encrypted data transfer

## Troubleshooting

<details>

<summary>Connection Issues</summary>

* Verify your server hostname or IP address is correct
* Check that the port is accessible (not blocked by firewall)
* Ensure your username and password are valid
* Verify the path exists on the server
* For SFTP, check that SSH keys are properly configured (if applicable)

</details>

<details>

<summary>Files not syncing</summary>

* Verify CSV files are present in the configured path
* Check file permissions allow read access
* Ensure files have the correct structure (header row, consistent columns)
* Check the delimiter is correctly detected
* Verify the sync schedule is active

</details>

<details>

<summary>Data type errors</summary>

* Review your mapping configuration - data types must match actual data
* Check for non-numeric values in INTEGER/FLOAT columns
* Verify date formats match your DATE/TIMESTAMP columns
* Look for special characters or encoding issues

</details>

<details>

<summary>Need Help?</summary>

Contact QUANTI support at <support@quanti.io> or consult our comprehensive documentation at <https://docs.quanti.io>

</details>


# PostgreSQL

Follow our setup guide to connect PostgreSQL to QUANTI:

{% hint style="info" %}
The PostgreSQL connector is currently in **beta**. Reach out to your CSM to enable it for your project.
{% endhint %}

## Prerequisites

Before setting up the PostgreSQL connector, ensure you have:

* A **PostgreSQL database** accessible from the internet (host must be reachable)
* **Connection credentials**: host, port, database name, username, and password
* A **database user with SELECT privileges** on the tables you want to sync
* If your database is behind a firewall, whitelist the QUANTI: IP addresses — contact your CSM for the list

## Setup Instructions

{% stepper %}
{% step %}
**Authorize your PostgreSQL Connection**

Enter your database credentials to let QUANTI: connect to your PostgreSQL server:

* **Host**: Your PostgreSQL server hostname or IP address (e.g., `db.yourdomain.com`)
* **Port**: Server port (default: `5432`)
* **Database**: The name of the database to connect to
* **Username**: Your PostgreSQL username
* **Password**: Your PostgreSQL password
* **SSL Mode** (optional): Enable SSL for encrypted connections — recommended for databases exposed over the public internet

Click **Next**
{% endstep %}

{% step %}
**Connector Information**

* **Connector Name**: Define a unique name for your connector
* **Dataset ID**: Specify the BigQuery dataset ID where tables will be created (the dataset is created automatically if it doesn't exist)

Click **Next**
{% endstep %}

{% step %}
**Table Selection**

Select the PostgreSQL table to sync to BigQuery:

* **Schema**: The PostgreSQL schema containing your table (default: `public`)
* **Table**: The name of the table to sync

{% hint style="info" %}
Each connector instance syncs a single table. To sync multiple tables, create one connector per table.
{% endhint %}

Click **Next**
{% endstep %}

{% step %}
**Sync Behavior**

Choose the data insertion method that fits your use case:

* **Table Type**: Select your table type:
  * **Fact table**: A table containing metrics and date-based data (e.g., events, transactions, orders)
  * **Dimension table**: A table composed exclusively of descriptive attributes (e.g., products, customers, categories)
* **Sync Method**: Choose your insertion method — [Learn more](https://docs.quanti.io/key-concepts/data-insertion-strategies)
  * [**INSERT**](https://docs.quanti.io/key-concepts/data-insertion-strategies/insert-mode): Add new rows without checking for duplicates (recommended for append-only time-series data)
  * [**REPLACE**](https://docs.quanti.io/key-concepts/data-insertion-strategies/replace-mode-delete-and-insert): Delete rows within the table scope and reload fresh data
  * [**UPSERT**](https://docs.quanti.io/key-concepts/data-insertion-strategies/upsert-mode-update-and-insert): Update existing rows or insert new ones based on a primary key — no rows deleted

{% hint style="info" %}
If you have difficulties determining the most accurate configuration for your case, [discover our guide](https://docs.quanti.io/key-concepts/data-insertion-strategies/insertion-method-selection-guide).
{% endhint %}

Click **Next**
{% endstep %}

{% step %}
**Mapping Configuration**

**Table Configuration**

* **Destination table name**: Define your BigQuery table name (lowercase, underscores only)

**Field Mapping**

For each column detected in your PostgreSQL table:

* **Destination field name**: Define the column name in BigQuery (lowercase, underscores recommended)
* **Data type**: Choose the appropriate type:
  * `STRING` — Text values, alphanumeric data
  * `INTEGER` — Whole numbers (e.g., 42, -10, 0)
  * `FLOAT` — Decimal numbers (e.g., 3.14, -0.5)
  * `BOOLEAN` — True/False values
  * `DATE` — Date only (format: YYYY-MM-DD)
  * `TIMESTAMP` — Date and time with timezone
  * `DATETIME` — Date and time without timezone

{% hint style="info" %}
PostgreSQL-specific types: `NUMERIC`/`DECIMAL` → `FLOAT`, `JSONB`/`JSON` → `STRING`, `UUID` → `STRING`.
{% endhint %}

**Date Column** (mandatory for Fact tables)

* Select the date field for table partitioning
* Mandatory when **Fact table** was selected
* Used to optimize query performance and data organization
* Must be a valid `DATE`, `TIMESTAMP`, or `DATETIME` field

**Historize Changes**

* **Required** if UPSERT was selected in the previous step
* **Optional** for INSERT and REPLACE methods
* **Selected fields**: Previous values are kept (full history)
* **Deselected fields**: Values are overwritten without keeping history

Click **Next**
{% endstep %}

{% step %}
**Finish Setup**

* Save your sync settings
* You can now activate auto-sync or launch a first sync manually
  {% endstep %}
  {% endstepper %}

## Notes

* **One table per connector**: Each connector instance syncs a single PostgreSQL table. Create multiple connectors to sync multiple tables from the same database.
* **Read-only access**: The database user only needs `SELECT` access — no write permissions are required on the PostgreSQL side.
* **Network access**: Your PostgreSQL server must be reachable from QUANTI:'s infrastructure. Contact your CSM to obtain the IP addresses to whitelist if needed.
* **SSL**: Enabling SSL is recommended for databases accessible over the public internet.

## Troubleshooting

<details>

<summary>Connection refused</summary>

* Verify the hostname or IP address is correct
* Check that the configured port is open and not blocked by a firewall
* Ensure PostgreSQL accepts external connections (`listen_addresses` in `postgresql.conf`)
* Confirm your username and password are valid

</details>

<details>

<summary>Permission denied on table</summary>

* Ensure the database user has `SELECT` privileges on the target table
* Run the following on your PostgreSQL instance:

```sql
GRANT CONNECT ON DATABASE your_db TO your_user;
GRANT USAGE ON SCHEMA public TO your_user;
GRANT SELECT ON TABLE your_table TO your_user;
```

</details>

<details>

<summary>Data type mapping issues</summary>

* PostgreSQL `NUMERIC` / `DECIMAL` columns → use `FLOAT` in the mapping
* PostgreSQL `JSONB` / `JSON` columns → use `STRING` in the mapping
* Check for `NULL` values in columns defined as non-nullable types

</details>

<details>

<summary>Need Help?</summary>

Contact QUANTI: support at <support@quanti.io> or consult our documentation at <https://docs.quanti.io>

</details>


# MySQL

Follow our setup guide to connect MySQL to QUANTI:

## Prerequisites

Before setting up the MySQL connector, ensure you have:

* A **MySQL database** accessible from the internet (host must be reachable)
* **Connection credentials**: host, port, database name, username, and password
* A **database user with SELECT privileges** on the tables you want to sync
* If your database is behind a firewall, allow inbound access from QUANTI:'s IP: **`51.158.117.103`**

## Setup Instructions

{% stepper %}
{% step %}
**Database Connection**

Enter your MySQL credentials to let QUANTI: connect to your server:

* **Host**: Your MySQL server hostname or IP address (e.g., `db.yourdomain.com` or `127.0.0.1`)
* **Port**: Server port (default: `3306`)
* **User**: Your MySQL username (e.g., `quanti_readonly`)
* **Password**: Your MySQL password
* **Database**: The name of the database to connect to
* **SSL Mode**: Choose the SSL security level for the connection:
  * `required` — Encrypted connection, no certificate verification (recommended default)
  * `verify-ca` — Encrypted + verifies the server certificate authority
  * `verify-identity` — Encrypted + verifies the server certificate and hostname
  * `preferred` — Encrypts if the server supports it, falls back to unencrypted
  * `disabled` — No SSL (local/dev environments only — not recommended for production)

Click **Save** to create the connector.
{% endstep %}

{% step %}
**Add Tables to Sync**

Once the connector is created, go to the **Reports** tab and click **Add table** to configure each table you want to sync:

* **Table**: Select the MySQL table to sync (the connector displays all accessible tables in the connected database)
* **Destination table name**: Define the BigQuery table name (lowercase, underscores only)
* **Table Type**: Select your table type:
  * **Fact table**: A table containing metrics and date-based data (e.g., events, transactions, orders)
  * **Dimension table**: A table composed exclusively of descriptive attributes (e.g., products, customers, categories)
* **Sync Method**: Choose your insertion method — [Learn more](https://docs.quanti.io/key-concepts/data-insertion-strategies)
  * [**INSERT**](https://docs.quanti.io/key-concepts/data-insertion-strategies/insert-mode): Add new rows without checking for duplicates (recommended for append-only time-series data)
  * [**REPLACE**](https://docs.quanti.io/key-concepts/data-insertion-strategies/replace-mode-delete-and-insert): Delete rows within the table scope and reload fresh data
  * [**UPSERT**](https://docs.quanti.io/key-concepts/data-insertion-strategies/upsert-mode-update-and-insert): Update existing rows or insert new ones based on a primary key — no rows deleted

{% hint style="info" %}
You can add as many tables as needed from the same database — each table is configured independently with its own sync method and mapping.
{% endhint %}

{% hint style="info" %}
If you have difficulties determining the most accurate configuration for your case, [discover our guide](https://docs.quanti.io/key-concepts/data-insertion-strategies/insertion-method-selection-guide).
{% endhint %}
{% endstep %}

{% step %}
**Field Mapping**

For each table, map the MySQL columns to BigQuery fields:

* **Destination field name**: Define the column name in BigQuery (lowercase, underscores recommended)
* **Data type**: Choose the appropriate type:
  * `STRING` — Text values, alphanumeric data
  * `INTEGER` — Whole numbers (e.g., 42, -10, 0)
  * `FLOAT` — Decimal numbers (e.g., 3.14, -0.5)
  * `BOOLEAN` — True/False values
  * `DATE` — Date only (format: YYYY-MM-DD)
  * `TIMESTAMP` — Date and time stored in UTC
  * `DATETIME` — Date and time without timezone

{% hint style="info" %}
MySQL-specific type mappings: `DECIMAL`/`NUMERIC` → `FLOAT`, `TINYINT(1)` → `BOOLEAN`, `JSON` → `STRING`, `ENUM`/`SET` → `STRING`, `BLOB`/`LONGTEXT` → `STRING`.
{% endhint %}

**Date Column** (mandatory for Fact tables)

* Select the date field used for table partitioning
* Mandatory when **Fact table** was selected
* Used to optimize query performance and data organization
* Must be a valid `DATE`, `TIMESTAMP`, or `DATETIME` field

**Historize Changes**

* **Required** if UPSERT was selected in the previous step
* **Optional** for INSERT and REPLACE methods
* **Selected fields**: Previous values are kept (full history)
* **Deselected fields**: Values are overwritten without keeping history

Click **Save** to apply the table configuration.
{% endstep %}

{% step %}
**Sync Settings**

* **Sync frequency**: Choose how often QUANTI: syncs your data — every 3, 6, or 12 hours, daily, weekly, or monthly
* **Lookback window**: Number of days to re-sync on each run to capture late-arriving updates (default: 3 days)
* You can also launch a **historical data load** to backfill past data (up to 3, 6, or 12 months, or a custom date range)

Click **Save** then activate auto-sync or launch a first sync manually.
{% endstep %}
{% endstepper %}

## Notes

* **Multiple tables per connector**: A single MySQL connector can sync multiple tables from the same database. Add tables from the **Reports** tab after the connector is created.
* **Read-only access**: The database user only needs `SELECT` access — no write permissions are required.
* **Network access**: Your MySQL server must be reachable from QUANTI:'s infrastructure. Allow inbound access from IP **`51.158.117.103`**.
* **SSL**: Using `required` or `verify-ca` is strongly recommended for databases accessible over the public internet.
* **Incremental sync**: If the table has a `TIMESTAMP` or `DATETIME` column, QUANTI: can sync only the rows modified since the last run (incremental). Otherwise, a full refresh is performed.

## Troubleshooting

<details>

<summary>Connection refused</summary>

* Verify the hostname or IP address is correct
* Check that port `3306` (or your custom port) is open and not blocked by a firewall
* Ensure MySQL accepts external connections (`bind-address = 0.0.0.0` in `my.cnf`)
* Confirm your username and password are valid

</details>

<details>

<summary>Permission denied on table</summary>

* Ensure the database user has `SELECT` privileges on the target table
* Run the following on your MySQL instance:

```sql
GRANT SELECT ON your_db.your_table TO 'your_user'@'%';
FLUSH PRIVILEGES;
```

* To grant access to all tables in the database:

```sql
GRANT SELECT ON your_db.* TO 'your_user'@'%';
FLUSH PRIVILEGES;
```

</details>

<details>

<summary>SSL connection error</summary>

* If the server does not have a valid SSL certificate, switch to `required` instead of `verify-ca` or `verify-identity`
* If SSL is not configured on the server, use `preferred` or `disabled` (dev only)
* Check that the MySQL server version supports SSL (MySQL 5.7.11+ has SSL enabled by default)

</details>

<details>

<summary>Data type mapping issues</summary>

* MySQL `DECIMAL` / `NUMERIC` columns → use `FLOAT` in the mapping
* MySQL `TINYINT(1)` columns → use `BOOLEAN` in the mapping
* MySQL `JSON` columns → use `STRING` in the mapping
* MySQL `ENUM` / `SET` columns → use `STRING` in the mapping
* Check for `NULL` values in columns defined as non-nullable types

</details>

<details>

<summary>Need Help?</summary>

Contact QUANTI: support at <support@quanti.io> or consult our documentation at <https://docs.quanti.io>

</details>


# Semantic View

The **Semantic View** is a custom connector that lets you expose external tables already present in your BigQuery project to QUANTI:'s Semantic Layer — without moving or syncing any data.

***

## How it fits in the architecture

QUANTI: connectors (File Connectors, App Connectors) feed into the Semantic Layer automatically. The Semantic View fills the gap for data that already lives in your BigQuery project but was not loaded by QUANTI: — for example an e-commerce order export, a CRM dataset, a custom analytics table, or any third-party feed loaded outside of QUANTI:.

Once exposed via the Semantic View, these external tables become part of the Semantic Layer alongside your QUANTI: data. The Semantic Layer is then made available to the **QUANTI: MCP**, which allows AI tools (Claude, ChatGPT, Copilot and others) to intelligently query and cross-reference your data.

```mermaid
flowchart LR
    subgraph ext["Other data sources"]
        extdata["External tables\nalready in BigQuery"]
    end

    subgraph qconn["QUANTI: connectors"]
        file["File Connector\nGoogle Sheets · CSV · SFTP · Webhooks"]
        app["App Connector\nGoogle Ads · GA4 · ..."]
    end

    subgraph semantic["Quanti Semantic View"]
        sc["Semantic View"]
        sl["Semantic Layer"]
        pq["Pre-built queries"]
    end

    mcp["Quanti MCP"]

    subgraph ai["AI tools"]
        claude["Claude"]
        chatgpt["ChatGPT"]
        copilot["Copilot"]
        etc["..."]
    end

    extdata --> sc
    file --> sl
    app --> sl
    sc --> sl
    sl --> pq
    sl --> mcp
    mcp --> claude
    mcp --> chatgpt
    mcp --> copilot
    mcp --> etc
```

***

## Prerequisites

* A QUANTI: project connected to a BigQuery dataset
* The external tables you want to expose must already exist in that BigQuery project
* You must have the necessary BigQuery permissions to read those tables

***

## Setup

In the QUANTI: app, go to **Custom Connectors**, click **Add custom connector** and select **Semantic View** from the list.

* **Connector Name**: Name your connector. It must be unique.
* **Dataset**: Select the BigQuery dataset that contains the external tables you want to expose.

Click **Create** to confirm. The connector is created in a single step — no authentication or scheduling is required.

***

## Adding tables

Once the connector is created, go to the **Reports** tab.

* Click **Add table**
* Select the table you want to expose from the dataset
* Choose the fields to include

You can add multiple tables to the same Semantic View, and expose as many fields as needed per table.

***

## Configuring field descriptions

Field descriptions are the most important part of the setup. They tell the MCP what each field means, how it relates to other data, and how it should be used in queries.

Open the **Semantic** panel for any added table and add a description for each field. Good descriptions should cover:

* What the field represents in business terms (e.g. "Net revenue after returns, excluding VAT")
* The unit or format when relevant (e.g. "Amount in euros", "Date in YYYY-MM-DD format")
* Any join keys that link this table to your QUANTI: connector data (e.g. "Can be joined with Meta Ads data on `date` and `country`")

The richer the descriptions, the more accurately the MCP can cross-reference your external data with your QUANTI: connector data.


# Market insights


# Calendar

Follow our setup guide to connect Calendar to QUANTI:

<a href="https://dbdiagram.io/e/6a0c7e16697f99c167b3ae47/6a0c7e2e697f99c167b3afaa" class="button primary" data-icon="table-tree">Prebuilt reports and definition</a>

***

## Overview

The Calendar connector enriches your data warehouse with daily calendar context by country — public holidays, school vacations, commercial events (Black Friday, sales periods), local events, and major sporting events. It is designed to be joined with your marketing and sales data for **marketing mix modeling (MMM)** and seasonality analysis.

No authentication is required. Simply select the countries you want to cover.

***

## Setup instructions

{% stepper %}
{% step %}

#### Select countries

Choose the countries you want to include. Each selected country generates one row per day in the output tables.

Available countries: **France**, **Germany**, **United Kingdom**, **Spain**, **Italy**, **Belgium**.
{% endstep %}

{% step %}

#### Select prebuilt reports

Review the available prebuilt reports and select the ones you want to activate.
{% endstep %}

{% step %}

#### Connector information

* **Connector Name**: Name your connector. It must be unique.
* **Dataset ID**: Define the ID of the dataset. It must not exist yet, as it will be created and data will be sent there.
  {% endstep %}
  {% endstepper %}

***

## Prebuilt reports

**calendar\_days**: Daily calendar flags by country and zone. One row per day per country per zone. Each row contains a set of boolean flags indicating the nature of the day — ideal for direct JOIN with marketing data on `date` and `country`. Dimensions: date, country, zone. Additional fields: day\_of\_week, week\_number, month, quarter, year. Flags: is\_weekend, is\_holiday, is\_school\_vacation, is\_commercial\_event, is\_local\_event, is\_sporting\_event.

**calendar\_events**: Detailed calendar events — one row per event per day. Contains the event name, type (holiday, school\_vacation, commercial, local, sporting) and zone. Use for detailed event-level analysis or to join with `calendar_days` for enriched context. Dimensions: date, country, event\_id, event\_name, event\_type, zone.

```mermaid
erDiagram
    calendar_days {
        TIMESTAMP _quanti_loaded_at PK
        DATE      date PK
        STRING    country PK
        STRING    zone PK
        INTEGER   day_of_week
        INTEGER   week_number
        INTEGER   month
        INTEGER   quarter
        INTEGER   year
        BOOLEAN   is_weekend
        BOOLEAN   is_holiday
        BOOLEAN   is_school_vacation
        BOOLEAN   is_commercial_event
        BOOLEAN   is_local_event
        BOOLEAN   is_sporting_event
    }
    calendar_events {
        TIMESTAMP _quanti_loaded_at PK
        DATE      date PK
        STRING    country PK
        STRING    event_id PK
        STRING    event_name
        STRING    event_type
        STRING    zone
    }

    calendar_days ||--o{ calendar_events : "date + country"
```

***

<a href="https://dbdiagram.io/e/6a0c7e16697f99c167b3ae47/6a0c7e2e697f99c167b3afaa" class="button primary" data-icon="table-tree">Prebuilt reports and definition</a>

***

## Notes

* **No authentication required**: The connector uses public data sources — no API key or OAuth is needed.
* **Sync frequency**: Data is refreshed **monthly**. Calendar data is stable by nature — events rarely change once published for the year.
* **Zone dimension**: For some countries, events are regional. In France, the `zone` field maps to school vacation zones (A, B, C). For countries without zones, `zone` contains the country code.
* **Joining with marketing data**: Use `calendar_days` as a dimension table — join on `date` and `country` to enrich any daily performance table with contextual flags.
* **Supported countries**: France, Germany, United Kingdom, Spain, Italy, Belgium. Additional countries can be added upon request.


# CSP

Follow our setup guide to connect CSP to QUANTI:

<a href="https://dbdiagram.io/e/6a0c7eb1697f99c167b3b678/6a0c7ec5697f99c167b3b7ba" class="button primary" data-icon="table-tree">Prebuilt reports and definition</a>

***

## Overview

The CSP connector loads socio-professional category (CSP/PCS) distribution data by territory into your data warehouse. It is designed to enrich your customer and order data with socio-demographic context — enabling you to cross-reference postal codes with population profiles to better understand your audience and optimize targeting.

Currently supports **France** at the **IRIS level** (the smallest INSEE geographic unit, corresponding to neighbourhoods of \~2,000 inhabitants).

No authentication is required.

***

## Setup instructions

{% stepper %}
{% step %}

#### Select country

Select the country for which you want to load CSP data. Currently only **France** is available.
{% endstep %}

{% step %}

#### Select prebuilt reports

Review the available prebuilt reports and select the ones you want to activate.
{% endstep %}

{% step %}

#### Connector information

* **Connector Name**: Name your connector. It must be unique.
* **Dataset ID**: Define the ID of the dataset. It must not exist yet, as it will be created and data will be sent there.
  {% endstep %}
  {% endstepper %}

***

## Prebuilt reports

**csp\_france\_iris**: Socio-professional category distribution at IRIS level from the French INSEE census. One row per IRIS territory per census year. Includes the postal code of the commune for easy JOIN with order and customer data.

Fields: `iris_code` (9-character code: 5-digit commune + 4-digit IRIS number), `iris_label` (neighbourhood name), `commune_code`, `postal_code`, `departement`, `region`, `census_year`.

Population metrics (percentage of population aged 15+):

| Field                     | CSP category                                    |
| ------------------------- | ----------------------------------------------- |
| `pct_agriculteurs`        | PCS 1 — Farmers                                 |
| `pct_artisans`            | PCS 2 — Craftsmen, shopkeepers, business owners |
| `pct_cadres`              | PCS 3 — Executives & senior professionals       |
| `pct_prof_intermediaires` | PCS 4 — Intermediate professions                |
| `pct_employes`            | PCS 5 — Employees                               |
| `pct_ouvriers`            | PCS 6 — Workers                                 |
| `pct_retraites`           | PCS 7 — Retirees                                |
| `pct_sans_activite`       | PCS 8 — Inactive persons                        |
| `pct_csp_plus`            | CSP+ aggregate (PCS 2+3+4)                      |

```mermaid
erDiagram
    csp_france_iris {
        TIMESTAMP _quanti_loaded_at PK
        STRING    iris_code PK
        STRING    census_year PK
        STRING    iris_label
        STRING    commune_code
        STRING    postal_code
        STRING    departement
        STRING    region
        FLOAT     population_15plus
        FLOAT     pct_agriculteurs
        FLOAT     pct_artisans
        FLOAT     pct_cadres
        FLOAT     pct_prof_intermediaires
        FLOAT     pct_employes
        FLOAT     pct_ouvriers
        FLOAT     pct_retraites
        FLOAT     pct_sans_activite
        FLOAT     pct_csp_plus
    }
```

***

<a href="https://dbdiagram.io/e/6a0c7eb1697f99c167b3b678/6a0c7ec5697f99c167b3b7ba" class="button primary" data-icon="table-tree">Prebuilt reports and definition</a>

***

## Notes

* **No authentication required**: The connector uses public INSEE census data — no API key or OAuth is needed.
* **Sync frequency**: Data is refreshed **monthly**. The underlying census data changes only when INSEE publishes a new census vintage.
* **Full replace sync**: Each sync fully replaces the table — the data is static by nature.
* **Joining with order data**: Use `postal_code` to join `csp_france_iris` with your order or customer tables. Note that one postal code can correspond to multiple IRIS — aggregate CSP metrics across IRIS for a given postal code to get a representative profile.
* **IRIS granularity**: IRIS is the smallest statistical unit in France (\~2,000 inhabitants per zone). It provides more precise socio-demographic targeting than postal codes or departments alone.
* **Additional countries**: Only France is currently supported. Other countries may be added in future versions.


# Weather

Follow our setup guide to connect Weather to QUANTI:

<a href="https://dbdiagram.io/e/6a0c7f169f1f8ec47b538ce9/6a0c7f22697f99c167b3bdab" class="button primary" data-icon="table-tree">Prebuilt reports and definition</a>

***

## Overview

The Weather connector loads daily weather data from [Open-Meteo](https://open-meteo.com) into your data warehouse — temperature, precipitation, sunshine hours, wind speed and a pre-computed bad weather indicator by country. It is designed to be joined with your marketing and sales data for **marketing mix modeling (MMM)** and climate impact analysis.

No authentication is required.

***

## Setup instructions

{% stepper %}
{% step %}

#### Select countries

Choose the countries for which you want to load weather data. Each selected country generates one row per day in the output table.

Available countries: **France**, **Germany**, **United Kingdom**, **Spain**, **Italy**, **Belgium**.
{% endstep %}

{% step %}

#### Select prebuilt reports

Review the available prebuilt reports and select the ones you want to activate.
{% endstep %}

{% step %}

#### Connector information

* **Connector Name**: Name your connector. It must be unique.
* **Dataset ID**: Define the ID of the dataset. It must not exist yet, as it will be created and data will be sent there.
  {% endstep %}
  {% endstepper %}

***

## Prebuilt reports

**weather\_daily**: Daily weather metrics by country. One row per day per country — designed for direct JOIN with marketing data on `date` and `country`. Dimensions: date, country. Metrics: temperature\_avg, temperature\_min, temperature\_max (°C), precipitation (mm), sunshine\_hours, wind\_speed\_max (km/h). Also includes `is_bad_weather` — a pre-computed boolean flag set to `true` when at least one of the following conditions is met: precipitation > 10 mm, sunshine < 2 hours, or wind speed > 50 km/h.

```mermaid
erDiagram
    weather_daily {
        TIMESTAMP _quanti_loaded_at PK
        DATE      date PK
        STRING    country PK
        FLOAT     temperature_avg
        FLOAT     temperature_min
        FLOAT     temperature_max
        FLOAT     precipitation
        FLOAT     sunshine_hours
        FLOAT     wind_speed_max
        BOOLEAN   is_bad_weather
    }
```

***

<a href="https://dbdiagram.io/e/6a0c7f169f1f8ec47b538ce9/6a0c7f22697f99c167b3bdab" class="button primary" data-icon="table-tree">Prebuilt reports and definition</a>

***

## Notes

* **No authentication required**: The connector uses [Open-Meteo](https://open-meteo.com), a free and open weather API — no API key is needed.
* **Sync frequency**: Daily (default) or weekly. Weather data is updated daily as new observations become available.
* **Historical data**: Up to **36 months** of history can be loaded on initial setup, or a custom date range can be defined.
* **`is_bad_weather` flag**: Pre-computed convenience indicator — `true` if precipitation > 10 mm **or** sunshine < 2 hours **or** wind speed > 50 km/h. Useful for quick segmentation in MMM models without manually combining conditions.
* **Geographic aggregation**: Weather data is aggregated at country level using a representative station. For country-level MMM analysis this provides a reliable signal; for highly regional use cases, granularity may be limited.
* **Joining with marketing data**: Join `weather_daily` on `date` and `country` to enrich any daily performance table with climate context.
* **Supported countries**: France, Germany, United Kingdom, Spain, Italy, Belgium. Additional countries can be added upon request.


# Marketing connectors


# Amazon DSP

Follow our setup guide to connect Amazon DSP to QUANTI:

{% hint style="warning" %}
This connector is currently in **beta**.
{% endhint %}

<a href="https://dbdiagram.io/e/69cd3ad0fb2db18e3b5a76bf/69cd3b0578c6c4bc7abfda08" class="button primary" data-icon="table-tree">Prebuilt reports and definition</a>

***

## Prerequisites

To connect Amazon DSP to QUANTI, you need access to an [Amazon Advertising](https://advertising.amazon.com) account with at least one active DSP profile.

***

## Setup instructions

{% stepper %}
{% step %}
**Authorize your Amazon account**

* Click **Continue with Amazon**
* You will be redirected to Amazon's authorization page
* Log in with your Amazon Advertising credentials
* Review and accept the requested permissions
* Click **Allow** to grant access
  {% endstep %}

{% step %}
**Select DSP Profiles**

Choose the Amazon DSP profiles you want to sync.
{% endstep %}

{% step %}
**Select pre-built reports**

Review the available Prebuilt reports and select the ones you want to activate.
{% endstep %}

{% step %}
**Connector information**

* **Connector Name**: Name your connector. It must be unique.
* **Dataset ID**: Define the ID of the dataset. It must not exist yet, as it will be created and data will be sent there.
  {% endstep %}
  {% endstepper %}

***

## Pre-built reports

**Dimension tables** — entity snapshots, updated at each sync:

* **advertiser\_history**: Advertiser entity data including name, currency, country, and timezone.
* **campaign\_history**: Campaign entities with budget settings, optimization goals, flight dates, delivery status, and targeting configuration.
* **ad\_group\_history**: Ad group entities with bid settings, budget caps, targeting parameters, scheduling, and delivery status.
* **creative\_history**: Creative assets with type, dimensions, click-through URLs, moderation status, and tracking tags.

**Fact table** — daily performance data:

* **campaign\_stats**: Campaign performance broken down by date, advertiser, order, and creative. Includes impressions, clicks, cost, purchases, sales, ROAS, video completion metrics, reach, and viewability.

***

<a href="https://dbdiagram.io/e/69cd3ad0fb2db18e3b5a76bf/69cd3b0578c6c4bc7abfda08" class="button primary" data-icon="table-tree">Prebuilt reports and definition</a>

***

## Notes

* **Historical data limit**: The Amazon DSP API provides a maximum of **90 days** of history.
* **Lookback window**: Default lookback is **5 days** to account for Amazon's attribution processing delays.
* **Beta status**: This connector is in beta — some features or report fields may evolve.


# Affilae

Follow our setup guide to connect your Affilae connector

<a href="https://dbdiagram.io/e/682704361227bdcb4e9c9d5b/6827045e1227bdcb4e9ca579" class="button primary" data-icon="table-tree">Prebuilt reports and definition</a>

***

## <mark style="background-color:blue;">Prerequisites</mark>

To connect Affilae to QUANTI:, you need an [Affilae](https://affilae.com/fr/logiciel-affiliation/?utm_source=quanti.io\&utm_medium=partnership) account.

***

## <mark style="background-color:blue;">Setup instructions</mark>

### Find API key

1. Log in to your [Affilae account](https://app.affilae.com/fr/login).
2. In the bottom-left corner, click on "**My account**", then select "**API keys**".\ <br>

   <figure><img src="https://1847929239-files.gitbook.io/~/files/v0/b/gitbook-x-prod.appspot.com/o/spaces%2FoRN0sxIyI0UJdSqkwdBu%2Fuploads%2Fgit-blob-d5993c257db53b2a4adbb8c38c3bf5722fa2f8a7%2Faffilae1.png?alt=media" alt="Access path to API key on Affilae interface" width="325"><figcaption><p>Access path to API key on Affilae interface</p></figcaption></figure>
3. You'll find in this section your API key. If the permission level is not appropriated, please make a request to your account manager.
4. keep your API key to finish your configuration in QUANTI:.

### Connector configuration

1. In the connector setup form, enter the **name** of your choice.
2. Enter the **API key** found in Step 1.
3. Click on "**Save & Test**"

***

## <mark style="background-color:blue;">Prebuilt reports</mark>

* **partnerships\_history**: Contains details about advertiser-publisher partnerships, including affiliate profiles, programs, tracking, and status information.
* **commissions**: Records performance metrics for partnerships such as clicks, conversions, commissions, impressions, and revenue by date and affiliate profile.

***

<a href="https://dbdiagram.io/e/682704361227bdcb4e9c9d5b/6827045e1227bdcb4e9ca579" class="button primary" data-icon="table-tree">Prebuilt reports and definition</a>


# Awin

Follow our setup guide to connect Awin to QUANTI:

<a href="https://dbdiagram.io/e/682706f31227bdcb4e9d14aa/682707e41227bdcb4e9d3d4d" class="button primary" data-icon="table-tree">Prebuilt reports and definition</a>

***

## <mark style="background-color:blue;">Prerequisites</mark>

To connect Awin to QUANTI, you need an [Awin](https://www.awin.com/fr?utm_source=quanti.io\&utm_medium=partnership) account with API access.

***

## <mark style="background-color:blue;">Setup instructions</mark>

### Find API token

1. Log in to your [Awin account](https://www.awin.com/fr?utm_source=quanti.io\&utm_medium=partnership\&utm_campaign=awin_connector).
2. In the top-right corner, click your profile name, then select API Credentials.\ <br>

   <figure><img src="https://1847929239-files.gitbook.io/~/files/v0/b/gitbook-x-prod.appspot.com/o/spaces%2FoRN0sxIyI0UJdSqkwdBu%2Fuploads%2Fgit-blob-f854a471f8cf66a2d67ca64a1f2b9c08f68a228d%2Fawin1.png?alt=media" alt="Access path to API key on Awin interface" width="327"><figcaption><p>Access path to API key on Awin interface</p></figcaption></figure>
3. In the **Password** field, enter your login password.
4. Click on "**Show my API token**"\ <br>

   <figure><img src="https://1847929239-files.gitbook.io/~/files/v0/b/gitbook-x-prod.appspot.com/o/spaces%2FoRN0sxIyI0UJdSqkwdBu%2Fuploads%2Fgit-blob-50b2a9c504377a85aeb6cc0f4e9cf1a7010aacab%2Fawin2.png?alt=media" alt=""><figcaption></figcaption></figure>
5. Keep and save your API token. It'll be needed to configure your connector in QUANTI:

### Find Advertiser ID

1. In the top-right corner, when you hover Dashboard tab, you can see the list of your accounts
2. Numbers between brackets are your advertiser IDs needed.\ <br>

   <figure><img src="https://1847929239-files.gitbook.io/~/files/v0/b/gitbook-x-prod.appspot.com/o/spaces%2FoRN0sxIyI0UJdSqkwdBu%2Fuploads%2Fgit-blob-bff8d6d617429cd22d0fab0690e3c031367b6efa%2Fawin3.png?alt=media" alt="Access path to find Advertiser ID"><figcaption><p>Access path to find Advertiser ID</p></figcaption></figure>
3. Make sure to keep the **Advertiser ID** safe, as it’s required to set up your connector in QUANTI:.

### Finish Quanti: configuration

1. In the connector setup form, enter the name of your choice.
2. Enter the API token you found in Step 1.
3. Enter your advertiser IDs you found in Step 2. You can add all of your ids seperated by commas.
4. Click Save & Test. Quanti: will take it from here and sync your Awin data.

***

## <mark style="background-color:blue;">Prebuilt reports</mark>

* **transactions\_import :** Detailed transaction records with commission and sale data.
* **stats\_by\_creative\_import :** Statistics summarized by creative assets.
* **stats\_by\_publisher\_import :** Statistics summarized by publisher.

***

<a href="https://dbdiagram.io/e/682706f31227bdcb4e9d14aa/682707e41227bdcb4e9d3d4d" class="button primary" data-icon="table-tree">Prebuilt reports and definition</a>


# Brevo

Follow our setup guide to connect Brevo to QUANTI:

<a href="https://dbdiagram.io/e/694c1666b8f7d8688612560d/694c1685b8f7d86886125905" class="button primary" data-icon="table-tree">Prebuilt reports and definition</a>

***

## Prerequisites

To connect Brevo to QUANTI, you need:

* An active [Brevo](https://app.brevo.com) account
* At least one email campaign created

***

## Setup instructions

{% stepper %}
{% step %}

#### Generate an API key

* In Brevo, go to **Settings** > **SMTP & API** > **API Keys & MCP**
* Click **Generate API Key**
* Enter a distinctive name (e.g. "QUANTI Integration") and select **No expiration**
* Click **Generate**
* Copy the value shown in the **API key** field — this is the only time it will be displayed

{% hint style="warning" %}
Do not enable the **Create MCP server API key** toggle. QUANTI requires a standard API key, not an MCP key.
{% endhint %}
{% endstep %}

{% step %}

#### Connect to QUANTI

* In QUANTI, click **Connect to Brevo**
* Paste your API key in the authentication field
* Click **Validate** to confirm the connection
  {% endstep %}

{% step %}

#### Connector information

* **Connector Name**: Name your connector. It must be unique.
* **Dataset ID**: Define the ID of the dataset. It must not exist yet, as it will be created and data will be sent there.
  {% endstep %}

{% step %}

#### Select prebuilt reports

Review the available prebuilt reports and select the ones you want to activate.
{% endstep %}
{% endstepper %}

***

## Prebuilt reports

* **campaigns**: Email campaign dimensions — configuration, sender details, A/B testing setup, and UTM parameters.
* **campaign\_stats**: Global aggregated performance metrics per campaign (all lists combined).
* **campaign\_lists\_stats**: Campaign performance broken down by recipient list.
* **contact\_lists**: Metadata about contact lists — names, folder organization, and list type.
* **contacts**: Individual contacts with email addresses, subscription status, list memberships, and custom attributes.

***

<a href="https://dbdiagram.io/e/694c1666b8f7d8688612560d/694c1685b8f7d86886125905" class="button primary" data-icon="table-tree">Prebuilt reports and definition</a>

***

## Historical data limitation

{% hint style="warning" %}
**`campaign_stats` only covers the last 6 months of data.**

This is an API-level constraint from Brevo: the list campaigns endpoint does not return statistics for events older than 6 months. Campaigns sent before that window will show `NULL` or `0` for all performance metrics — views, clicks, unsubscribes, bounces, etc. — regardless of their actual performance.

**If you need data beyond 6 months, use `campaign_lists_stats` instead.** This table fetches statistics per campaign individually via a dedicated Brevo endpoint, which is not subject to the 6-month restriction and provides full historical coverage.
{% endhint %}

***

## Notes

* **Rate limits**: Brevo enforces a limit of 600 requests per 10 minutes. QUANTI manages this automatically.
* **Incremental sync**: The `contacts` table uses incremental sync — only contacts modified since the last sync are fetched.
* **A/B testing**: Campaign dimensions include full A/B test configuration (subjects, split rule, winner criteria).
* **Custom attributes**: Contact attributes vary by account and are stored as JSON.
* **`deferred` metric**: Only available in `campaign_lists_stats`, not in `campaign_stats`.
* **Deprecated fields**: `totalBlacklisted`, `totalSubscribers`, and `uniqueSubscribers` are deprecated by Brevo and not collected.
* **`clickers` vs `clicks`**: The Brevo API exposes `clickers` (number of unique individuals who clicked at least once) and `unique_clicks` (total unique click count). There is no field named `clicks` in the API response — if you observe a `clicks` column returning `NULL` in your warehouse, it is an unmapped field. Refer to `clickers` or `unique_clicks` depending on the metric you need.
* **Deduplication**: If you use `campaign_stats` or `campaign_lists_stats` in a dashboard or aggregated model, filter on the most recent `_quanti_process_id` to avoid counting duplicate rows from multiple syncs on the same day.


# CJ

Follow our setup guide to connect CJ to QUANTI:

<a href="https://dbdiagram.io/e/68270cd31227bdcb4e9e10aa/68270d411227bdcb4e9e225d" class="button primary" data-icon="table-tree">Prebuilt reports and definition</a>

***

## <mark style="background-color:blue;">Prerequisites</mark>

To connect CJ to QUANTI, you need an [CJ](https://www.cj.com/?utm_source=quanti.io\&utm_medium=partnership) account.

***

## <mark style="background-color:blue;">Setup instructions</mark>

### Find Advertiser ID

1. Log in to your [CJ account](https://signin.cj.com/login).
2. In the top-right corner, you can click on a multi-selection field which permit you to pick your different accounts. The advertiser IDs are the CID near each account name.\ <br>

   <figure><img src="https://1847929239-files.gitbook.io/~/files/v0/b/gitbook-x-prod.appspot.com/o/spaces%2FoRN0sxIyI0UJdSqkwdBu%2Fuploads%2Fgit-blob-2020b11c6960934d1f7db643d974799521bf3978%2Fcj1.png?alt=media" alt="Access path to find advertiser ID" width="302"><figcaption><p>Access path to find advertiser ID</p></figcaption></figure>
3. Make a note of the advertiser ID. You will need it to configure QUANTI:.
4. N.B : With the CJ connector, you will can recover datas from only one advertiser. You have to create several connector if you have several advertiser accounts.

### Find Token

1. To recover the token needed, no other way that to request it to your account manager.
2. Make a note of the API token. You will need it to configure QUANTI:.

### Finish Quanti: configuration

1. In the connector setup form, enter the name of your choice.
2. Enter the advertiser ID you found in Step 1.
3. Enter the token you found in Step 2.
4. Click Save & Test. Quanti: will take it from here and sync your CJ data.

***

## <mark style="background-color:blue;">Prebuilt reports</mark>

* orders : Conversions tables

***

<a href="https://dbdiagram.io/e/68270cd31227bdcb4e9e10aa/68270d411227bdcb4e9e225d" class="button primary" data-icon="table-tree">Prebuilt reports and definition</a>


# Criteo

Follow our setup guide to connect Criteo to QUANTI:

<a href="https://dbdiagram.io/e/67aa0d57263d6cf9a0a4115e/67aa17c7263d6cf9a0a58734" class="button primary" data-icon="table-tree">Prebuilt reports and definition</a>

***

## <mark style="background-color:blue;">Prerequisites</mark>

To connect Criteo to Quanti:, you need to access a [Criteo](https://marketing.criteo.com/) account.

#### Find Client ID and Client Secret <a href="#findclientidandclientsecret" id="findclientidandclientsecret"></a>

1. Log in to your [Criteo account](https://www.criteo.com/login/).
2. [Create your organization](https://developers.criteo.com/retail-media/docs/create-your-organization).
3. Click **Create a new app** to create an app.
4. Select an **Authentication Method**.

   > NOTE: This selection can not be changed once submitted.
5. Choose the **Service**.

   > NOTE: This selection can not be changed once submitted.
6. In the **Authorization** section, set every domain option to Read access level or above. Click **Save**.

   > NOTE: Each domain requires a minimum of Read access for the connection to succeed. This selection can not be changed once submitted.
7. Scroll to the middle of the page and click **Create API key**.

   > NOTE: The file with the Client ID and Client Secret will *only be* loaded *once*. You will need them to configure Fivetran. Download and save the file.
8. Click the Copy button to copy the link. You need to send the link to your account administrator.
9. Call the portfolio endpoint with your credentials to confirm that you can now access the accounts.
10. (Optional) (For advertisers, brands, or publishers) Click the shared link and choose **Portfolio access**.

    > NOTE: For more information, see Criteo's [Onboarding Checklist](https://developers.criteo.com/marketing-solutions/docs/onboarding-checklist) and [Authorization requests](https://developers.criteo.com/retail-media/docs/authorization-requests) documentation.

***

## <mark style="background-color:blue;">Setup instructions</mark>

* Connector information
  1. Name your connector
     1. Connector Name : Name your connector. It must be unique.
     2. Dataset ID : Define the ID of the dataset. It must not exist yet, as it will be created and data will be sent there.
  2. Connector information
     1. Client ID and Client secret retrieved following the steps above.
     2. Select the currency code using the Currency drop-down menu.
     3. Select the Report Timezone.
  3. Advertiser ID(s)
     1. Click on + Add an advertiser and select one or those what you wxant to sync.
* Select queries: You can select pre-built queries that you want to sync.

***

## <mark style="background-color:blue;">Prebuilt reports</mark>

* AdSet Stats Report : Advertising performance at adset level (**Impressions, Clicks, Spend**)
* AdSet Transactions Report : Conversion performance at adset level (**Transaction ID, amount**)

***

<a href="https://dbdiagram.io/e/682704361227bdcb4e9c9d5b/6827045e1227bdcb4e9ca579" class="button primary" data-icon="table-tree">Prebuilt reports and definition</a>


# Effinity

Follow our setup guide to connect Effinity to QUANTI:

<a href="https://dbdiagram.io/e/65577c543be149578735ccf9/65cf2b18ac844320ae4a3ed6" class="button primary" data-icon="table-tree">Prebuilt reports and definition</a>

***

## <mark style="background-color:blue;">Prerequisites</mark>

To connect Effinity to QUANTI, you need an [Effinity](https://www.effinity.fr/?utm_source=quanti.io\&utm_medium=partnership\&utm_campaign=effinity_data_connector) account.

***

## <mark style="background-color:blue;">Setup instructions</mark>

### Find API key

1. Log in to your [Effinity account](https://sso.effinity.fr/auth/sign/affilieur?lg=fr).
2. In the top-right corner, in account parameters, you can find the API Key.
3. You can also request it directly to your account manager.
4. **Important: Keep Your API Key Secure.** You will need it for the configuration in QUANTI.

### Finish Quanti: configuration

1. Enter the API key from Step 1. You can add multiple keys if needed.
2. Enter the name of your choice.
3. Select the queries you want to sync.
4. Click Save. Quanti: will take it from here and sync your Effinity data.

***

## <mark style="background-color:blue;">Prebuilt reports</mark>

* Performances : Aggregated daily performance metrics.

***

<a href="https://dbdiagram.io/e/65577c543be149578735ccf9/65cf2b18ac844320ae4a3ed6" class="button primary" data-icon="table-tree">Prebuilt reports and definition</a>


# Facebook Organic

Follow our setup guide to connect Facebook Organic to QUANTI:

<a href="https://dbdiagram.io/e/6943dbc1e4bb1dd3a98c5af8/6944301ee4bb1dd3a9961b6b" class="button primary" data-icon="table-tree">Prebuilt reports and definition</a>

***

## Prerequisites

Before connecting Facebook Organic to QUANTI, ensure you have:

* **Facebook Page Access**: Administrator or Editor access to the Facebook Page(s) you want to connect
* **Facebook Business Account**: A Facebook Business account linked to your Page(s)
* **Active Facebook Page**: Your Page must have published content to retrieve insights

***

## Setup Instructions

{% stepper %}
{% step %}

#### Authorize Facebook Connection

* Click on **Connect to Facebook**
* You will be redirected to Facebook's authorization page
* Log in with your Facebook account credentials
* Review and accept the requested permissions:
* Click **Continue** to grant access
  {% endstep %}

{% step %}

#### **Connector Information**

* **Connector Name**: Define a unique name for your connector
* **Dataset ID**: Specify the BigQuery dataset ID where tables will be created
  * The dataset will be created automatically if it doesn't exist
* Click **Next**
  {% endstep %}

{% step %}

#### Select Facebook Page(s)

* After authorization, you'll see a list of your Facebook Pages
* Select the Page(s) you want to connect to QUANTI
* You can select multiple Pages to track organic content from different sources
* Click **Next**
  {% endstep %}

{% step %}

#### Select Prebuilt reports

* Review the available Prebuilt reports (see section below for details)
* All tables are selected by default - you can deselect tables you don't need
* Recommended: Keep all tables enabled for complete organic performance tracking
* Click **Next**
  {% endstep %}

{% step %}

#### **Finish setup**

* Define a sync period and a lookback window - Click save
* For the first sync, you have the following options:
  * Activate auto-sync for recurring syncs based on your sync settings by clicking the switch button
  * Launch a historical data recovery by choosing your desired dates in the historical data tab
  * Launch a manual sync immediately by clicking the Sync now button
* Wait for the sync to complete. Then navigate to your data warehouse to verify that tables are populated
* Check the connector dashboard for sync status and any potential errors
  {% endstep %}
  {% endstepper %}

***

## Prebuilt reports

* **Lifetime\_page\_info** : Basic information about Facebook Pages including page ID, name, category, and follower metrics.
* **Page\_posts** : Posts published on Facebook Pages with message content, creation time, and permalink.
* **Daily\_page\_insights** : Daily aggregated insights metrics for Facebook Pages including impressions, reach, and engagement.
* **Daily\_post\_insights** : Lifetime engagement metrics for individual posts including reach, clicks, reactions, and activity breakdown.
* **Daily\_page\_views** : Daily page views metrics tracking total visits to the Facebook Page.
* **Lifetime\_video\_insights** : Lifetime performance metrics for video posts including plays, watch time, replays, reactions, and social actions (cumulative data, not daily).

***

<a href="https://dbdiagram.io/e/6943dbc1e4bb1dd3a98c5af8/6944301ee4bb1dd3a9961b6b" class="button primary" data-icon="table-tree">Prebuilt reports and definition</a>

***

## Notes

* **Data Refresh**: Facebook Organic data is typically updated once per day
* **Historical Limitations**: Facebook's API has limitations on historical data retrieval. Some metrics may only be available for the last 90 days
* **Lifetime vs Daily Metrics**: Note that video insights and post insights are lifetime/cumulative metrics, while page insights are aggregated daily
* **JSON Fields**: Some fields (reactions, activities) are stored as JSON strings for flexible analysis
* **API Rate Limits**: Facebook enforces rate limits on API requests. QUANTI automatically manages these limits to ensure reliable data extraction
* **Video Detection**: Only posts identified as video content will appear in the `lifetime_video_insights` table

***

## Troubleshooting

<details>

<summary>Connection Issues</summary>

* Verify that your Facebook Business account has proper permissions
* Ensure your Page is not restricted or deactivated
* Check that API permissions haven't been revoked

</details>

<details>

<summary>Missing Data</summary>

* Some metrics may not be available for all post types
* Historical data older than 90 days may be limited
* Private or unpublished posts won't be included

</details>

<details>

<summary>Need Help?</summary>

Contact QUANTI support at <support@quanti.io> or consult our comprehensive documentation at <https://docs.quanti.io>

</details>


# Google Ad Manager

Follow our setup guide to connect Google Ad Manager to QUANTI.

<a href="https://dbdiagram.io/e/6a427a9c36d348d120298fc8/6a427abe36d348d12029926f" class="button primary" data-icon="table-tree">Prebuilt reports and definition</a>

{% hint style="info" %}
This connector is currently in **beta**. The Google Ad Manager REST API is itself in Open Beta — breaking changes may occur. Monitor the [release notes](https://developers.google.com/ad-manager/api/beta/docs/release-notes) before upgrading.
{% endhint %}

***

## Prerequisites

Before connecting Google Ad Manager to QUANTI, ensure you have:

* An active Google Ad Manager account (standard or 360)
* **Administrator** or **Ad Manager** role on the network
* API access enabled in GAM: **Admin** > **Global settings** > **Network settings** > enable **API access**

***

## Setup instructions

{% stepper %}
{% step %}

#### Connect your Google account

Click **Continue with Google** and authorize QUANTI to access your Ad Manager data. QUANTI requests the `admanager` OAuth scope, which covers both read operations and the report generation endpoint.
{% endstep %}

{% step %}

#### Select your network

QUANTI lists all Ad Manager networks accessible from your Google account. Select the network you want to sync. Each network syncs into its own dataset.
{% endstep %}

{% step %}

#### Select prebuilt reports

Choose which tables to activate. All 7 reports are selected by default. You can deselect tables you don't need.
{% endstep %}

{% step %}

#### Connector information

* **Connector Name**: Give your connector a unique name
* **Dataset ID**: The dataset will be created automatically, named `googleadmanager_{networkCode}`
* **Sync frequency**: Daily (default), weekly, or monthly
* **Lookback window**: 7 days by default (up to 30)
* **Historical data**: Up to 95 days back via the historical sync tab
  {% endstep %}
  {% endstepper %}

***

## Prebuilt reports

### Dimensions (reference tables)

* **network**: Configuration and settings of the Ad Manager network — network code, display name, property code, timezone, primary and secondary currencies, root ad unit, test network flag.
* **company**: Directory of advertisers and agencies — company ID, name, type (`ADVERTISER`, `AGENCY`, `HOUSE_ADVERTISER`…), external ID, contact details, last update timestamp.
* **ad\_unit**: Inventory hierarchy — ad unit ID, name, serving code, parent ad unit ID (for tree reconstruction), status (`ACTIVE`, `INACTIVE`, `ARCHIVED`), target window, sizes (JSON), last update timestamp. Historized with SCD2 on `update_time`.
* **placement**: Placement groups and their targeted ad units — placement ID, name, serving code, status, list of targeted ad unit resource names (JSON), last update timestamp. Historized with SCD2 on `update_time`.
* **order**: Trafficking orders — order ID, name, status (`DRAFT`, `PENDING_APPROVAL`, `APPROVED`, `PAUSED`, `CANCELED`, `ARCHIVED`), start/end dates, advertiser ID, agency ID, trafficker ID, total budget, purchase order number, creation timestamp. Historized with SCD2 on `update_time`.
* **line\_item**: Line item delivery settings — line item ID, parent order ID, name, type (`SPONSORSHIP`, `STANDARD`, `NETWORK`, `PRICE_PRIORITY`, `HOUSE`…), status, start/end dates, cost type (CPM, CPC, CPD…), cost per unit (JSON, Google Money format), contracted volume, serving priority, creative rotation, pacing strategy, targeting rules (JSON). Historized with SCD2 on `update_time`.

### Metrics

* **delivery\_stats**: Daily ad serving performance by ad unit — impressions, clicks, CTR, revenue, and average eCPM across all traffic sources (Ad Server, AdSense, Ad Exchange). Granularity: one row per `date × ad_unit_id`. Refreshed with `delete_insert` on the synced date range.

***

<a href="https://dbdiagram.io/e/6a427a9c36d348d120298fc8/6a427abe36d348d12029926f" class="button primary" data-icon="table-tree">Prebuilt reports and definition</a>

***

## Notes

* **Rate limits**: Ad Manager standard networks are limited to 2 requests/second; Ad Manager 360 networks to 8 requests/second. QUANTI manages backoff automatically.
* **Historical data**: Maximum 95 days per historical sync run. For longer histories, run multiple historical syncs with different date ranges.
* **Lookback window**: Default 7 days. Increase to 30 days if your ad server has late-reporting traffic sources (AdSense, Ad Exchange).
* **JSON fields**: The following columns are stored as JSON strings and must be parsed in BigQuery: `ad_unit_sizes`, `targeted_ad_units`, `targeting`, `cost_per_unit`. To extract the cost per unit value: `CAST(JSON_VALUE(cost_per_unit, '$.units') AS FLOAT64) + CAST(JSON_VALUE(cost_per_unit, '$.nanos') AS FLOAT64) / 1e9`.
* **Ad unit hierarchy**: `ad_unit` is a tree structure (2–5 levels). Reconstruct the full path using recursive CTEs on `parent_ad_unit_id`.
* **SCD2 dimensions**: `ad_unit`, `placement`, `order`, and `line_item` are historized — each modification creates a new row. To get the current state, filter on the latest `update_time` per entity ID.
* **Reporting**: `delivery_stats` uses the asynchronous GAM Reporting API. The report is generated server-side and fetched once ready. This may add a few minutes to the sync time for large networks.


# Google Ads

Follow our setup guide to connect Google Ads to QUANTI:

<a href="https://dbdiagram.io/e/67a6375d263d6cf9a069bf46/67a63980263d6cf9a069f135" class="button primary" data-icon="table-tree">Prebuilt reports and definition</a>

***

## Prerequisites

Before connecting Google Ads to QUANTI, ensure you have:

* **Google Ads Account Access**: You need access to a [Google Ads](https://ads.google.com/) account with appropriate permissions
* **Customer ID**: Your Google Ads customer ID (found in the upper right corner of your Google Ads interface)
* **Admin or Standard Access**: Sufficient permissions to authorize third-party applications

### Find Your Customer ID

{% stepper %}
{% step %}
Log in to your [Google Ads account](https://ads.google.com/nav/login)
{% endstep %}

{% step %}
In the top right corner of your account, you'll see a 10-digit number (format: XXX-XXX-XXXX)
{% endstep %}

{% step %}
This is your Google Ads Customer ID - note it down for the setup process
{% endstep %}
{% endstepper %}

<figure><img src="https://content.gitbook.com/content/oRN0sxIyI0UJdSqkwdBu/blobs/Iy2r5vX6WEgbcG2J0JFd/image.png" alt="Google Ads Customer ID location"><figcaption></figcaption></figure>

***

## Setup Instructions

{% stepper %}
{% step %}
**Authorize Google Connection**

* Click on **Connect to Google Ads**
* You will be redirected to Google's authorization page
* Log in with your Google account credentials
* Review and accept the requested permissions to allow QUANTI to access your Google Ads data
* Click **Allow** to grant access
  {% endstep %}

{% step %}
**Configure Connector**

* **Connector Name**: Enter a unique name for this connector (e.g., "Google Ads - Brand Campaign")
* **Dataset ID**: Define the BigQuery dataset ID where data will be stored (will be created automatically if it doesn't exist)
* **Customer ID**: Enter your Google Ads Customer ID (10-digit number without hyphens)
  {% endstep %}

{% step %}
**Select Accounts**

* Review the list of Google Ads accounts accessible with your credentials
* Select the account(s) you want to synchronize
* You can connect multiple accounts by creating separate connectors
* Click **Next**
  {% endstep %}

{% step %}
**Select Pre-built reports**

* Review the available pre-built reports (see section below for details)
* All reports are selected by default - you can deselect any you don't need
* Recommended: Keep all reports enabled for comprehensive campaign analysis
* Click **Next**
  {% endstep %}

{% step %}
**Create reports**

Select the pre-built reports you want to activate, and/or create your own custom reports. To help you configure custom reports, refer to the **Custom reports** chapter below.
{% endstep %}

{% step %}
**Finish Setup**

* Define a sync period and lookback window
* For the first sync, you have the following options:
  * Activate auto-sync for recurring syncs based on your sync settings by clicking the switch button
  * Launch a historical data recovery by choosing your desired dates in the historical data tab
  * Launch a manual sync immediately by clicking the **Sync now** button
* Wait for the sync to complete, then navigate to your data warehouse to verify that tables are populated
* Check the connector dashboard for sync status and any potential errors
  {% endstep %}
  {% endstepper %}

***

## Pre-built reports

#### Dimension Tables

These tables track the historical evolution of your Google Ads account structure and configuration. They enable audit trails and analysis of how settings changes impact performance over time.

* **Account History**: Account-level configuration and settings including currency, time zone, auto-tagging status, optimization score, and manager account relationships. Tracks whether the account is a test account, payment eligibility status, and URL tracking templates. Essential for multi-account management and configuration audit trails.
* **Campaign History**: Campaign configuration history including status (enabled, paused, removed), serving status, campaign dates, advertising channel type (Search, Display, Video, Shopping, etc.), channel subtypes, optimization scores, experiment settings, payment modes, URL tracking templates, frequency caps, and video brand safety settings. Enables analysis of campaign evolution and A/B test tracking.
* **Ad Group History**: Ad group configuration including status, type (search standard, display standard, etc.), ad rotation mode, optimized targeting settings, display custom bid dimensions, targeting restrictions, URL tracking templates, and experiment base ad group relationships. Tracks how ad group settings change over time for optimization analysis.
* **Ad History**: Individual ad creative history including ad type (text ad, responsive search ad, etc.), status, policy approval and review status, action items for compliance, system-managed ad indicators, device preferences, display URLs, final URLs (desktop, mobile, app), URL suffixes, tracking templates, and URL collections. Critical for creative performance analysis and policy compliance monitoring.
* **Campaign Change History**: Campaign-level change events from the Google Ads change history API. Records every modification made to campaigns — budget changes, bidding strategy updates, target CPA/ROAS adjustments, status changes. Each row includes the operation type (ADD, SET, REMOVE), the list of changed fields, the old and new resource states (as JSON), and the user or client type that made the change. Enables correlation between campaign configuration changes and performance metrics.
* **Ad Group Change History**: Ad group-level change events from the Google Ads change history API. Records every modification made to ad groups — bid changes, status updates, targeting modifications, CPC bid adjustments. Same structure as Campaign Change History with campaign and ad group identifiers. Enables correlation between ad group configuration changes and performance metrics.
* **Ad Change History**: Ad-level change events from the Google Ads change history API. Records every modification made to ads — creative updates, status changes, policy review updates, URL changes. Most granular of the three change history tables, adding `ad_id` to the composite key. Critical for tracking creative iteration and correlating creative changes with performance shifts.
* **Criterion**: Targeting criteria at ad group level including keywords, audiences, placements, topics, and other targeting methods. Contains detailed criterion configuration including type, text, match type (for keywords), bid adjustments, status, quality scores, final URLs, tracking templates, and user list information. Essential for understanding what triggers ad delivery and for optimizing targeting strategies.
* **Shopping Product**: Shopping product catalog with eligibility status and issues tracking. Includes item ID, Merchant Center account, channel (online/local), language, status (eligible, not eligible), title, brand, Google taxonomy categories (up to 5 levels), merchant-defined product types, condition, and custom attributes (0–4). Useful for identifying product issues and optimization opportunities. ⚠️ Large dimension table — use date-filtered queries and avoid MERGE on the full table.

#### Metric Tables

These are the essential performance tables providing daily metrics at different aggregation levels. They form the foundation for standard campaign performance analysis.

* **Ad Stats**: Daily ad-level advertising performance metrics including impressions, clicks, cost (in micros), conversions, conversion value, interactions, view-through conversions, and Active View metrics (viewable impressions, measurability, viewability percentages). Segmented by device type (desktop, mobile, tablet) and ad network type (Search, Display, YouTube). Essential for analyzing individual ad creative performance and device/network breakdowns. Includes interaction event types to understand engagement patterns.
* **Ad Conversions**: Daily ad-level conversion data broken down by conversion action type. Contains conversion action resource name, category (purchase, lead, signup, etc.), action name, conversion counts, conversion values, all conversions (including cross-device), and view-through conversions. Uses Google Ads platform attribution (default 30-day post-click). Critical for understanding which ads drive specific conversion types and calculating ROI by conversion action. Enables analysis of both online conversion events from Google Ads tags and offline conversions uploaded via offline events.
* **Campaign Stats**: Daily campaign-level performance metrics aggregated across all ad groups and ads. Includes impressions, clicks, cost, conversions, conversion value, interactions, view-through conversions, and Active View metrics. Segmented by device and ad network type. Provides high-level campaign performance overview for quick analysis of campaign delivery, spend tracking, and year-over-year comparisons. Ideal for executive dashboards and campaign-level budget management.
* **Campaign Conversions**: Daily campaign-level conversion metrics broken down by conversion action. Contains the same conversion action details as ad conversions (action name, category, counts, values) but aggregated at campaign level. Enables quick comparison of which campaigns drive the most valuable conversion actions and ROI analysis by campaign. Useful for budget allocation decisions based on conversion performance rather than just clicks or impressions.
* **Search Term Stats**: Actual user search queries that triggered your ads. Contains the exact search terms (not just matched keywords), match type that was used, search term status (added as keyword, excluded, or none), impressions, clicks, cost, conversions, CTR, average CPC, conversion rates, position metrics (absolute top and top impression percentages), and view-through conversions. Critical for search query mining, negative keyword discovery, and understanding user intent vs keyword targeting.
* **Audience Stats**: Performance metrics segmented by audience targeting. Includes audience resource names, user list details, criterion IDs, combined audience information, custom affinity/intent audiences, demographic segments (age, gender, income, parental status), and standard performance metrics. Enables analysis of which audience segments drive the best results and ROI by demographic or behavior-based targeting.
* **Keyword Stats**: Comprehensive keyword-level performance including the keyword text, match type (broad, phrase, exact), approval status, quality score components (quality score, ad relevance, landing page experience, expected CTR), first page CPC estimates, top of page CPC estimates, historical quality scores, search impression share metrics, budget lost impression shares, rank lost impression shares, absolute top impression percentage, top impression percentage, and all standard performance metrics. Essential for keyword optimization, bid management, and quality score improvement.
* **Age Range Stats**: Daily performance metrics broken down by age range targeting (18–24, 25–34, 35–44, 45–54, 55–64, 65+, undetermined) at ad group level. Includes impressions, clicks, cost (micros), conversions, and conversion value. Useful for optimizing bid adjustments and budget allocation across age demographics.
* **Gender Stats**: Daily performance metrics broken down by gender targeting (male, female, undetermined) at ad group level. Includes impressions, clicks, cost (micros), conversions, and conversion value. Enables analysis of gender-based performance differences to refine targeting strategies.
* **Landing Page View**: Daily landing page performance metrics segmented by URL, device, and ad network type. Includes standard traffic metrics (impressions, clicks, cost, conversions) alongside page quality indicators: mobile speed score (1–100), percentage of clicks on mobile-friendly pages, and percentage of clicks on valid AMP pages. Useful for identifying underperforming landing pages and prioritizing UX improvements.
* **Product Group View**: Daily performance metrics for product listing groups in Shopping campaigns. Segmented by campaign, ad group, criterion, and listing group type (subdivision or unit). Includes impressions, clicks, cost (micros), conversions, conversion value, all conversions, CTR, and average CPC. Useful for optimizing product group bids and Shopping campaign structure.
* **Asset Group Product Group View**: Daily performance metrics for product targeting within Performance Max campaigns, at the asset group and listing group filter level. Includes impressions, clicks, cost (micros), conversions, conversion value, and all conversions. Enables granular analysis of which product groups perform best within PMax asset groups.
* **Shopping Performance View**: Shopping campaign performance metrics aggregated at product level. Includes product attributes (item ID, title, brand, category, custom labels, condition, channel, language, country) alongside standard performance metrics (impressions, clicks, cost, conversions, conversion value, all conversions). Essential for identifying top-performing products and optimizing product feed and bidding strategies.

***

<a href="https://dbdiagram.io/e/67a6375d263d6cf9a069bf46/67a63980263d6cf9a069f135" class="button primary" data-icon="table-tree">Prebuilt reports and definition</a>

***

## Custom reports

{% stepper %}
{% step %}
**Retrieve your field names from the Google Ads Query Language Explorer**

The easiest way to identify the field names and report types expected by the Google Ads API is to use the [**Google Ads Query Builder**](https://developers.google.com/google-ads/api/docs/developer-toolkit/gaa-query-builder).

This tool is the official Google reference for building API queries. It lets you:

* Browse all available **report types** (called *resources* in the Google Ads API), such as `campaign`, `ad_group`, `search_term_view`, `keyword_view`, `shopping_performance_view`, etc.
* Explore the **fields**, **metrics**, and **segments** available for each resource, along with their exact API names
* Check **field compatibility** — the explorer highlights which fields can be combined in the same query
* Generate a complete **GAQL query** that you can use as a reference to fill in your QUANTI JSON configuration

**How to use it:**

1. Go to [developers.google.com/google-ads/api/docs/developer-toolkit/gaa-query-builder](https://developers.google.com/google-ads/api/docs/developer-toolkit/gaa-query-builder)
2. Select a **resource** from the left panel (e.g., `campaign` for campaign-level data, `ad_group_ad` for ad-level data)
3. Browse the available fields and tick those you want to retrieve — the explorer will warn you if two fields are incompatible
4. Note down:
   * The **resource name** → this will populate the `report` field in your JSON
   * The **selected field names** (in `resource.field_name` format) → these will populate the `fields` value in your JSON
   * Any **filter or sort** conditions you wish to apply

{% hint style="info" %}
Field names follow the `resource.attribute` format. For example, for the `campaign` resource: `campaign.name`, `campaign.status`, `metrics.impressions`, `metrics.clicks`, `metrics.cost_micros`, `segments.date`.
{% endhint %}
{% endstep %}

{% step %}
**Configure the custom report query**

In QUANTI, at the **Create reports** step, click **Add custom report**. A pop-in opens with two steps: **Query** and **Schema**.

In the **Query** step:

* Give your report a name in the **Query name** field — this name will become the table name in your data warehouse

{% hint style="danger" %}
The name chosen for your custom report is the one that names your table in the data warehouse.
{% endhint %}

* Fill in the **Query configuration (JSON)** with the following structure:

```json
{
  "report": "",
  "fields": "",
  "filters": [],
  "sorts": []
}
```

* **`report`** *(required)*: The Google Ads API resource name as identified in the GAQL explorer (e.g., `"campaign"`, `"ad_group_ad"`, `"search_term_view"`).
* **`fields`** *(required)*: A comma-separated string of field names copied from the GAQL explorer.\
  Example: `"fields": "campaign.id, campaign.name, metrics.impressions, metrics.clicks, metrics.cost_micros, segments.date"`
* **`filters`** *(optional)*: An array of filter conditions to restrict the data returned. Each filter is an object with `field`, `operator`, and `value`.\
  Example: `"filters": [{"field": "campaign.status", "operator": "EQUALS", "value": "ENABLED"}]`\
  Can be left as an empty array `[]` if no filter is needed.
* **`sorts`** *(optional)*: An array of sort conditions. Each sort is an object with `field` and `order` (`ASC` or `DESC`).\
  Example: `"sorts": [{"field": "metrics.impressions", "order": "DESC"}]`\
  Can be left as an empty array `[]`.

Once your JSON is filled in, click **Next**.
{% endstep %}

{% step %}
**Map your fields (Schema)**

The second step of the pop-in is the **Schema** mapping. QUANTI infers the type of each field and displays them in a table.

For each field, you can:

* Adjust the **Type** (STRING, INTEGER, FLOAT, etc.)
* Check **Unique identifiers** to mark the field as part of the primary key — this should include all dimension fields of your report (e.g., `campaign.id`, `ad_group.id`, `segments.date`), as they collectively form the unique identifier of each row
* Check **Metric** to flag a field as a numeric metric

Once all fields are correctly mapped, click **Save** to create the custom report table.
{% endstep %}
{% endstepper %}

***

## Troubleshooting

<details>

<summary>Connection Issues</summary>

* Verify that your Google account has proper permissions for the Google Ads account
* Check that the Customer ID is entered correctly (10 digits, no hyphens)
* Ensure your account is not suspended or restricted
* Try disconnecting and reconnecting the Google authorization

</details>

<details>

<summary>Missing Data</summary>

* Some metrics may not be available for all campaign types (e.g., Quality Score only applies to Search campaigns)
* Historical data older than 2 years may not be available
* Removed campaigns, ad groups, or ads may not appear in history tables depending on sync settings
* Draft or experiment data may have limited availability

</details>

<details>

<summary>Need Help?</summary>

Contact QUANTI support at <support@quanti.io> or consult our comprehensive documentation at [https://docs.quanti.io](https://docs.quanti.io/)

</details>


# FAQ

## Why is Auction Insights data not available?

The Auction Insights report lets you compare your performance against other advertisers competing in the same auctions. It exposes six metrics: Impression Share, Overlap Rate, Position Above Rate, Top of Page Rate, Absolute Top of Page Rate, and Outranking Share.

These metrics exist in the Google Ads API (`metrics.auction_insight_search_*`), but access is restricted to accounts explicitly approved by Google through an allowlisting programme. This programme is currently closed — Google is no longer accepting new requests, including through a Google representative. This has been confirmed by the Google Ads API team in public exchanges on the official developer forum (June 2025).

**Source**: [Google Ads API Forum — Feature Request Auction Insights](https://groups.google.com/g/adwords-api/c/30s21wGZkOU)

### Accessing this data in the meantime

The only available option is the Google Ads interface:

1. Log in to your Google Ads account
2. Go to **Insights** > **Reports** > **Auction Insights**
3. Select the period and level (campaign, ad group, keyword) and export the report manually

### What we are doing

We monitor the [Google Ads API Release Notes](https://developers.google.com/google-ads/api/docs/release-notes) and the [Google Ads developer blog](https://ads-developers.googleblog.com/search/label/google_ads_api). As soon as Google opens access to these metrics, we will integrate them into the connector.


# Google Business Profile

Follow our setup guide to connect Google Business Profile to QUANTI:

<a href="https://dbdiagram.io/e/6a0c63899f1f8ec47b5182ca/6a0c63e99f1f8ec47b518a1d" class="button primary" data-icon="table-tree">Prebuilt reports and definition</a>

***

## Prerequisites

To connect Google Business Profile to QUANTI, you need:

* A [Google Business Profile](https://business.google.com) account with at least one verified location
* A Google account with **Owner** or **Manager** access to the Business Profile

***

## Setup instructions

{% stepper %}
{% step %}

#### Authorize your Google account

* Click **Continue with Google**
* You will be redirected to Google's authorization page
* Log in with your Google account credentials
* Review and accept the requested permissions
* You will be redirected back to QUANTI automatically
  {% endstep %}

{% step %}

#### Select your Business Account

Select the Business Account you want to sync. Each Business Account can contain multiple locations.

{% hint style="info" %}
Only one Business Account can be selected per connector. To sync multiple Business Accounts, create one connector per account.
{% endhint %}
{% endstep %}

{% step %}

#### Select prebuilt reports

Review the available prebuilt reports and select the ones you want to activate.
{% endstep %}

{% step %}

#### Connector information

* **Connector Name**: Name your connector. It must be unique.
* **Dataset ID**: Define the ID of the dataset. It must not exist yet, as it will be created and data will be sent there.
  {% endstep %}
  {% endstepper %}

***

## Prebuilt reports

**location**: Business location reference data — address (region, postal code, city, address lines), primary and additional categories, contact details (phone, website), opening hours (regular and special), GPS coordinates, open/closed status, profile description, labels, and service items. One row per location, updated at each sync.

**review**: Customer reviews submitted on Google Maps for each location — star rating (ONE to FIVE), comment text, creation and update timestamps, reviewer display name, anonymity flag, and merchant reply (comment and update time). A new row is inserted at each sync for each review, enabling review history tracking.

**location\_insight**: Daily performance metrics per location and metric type. Each row represents one metric for one location on one day. Dimensions: location\_id, date, daily\_metric. Metric: value.

Available `daily_metric` values include:

* `BUSINESS_IMPRESSIONS_DESKTOP_MAPS` — Impressions on Google Maps (desktop)
* `BUSINESS_IMPRESSIONS_DESKTOP_SEARCH` — Impressions on Google Search (desktop)
* `BUSINESS_IMPRESSIONS_MOBILE_MAPS` — Impressions on Google Maps (mobile)
* `BUSINESS_IMPRESSIONS_MOBILE_SEARCH` — Impressions on Google Search (mobile)
* `BUSINESS_DIRECTION_REQUESTS` — Clicks on "Get directions"
* `CALL_CLICKS` — Clicks on the phone number
* `WEBSITE_CLICKS` — Clicks on the website URL
* `BUSINESS_BOOKINGS` — Bookings made via the profile
* `BUSINESS_FOOD_ORDERS` — Food orders placed via the profile
* `BUSINESS_CONVERSATIONS` — Conversations initiated via the profile

```mermaid
erDiagram
    location {
        TIMESTAMP _quanti_loaded_at PK
        STRING    name PK
        STRING    language_code
        STRING    store_code
        STRING    title
        STRING    primary_phone
        STRING    primary_category_display_name
        STRING    storefront_address_region_code
        STRING    storefront_address_postal_code
        STRING    storefront_address_locality
        STRING    storefront_address_address_lines
        STRING    website_uri
        STRING    regular_hours
        FLOAT     latlng_latitude
        FLOAT     latlng_longitude
        STRING    open_info_status
        STRING    profile_description
    }
    review {
        TIMESTAMP _quanti_loaded_at PK
        STRING    name PK
        STRING    review_id PK
        STRING    location_id
        STRING    star_rating
        STRING    comment
        TIMESTAMP create_time
        TIMESTAMP update_time
        STRING    reviewer_display_name
        BOOLEAN   reviewer_is_anonymous
        STRING    review_reply_comment
    }
    location_insight {
        STRING  _quanti_ad_account
        DATE    _quanti_date PK
        STRING  location_id PK
        DATE    date PK
        STRING  daily_metric PK
        INTEGER value
    }

    location ||--o{ review          : "name / location_id"
    location ||--o{ location_insight : "name / location_id"
```

***

<a href="https://dbdiagram.io/e/6a0c63899f1f8ec47b5182ca/6a0c63e99f1f8ec47b518a1d" class="button primary" data-icon="table-tree">Prebuilt reports and definition</a>

***

## Notes

* **Lookback window**: Default lookback is **7 days**. Metrics and reviews are re-synced over the lookback window to capture retroactive updates.
* **Historical data**: Up to **18 months** (540 days) of history can be loaded on initial setup.
* **`location_insight` granularity**: Metrics are stored in a narrow (unpivoted) format — one row per metric per day per location. Use a pivot in your BI tool or a SQL `CASE WHEN` to reshape the data by metric type.


# Google Display & Video 360

Follow our setup guide to connect Google Display & Video 360 to QUANTI:

<a href="https://dbdiagram.io/e/689b4a341d75ee360a3f3158/689b4a4c1d75ee360a3f363f" class="button primary" data-icon="table-tree">Prebuilt reports and definition</a>

***

## <mark style="background-color:blue;">Prerequisites</mark>

To connect Google DV360 to Quanti:, you need to access a Google account and an advetiser account [here](https://marketingplatform.google.com/about/display-video-360/).

***

## <mark style="background-color:blue;">Setup instructions</mark>

1. Connect your Google account to permit Quanti: to access to your data
2. Connector information
   1. Connector Name : Name your connector. It must be unique.
   2. Dataset ID : Define the ID of the dataset. It must not exist yet, as it will be created and data will be sent there.
3. Select Partners & Advertisers : Choose accounts to sync.
4. Select queries : Choose the pre-built queries you’d like to synchronize.

***

## <mark style="background-color:blue;">Prebuilt reports</mark>

* **campaign\_age\_gender**: Stores campaign performance metrics broken down by country, age group, and gender.
* **campaign\_geo\_device**: Tracks campaign metrics by geographic location (country, region) and device type, including viewability and video engagement stats.
* **campaign\_stats**: Contains overall performance metrics for campaigns, including clicks, impressions, and video engagement.
* **creative\_stats**: Records performance data for individual creatives within campaigns, including impressions, clicks, conversions, and video metrics.
* **url\_stats**: Captures campaign performance metrics for specific app or website URLs.

***

<a href="https://dbdiagram.io/e/689b4a341d75ee360a3f3158/689b4a4c1d75ee360a3f363f" class="button primary" data-icon="table-tree">Prebuilt reports and definition</a>


# Google Merchant Center

Follow our setup guide to connect Google Merchant Center to QUANTI:

<a href="https://dbdiagram.io/e/698b4b39bd82f5fce2470793/698b4dddbd82f5fce2476a9a" class="button primary" data-icon="table-tree">Prebuilt reports and definition</a>

***

## Prerequisites

Before connecting Google Merchant Center to QUANTI, ensure you have:

* **Google Merchant Center Account**: An active Google Merchant Center account with product feeds configured
* **Google Account Access**: Owner or Admin access to the Merchant Center account
* **Product Feed**: At least one product feed with approved products
* **API Access**: Ensure API access is enabled for your Merchant Center account

***

## Setup Instructions

{% stepper %}
{% step %}
**Authorize Google Connection**

* Click on **Connect to Google**
* You will be redirected to Google's authorization page
* Log in with your Google account credentials
* Review and accept the requested permissions:
  * View and manage your Google Merchant Center accounts
  * Access product and performance data
* Click **Allow** to grant access
  {% endstep %}

{% step %}
**Select Merchant Center Account(s)**

* After authorization, you'll see a list of your Merchant Center accounts
* Select the account(s) you want to connect to QUANTI
* You can select multiple accounts to track products from different sources
* Click **Next**
  {% endstep %}

{% step %}
**Select Prebuilt reports**

* Review the available Prebuilt reports (see section below for details)
* All tables are selected by default - you can deselect tables you don't need
* Recommended: Keep all tables enabled for complete product tracking and performance analysis
* Click **Next**
  {% endstep %}

{% step %}
**Finish Setup**

* Define a sync period and a lookback window - Click **Save**
* For the first sync, you have the following options:
  * Activate auto-sync for recurring syncs based on your sync settings by clicking the switch button
  * Launch a historical data recovery by choosing your desired dates in the historical data tab
  * Launch a manual sync immediately by clicking the **Sync now** button
* Wait for the sync to complete. Then navigate to your data warehouse to verify that tables are populated
* Check the connector dashboard for sync status and any potential errors
  {% endstep %}
  {% endstepper %}

***

## Prebuilt reports

### Dimension Tables

* **product**: Complete product catalog with attribute change tracking. Contains product details including ID, title, brand, availability, condition, channel, language, and aggregated status. This table includes historization to track product attribute changes over time.
* **item\_issue**: Product issues child table linked to the product table. Captures all issues affecting products including issue code, affected attribute, description, resolution type, severity level, and documentation links. Each product can have multiple issues.

### Metric Tables

* **product\_performance**: Daily product performance metrics including clicks, impressions, click-through rate, conversions, conversion rate, and conversion value. Data is segmented by marketing method (Shopping Ads, Free Listings, etc.) and customer country. Includes hierarchical categorization with Google categories (5 levels), product types (5 levels), and custom labels (5 labels).

{% hint style="info" %}

#### **The Parent-Child Relationship between `product` & `item_issue`**

`item_issues` is a nested object within the `product` table, representing a one-to-many relationship between products and their issues. Each product can have multiple issues associated with it. To link issues to their respective products, use the `_quanti_id` field present in both tables - this field enables the join between the two tables and ensures each issue is correctly associated with its parent product record.
{% endhint %}

***

<a href="https://dbdiagram.io/e/698b4b39bd82f5fce2470793/698b4dddbd82f5fce2476a9a" class="button primary" data-icon="table-tree">Prebuilt reports and definition</a>

***

## Notes

* **Historical Limitations**: Google's API allows historical data retrieval up to 18 months for performance metrics.


# Google Search Console

Follow our setup guide to connect Google Search Console to QUANTI:

<a href="https://dbdiagram.io/e/68555a41f039ec6d36273bf9/685562ddf039ec6d36286cbf" class="button primary" data-icon="table-tree">Prebuilt reports and definition</a>

***

## Prerequisites

To connect Google Search Console to QUANTI, you need access to a [Google Search Console](https://search.google.com/search-console?hl=fr) account with at least one verified property.

***

## Setup Instructions

{% stepper %}
{% step %}
**Authorize Google Connection**

* Click on **Connect to Google**
* You will be redirected to Google's authorization page
* Log in with your Google account credentials
* Review and accept the requested permissions
* Click **Continue** to grant access
  {% endstep %}

{% step %}
**Configure Connector**

* **Connector Name**: Name your connector. It must be unique.
* **Dataset ID**: Define the ID of the dataset. It must not exist yet, as it will be created and data will be sent there.
  {% endstep %}

{% step %}
**Select Account(s)**

* Choose the Google Search Console property (or properties) you want to sync
* Click **Next**
  {% endstep %}

{% step %}
**Select Prebuilt reports**

* Review the available Prebuilt reports (see section below for details)
* All tables are selected by default — you can deselect tables you don't need
* Click **Next**
  {% endstep %}

{% step %}
**Finish Setup**

* Define a sync period and a lookback window — Click **Save**
* For the first sync, you have the following options:
  * Activate auto-sync for recurring syncs based on your sync settings by clicking the switch button
  * Launch a historical data recovery by choosing your desired dates in the historical data tab
  * Launch a manual sync immediately by clicking the **Sync now** button
* Wait for the sync to complete. Then navigate to your data warehouse to verify that tables are populated
* Check the connector dashboard for sync status and any potential errors
  {% endstep %}
  {% endstepper %}

***

## Prebuilt reports

### Search performance

**site\_report\_by\_page** : Site-level search traffic, with metrics aggregated using the `byPage` method. Each record represents one day for a given country, device and search type. Metrics: clicks, impressions, CTR, position.

**site\_report\_by\_site** : Site-level search traffic, with metrics aggregated using the `byProperty` method. Same dimensions as `site_report_by_page`. Metrics: clicks, impressions, CTR, position.

{% hint style="info" %}
`site_report_by_page` and `site_report_by_site` share the same dimensions but use different aggregation methods (`byPage` vs `byProperty`). Google computes metrics differently between the two — totals may vary slightly for the same date and filters.
{% endhint %}

**page\_report** : Search traffic per individual page. Each record shows how a specific page appeared in search results on a given day. Dimensions: date, search type, site, country, device, page. Metrics: clicks, impressions, CTR, position.

**keyword\_site\_report\_by\_page** : Keyword-level search traffic at site scope, aggregated by the `byPage` method. Each record shows how the site appeared for a specific search query on a given day. Dimensions: date, search type, site, country, device, query. Metrics: clicks, impressions, CTR, position.

**keyword\_site\_report\_by\_site** : Keyword-level search traffic at site scope, aggregated by the `byProperty` method. Same dimensions as `keyword_site_report_by_page`.

{% hint style="info" %}
`keyword_site_report_by_page` and `keyword_site_report_by_site` share the same dimensions but use different aggregation methods. The same note on metric discrepancies applies as for the site reports above.
{% endhint %}

**keyword\_page\_report** : The most granular search table — keyword-level traffic per individual page. Each record shows how a specific page appeared for a specific query on a given day. Dimensions: date, search type, site, country, device, page, query. Metrics: clicks, impressions, CTR, position.

***

### Discover

**discover\_report** : Daily Google Discover performance at site level. Discover is Google's content recommendation feed — this table tracks global engagement on that surface. Dimensions: date, site. Metrics: clicks, impressions, CTR.

**discover\_report\_by\_country** : Google Discover performance broken down by country. Dimensions: date, site, country. Metrics: clicks, impressions, CTR.

**discover\_report\_by\_page** : Google Discover performance broken down by page. Dimensions: date, site, page. Metrics: clicks, impressions, CTR.

***

### News

**news\_report** : Daily Google News performance at site level. Tracks how content appears in the Google News surface. Dimensions: date, site. Metrics: clicks, impressions, CTR.

**news\_report\_by\_country** : Google News performance broken down by country. Dimensions: date, site, country. Metrics: clicks, impressions, CTR.

**news\_report\_by\_device** : Google News performance broken down by device. Dimensions: date, site, device. Metrics: clicks, impressions, CTR.

**news\_report\_by\_page** : Google News performance broken down by page. Dimensions: date, site, page. Metrics: clicks, impressions, CTR.

***

### Sitemap

**sitemap** : Dimension table with sitemap file metadata. Each record represents a sitemap submitted in Google Search Console — path, type, last submission date, last download date, number of submitted URLs and indexed URLs.

***

```mermaid
erDiagram
    site_report_by_page {
        DATE   _quanti_date PK
        STRING search_type PK
        STRING site PK
        STRING country PK
        STRING device PK
        FLOAT  clicks
        FLOAT  impressions
        FLOAT  ctr
        FLOAT  position
    }
    site_report_by_site {
        DATE   _quanti_date PK
        STRING search_type PK
        STRING site PK
        STRING country PK
        STRING device PK
        FLOAT  clicks
        FLOAT  impressions
        FLOAT  ctr
        FLOAT  position
    }
    page_report {
        DATE   _quanti_date PK
        STRING search_type PK
        STRING site PK
        STRING country PK
        STRING device PK
        STRING page PK
        FLOAT  clicks
        FLOAT  impressions
        FLOAT  ctr
        FLOAT  position
    }
    keyword_site_report_by_page {
        DATE   _quanti_date PK
        STRING search_type PK
        STRING site PK
        STRING country PK
        STRING device PK
        STRING query PK
        FLOAT  clicks
        FLOAT  impressions
        FLOAT  ctr
        FLOAT  position
    }
    keyword_site_report_by_site {
        DATE   _quanti_date PK
        STRING search_type PK
        STRING site PK
        STRING country PK
        STRING device PK
        STRING query PK
        FLOAT  clicks
        FLOAT  impressions
        FLOAT  ctr
        FLOAT  position
    }
    keyword_page_report {
        DATE   _quanti_date PK
        STRING search_type PK
        STRING site PK
        STRING country PK
        STRING device PK
        STRING page PK
        STRING query PK
        FLOAT  clicks
        FLOAT  impressions
        FLOAT  ctr
        FLOAT  position
    }
    discover_report {
        DATE   _quanti_date PK
        STRING site PK
        FLOAT  clicks
        FLOAT  impressions
        FLOAT  ctr
    }
    discover_report_by_country {
        DATE   _quanti_date PK
        STRING site PK
        STRING country PK
        FLOAT  clicks
        FLOAT  impressions
        FLOAT  ctr
    }
    discover_report_by_page {
        DATE   _quanti_date PK
        STRING site PK
        STRING page PK
        FLOAT  clicks
        FLOAT  impressions
        FLOAT  ctr
    }
    news_report {
        DATE   _quanti_date PK
        STRING site PK
        FLOAT  clicks
        FLOAT  impressions
        FLOAT  ctr
    }
    news_report_by_country {
        DATE   _quanti_date PK
        STRING site PK
        STRING country PK
        FLOAT  clicks
        FLOAT  impressions
        FLOAT  ctr
    }
    news_report_by_device {
        DATE   _quanti_date PK
        STRING site PK
        STRING device PK
        FLOAT  clicks
        FLOAT  impressions
        FLOAT  ctr
    }
    news_report_by_page {
        DATE   _quanti_date PK
        STRING site PK
        STRING page PK
        FLOAT  clicks
        FLOAT  impressions
        FLOAT  ctr
    }
    sitemap {
        TIMESTAMP _quanti_loaded_at PK
        STRING    path PK
        STRING    site PK
        STRING    type
        TIMESTAMP last_submitted
        TIMESTAMP last_downloaded
        INTEGER   submitted
        INTEGER   indexed
    }

    site_report_by_page    ||--o{ page_report              : "site"
    site_report_by_page    ||--o{ keyword_site_report_by_page : "site"
    keyword_site_report_by_page ||--o{ keyword_page_report : "site"
    discover_report        ||--o{ discover_report_by_country : "site"
    discover_report        ||--o{ discover_report_by_page   : "site"
    news_report            ||--o{ news_report_by_country   : "site"
    news_report            ||--o{ news_report_by_device    : "site"
    news_report            ||--o{ news_report_by_page      : "site"
```

***

<a href="https://dbdiagram.io/e/68555a41f039ec6d36273bf9/685562ddf039ec6d36286cbf" class="button primary" data-icon="table-tree">Prebuilt reports and definition</a>

***

## Notes

* **Data Availability Delay**: Google Search Console data is typically available with a **2 to 3 day delay**. The most recent days will not be populated immediately after a sync — this is a Google API limitation. It is recommended to configure a **lookback window of at least 3 days** to ensure complete and finalized data is retrieved.
* **No Real-Time or Fresh Data via API**: The Search Analytics API only returns **finalized data**. The "fresh data" available in the Google Search Console web interface (including the 24-hour view) is not exposed through the API and therefore not available in QUANTI.
* **Data May Retroactively Change**: Data for the last few days before finalization can change slightly as Google continues processing. This is expected behavior — the lookback window ensures these days are re-synced and updated automatically.
* **`byPage` vs `byProperty` Aggregation**: Google computes metrics differently depending on the aggregation type. `byPage` and `byProperty` tables for the same date and dimensions may show slightly different numbers for clicks, impressions, and position. Refer to [Google's documentation](https://support.google.com/webmasters/answer/6155685) for details on how each method calculates data.
* **Historical Data Limit**: The Search Analytics API provides data for up to **16 months** of history.
* **API Rate Limits**: Google enforces quotas on API requests. QUANTI automatically manages these limits to ensure reliable data extraction.


# FAQ

Frequently asked questions about Google Search Console

***

### Clicks/impressions in Quanti don't match the GSC interface

**Symptom**\
Clicks and impressions totals in Quanti tables differ from what is displayed in the Google Search Console interface, even with identical filters.

**Understanding aggregation methods**

The GSC API exposes two aggregation methods — here is how they map to Quanti tables:

| Method       | Quanti tables | Behavior                                                                       |
| ------------ | ------------- | ------------------------------------------------------------------------------ |
| `byProperty` | `*_by_site`   | Max 1 impression/click per query, even if multiple URLs appear → lower numbers |
| `byPage`     | `*_by_page`   | 1 impression/click per URL shown in results → higher numbers                   |

**The GSC interface uses `byProperty` by default** for the global performance graph. The table below the graph switches to `byPage` when the *Pages* dimension is selected.

> ℹ️ To replicate the numbers shown in the GSC interface graph, use the `*_by_site` tables.

**If the discrepancy persists despite using the same aggregation method**

Same aggregation method but still different numbers? Check the following:

* Is the date range strictly identical on both sides?
* Are the filters (country, device, search type) the same?
* Check the GSC property type: a **domain property** aggregates subdomains, a **URL prefix property** does not.

**Reference**: [How Search Console data is calculated](https://support.google.com/webmasters/answer/6155685)

***

### Sync fails with error 403 "Search Analytics load quota exceeded"

**Symptom**\
A sync returns the following error:

```
analytics request failed for web: HTTP 403: Search Analytics load quota exceeded.
```

**Explanation**\
The Google Search Console API enforces request rate limits on the Search Analytics endpoint. When a sync triggers too many requests in a short window — typically when syncing multiple properties, multiple report types, or a large date range simultaneously — the quota is exceeded and the API returns a 403 error.

The applicable limits are:

| Scope           | Limit                                            |
| --------------- | ------------------------------------------------ |
| Per site        | 1,200 requests/minute                            |
| Per user        | 1,200 requests/minute                            |
| Per GCP project | 40,000 requests/minute / 30,000,000 requests/day |

**What to do**

The sync will be retried automatically by Quanti on the next scheduled run. If the error persists:

* Reduce the number of report types enabled on the connector — deselect tables you don't need
* Increase the sync interval to reduce concurrent load
* If you have multiple GSC connectors on the same GCP project, stagger their sync schedules

**Reference**: [Google Search Console API usage limits](https://developers.google.com/webmaster-tools/limits?hl=fr#qps-quota)

***

### Data for yesterday or the day before is missing or incomplete

**Symptom**\
The most recent 1 to 3 days of data are absent or show lower numbers than expected in the GSC tables.

**Explanation**\
This is expected behavior documented by Google — it applies equally to the GSC interface and the API, which draw from the same data pipeline. Google typically takes 2 to 3 days to finalize Search Analytics data. During that window, data for the most recent days may be missing or preliminary (still being collected and subject to change).

This is not a Quanti connector issue. The connector retrieves exactly what the API exposes at the time of the sync.

**What to do**\
Ensure the connector's lookback window is set to at least **3 days** so that preliminary data from recent days is re-synced and updated once finalized by Google.

**Reference**: [Google Search Console — Performance report data delays](https://support.google.com/webmasters/answer/7576553)


# Instagram Business

Follow our setup guide to connect Instagram Business to QUANTI:

<a href="https://dbdiagram.io/e/69443544e4bb1dd3a996a990/69443574e4bb1dd3a996ae40" class="button primary" data-icon="table-tree">Prebuilt reports and definition</a>

***

## Prerequisites

Before connecting Instagram Business to QUANTI, ensure you have:

* **Instagram Business or Creator account**: Your Instagram profile must be converted to a Business or Creator account. Personal accounts are not supported.
* **Facebook Page connection**: Your Instagram account must be linked to a Facebook Page.
* **Facebook Business Manager access**: You need administrator rights on the Facebook Page connected to your Instagram account.
* **Published content**: Your profile should have published media to retrieve media and comment insights.

***

## Setup Instructions

{% stepper %}
{% step %}

#### Authorize your Facebook connection

* Click **Continue with Facebook** (Instagram Business relies on Facebook's authentication)
* You will be redirected to Facebook's authorization page
* Log in with the Facebook account that manages your Instagram Business Page
* Review and accept the requested permissions for Instagram data access
  {% endstep %}

{% step %}

#### Select your Instagram Business account(s)

* QUANTI lists the Instagram Business accounts linked to the Facebook Pages you manage
* Select the account(s) you want to connect — multiple accounts can be synced through the same connector
* Click **Next**
  {% endstep %}

{% step %}

#### Select pre-built reports

* Review the available pre-built reports (see section below for details)
* All reports are selected by default — deselect any you don't need
* Click **Next**
  {% endstep %}

{% step %}

#### Connector Information

* **Connector Name**: Define a unique name for your connector
* **Dataset ID**: Specify the BigQuery dataset ID where tables will be created
  * The dataset will be created automatically if it doesn't exist
* Click **Next**
  {% endstep %}

{% step %}

#### Finish setup

* Define a sync frequency (daily, weekly, or monthly) and a lookback window (1, 3, 5, 7, 14, or 30 days — default 7 days)
* For the first sync, you have the following options:
  * Activate auto-sync for recurring syncs by clicking the switch button
  * Launch a historical data recovery — quick options of 3, 6, or 12 months, or a custom date range up to 730 days
  * Launch a manual sync immediately by clicking **Sync now**
* Wait for the sync to complete, then check your data warehouse to verify that tables are populated
  {% endstep %}
  {% endstepper %}

***

## Pre-built reports

* **lifetime\_user\_history**: Account profile and follower snapshot. Dimensions: instagram\_id, username, name, biography, website, profile\_picture\_url. Metrics: followers\_count, follows\_count, media\_count.
* **media\_history**: History of published media with metadata. Dimensions: media\_id, caption, media\_type (IMAGE, VIDEO, CAROUSEL\_ALBUM), media\_product\_type (FEED, REELS), media\_url, thumbnail\_url, permalink, timestamp. Metrics: like\_count, comments\_count.
* **lifetime\_media\_insights**: Lifetime engagement metrics for each media item. Dimension: media\_id. Metrics: reach, total\_interactions, saved, likes, comments, shares, views.
* **daily\_user\_insights**: Daily account-level insights, one row per day. Dimension: date. Metrics: reach, profile\_views, website\_clicks, follower\_count, total\_interactions, views.
* **media\_comments**: Comments collected on published media. Dimensions: comment\_id, media\_id, text, timestamp, username, hidden. Metric: like\_count.

***

```mermaid
erDiagram
    lifetime_user_history {
        TIMESTAMP _quanti_loaded_at PK
        STRING    instagram_id     PK
        STRING    username
        STRING    name
        STRING    biography
        STRING    website
        STRING    profile_picture_url
        INTEGER   followers_count
        INTEGER   follows_count
        INTEGER   media_count
    }
    media_history {
        TIMESTAMP _quanti_loaded_at PK
        STRING    media_id         PK
        STRING    caption
        STRING    media_type
        STRING    media_product_type
        STRING    media_url
        STRING    thumbnail_url
        STRING    permalink
        TIMESTAMP timestamp
        INTEGER   like_count
        INTEGER   comments_count
    }
    lifetime_media_insights {
        TIMESTAMP _quanti_loaded_at PK
        STRING    media_id         PK
        INTEGER   reach
        INTEGER   total_interactions
        INTEGER   saved
        INTEGER   likes
        INTEGER   comments
        INTEGER   shares
        INTEGER   views
    }
    daily_user_insights {
        STRING  _quanti_ad_account
        DATE    _quanti_date PK
        STRING  _quanti_id
        DATE    date         PK
        INTEGER reach
        INTEGER profile_views
        INTEGER website_clicks
        INTEGER follower_count
        INTEGER total_interactions
        INTEGER views
    }
    media_comments {
        TIMESTAMP _quanti_loaded_at PK
        STRING    comment_id       PK
        STRING    media_id
        STRING    text
        TIMESTAMP timestamp
        STRING    username
        INTEGER   like_count
        BOOLEAN   hidden
    }

    media_history ||--o{ lifetime_media_insights : "media_id"
    media_history ||--o{ media_comments           : "media_id"
```

***

<a href="https://dbdiagram.io/e/69443544e4bb1dd3a996a990/69443574e4bb1dd3a996ae40" class="button primary" data-icon="table-tree">Prebuilt reports and definition</a>

***

## Notes

* **Data refresh**: Syncs run daily (default), weekly, or monthly, with a default lookback window of 7 days to capture retroactive metric adjustments.
* **Historical data**: Historical recovery is available up to **730 days** (\~24 months). Media insights are only retrievable for media published within the last 2 years, per Instagram Graph API limitations.
* **`views` metric**: Since April 21, 2025, Instagram consolidated `impressions`, `plays`, and `video_views` into a single `views` metric, available for FEED, REELS, and STORY media. `impressions` and `video_views` are no longer collected as they are deprecated on the Graph API.
* **`total_interactions`**: Replaces the deprecated `engagement` metric and aggregates likes, comments, saves, and shares.
* **Metric delay**: Some insights can take up to 48 hours to become available via the Instagram Graph API.
* **Timestamps**: Timestamps returned by the API are normalized to RFC3339 format (e.g. `2024-11-15T10:30:00Z`).
* **Custom reports**: This connector does not support custom queries. Only the pre-built reports above are available.

***

## Troubleshooting

<details>

<summary>Connection Issues</summary>

* Verify that your Instagram account is converted to a Business or Creator account
* Ensure your Instagram account is properly linked to a Facebook Page
* Check that you have administrator rights on the Facebook Page connected to your Instagram account
* Verify that API permissions haven't been revoked in your Facebook account settings

</details>

<details>

<summary>Missing Data</summary>

* Media insights are only available for media published within the last 2 years
* Historical recovery beyond 730 days is not supported by the Instagram Graph API
* `impressions` and `video_views` are deprecated and will not appear in any table — use `reach` and `views` instead
* Some metrics may take up to 48 hours to appear after publication

</details>

<details>

<summary>Need Help?</summary>

Contact QUANTI support at <support@quanti.io> or consult our comprehensive documentation at [https://docs.quanti.io](https://docs.quanti.io/)

</details>


# Klaviyo

<a href="https://dbdiagram.io/e/69a05c95a3f0aa31e132e756/69a05df0a3f0aa31e13313b7" class="button primary" data-icon="table-tree">Prebuilt reports and definition</a>

***

## Prerequisites

Before connecting Klaviyo to QUANTI, ensure you have:

* **Klaviyo Account**: An active Klaviyo account with at least one campaign sent
* **API Key**: A Private API Key with read access — generate it from **Klaviyo > Account > Settings > API Keys**
* **Permissions**: The key must have read permissions on Campaigns, Lists, Segments, Profiles, and Metrics

***

## Setup Instructions

{% stepper %}
{% step %}
**Authorize Klaviyo Connection**

* Click on **Connect to Klaviyo**
* Enter your Klaviyo Private API Key
* Click **Connect** to validate the connection
  {% endstep %}

{% step %}
**Select Prebuilt reports**

* Review the available Prebuilt reports (see section below for details)
* All tables are selected by default — you can deselect tables you don't need
* Recommended: Keep all tables enabled for complete email marketing analytics
* Click **Next**
  {% endstep %}

{% step %}
**Finish setup**

* Define a sync period and a lookback window — Click save
* For the first sync, you have the following options:
  * Activate auto-sync for recurring syncs based on your sync settings by clicking the switch button
  * Launch a historical data recovery by choosing your desired dates in the historical data tab
  * Launch a manual sync immediately by clicking the Sync now button
* Wait for the sync to complete. Then navigate to your data warehouse to verify that tables are populated
* Check the connector dashboard for sync status and any potential errors
  {% endstep %}
  {% endstepper %}

***

## Prebuilt reports

### Dimensions

* **Campaign** : Email campaigns with status (Draft, Scheduled, Sending, Sent, Paused, Canceled), channel, send timestamps, targeted audiences, and send/tracking options as JSON.
* **List** : Contact lists used for campaign targeting, with opt-in process type (single or double opt-in).
* **Segment** : Dynamic segments with their segmentation rule definition (JSON), active status, and processing state.
* **Profile** : Contact profiles with email, phone, external ID, demographics, location details, custom properties, and subscription status per channel — all stored as JSON objects.

### Facts

* **Campaign\_performance\_stats** : Aggregated performance metrics per campaign: recipients, deliveries, opens, clicks, unsubscribes, spam complaints, and derived rates (open rate, click rate, bounce rate, unsubscribe rate).

***

<a href="https://dbdiagram.io/e/69a05c95a3f0aa31e132e756/69a05df0a3f0aa31e13313b7" class="button primary" data-icon="table-tree">Prebuilt reports and definition</a>


# Kwanko

Follow our setup guide to connect Kwanko to QUANTI:

<a href="https://dbdiagram.io/e/689b4f0c1d75ee360a4021c3/689b50301d75ee360a40615a" class="button primary" data-icon="table-tree">Prebuilt reports and definition</a>

***

## Prerequisites

To connect Kwanko to QUANTI, you need an active [Kwanko](https://advertiser.kwanko.com/#/dashboard) advertiser account.

***

## Setup instructions

{% stepper %}
{% step %}

#### Find your API token

* Log in to your [Kwanko account](https://advertiser.kwanko.com/#/dashboard)
* In the top-right corner, click **Tools** then **API**
* Copy the API token displayed on this screen
  {% endstep %}

{% step %}

#### Connect to QUANTI

* In QUANTI, click **Connect to Kwanko**
* Paste your API token in the authentication field
* Click **Validate** to confirm the connection
  {% endstep %}

{% step %}

#### Connector information

* **Connector Name**: Name your connector. It must be unique.
* **Dataset ID**: Define the ID of the dataset. It must not exist yet, as it will be created and data will be sent there.
  {% endstep %}

{% step %}

#### Select prebuilt reports

Review the available prebuilt reports and select the ones you want to activate.
{% endstep %}
{% endstepper %}

***

## Prebuilt reports

* **campaign\_stats**: Overall performance metrics per campaign — impressions, clicks, leads, sales, downloads, bonus activities, and associated spend.
* **transactions**: Individual transaction and conversion records — campaign details, device type, tracking source, website information, achievement status, and spend values.

***

<a href="https://dbdiagram.io/e/689b4f0c1d75ee360a4021c3/689b50301d75ee360a40615a" class="button primary" data-icon="table-tree">Prebuilt reports and definition</a>


# Linkedin Ads

Follow our setup guide to connect Linkedin Ads to QUANTI:

<a href="https://dbdiagram.io/e/682b4daf1227bdcb4eff888a/682b4fa51227bdcb4effdd6c" class="button primary" data-icon="table-tree">Prebuilt reports and definition</a>

***

## Prerequisites

Before connecting LinkedIn Ads to QUANTI, ensure you have:

* **LinkedIn Campaign Manager Access**: You need access to a [LinkedIn Campaign Manager](https://www.linkedin.com/campaignmanager/accounts) account with appropriate permissions
* **Account Manager or Campaign Manager Role**: Sufficient permissions to authorize third-party applications and access campaign data
* **Active Campaigns**: At least one LinkedIn Ads account with campaigns (historical or active)

***

## Setup Instructions

{% stepper %}
{% step %}
**Authorize LinkedIn Connection**

* Click on **Connect to LinkedIn Ads**
* You will be redirected to LinkedIn's authorization page
* Log in with your LinkedIn account credentials (the one with Campaign Manager access)
* Review and accept the requested permissions to allow QUANTI to access your LinkedIn Ads data
* Click **Allow** to grant access
  {% endstep %}

{% step %}
**Configure Connector**

* **Connector Name**: Enter a unique name for this connector (e.g., "LinkedIn Ads - North America Campaigns")
* **Dataset ID**: Define the BigQuery dataset ID where data will be stored (will be created automatically if it doesn't exist)
  {% endstep %}

{% step %}
**Select Accounts**

* Review the list of LinkedIn Ads accounts accessible with your credentials
* Select the account(s) you want to synchronize
* You can connect multiple accounts by creating separate connectors
* Click **Next**
  {% endstep %}

{% step %}
**Select Prebuilt reports**

* Review the available Prebuilt reports (see section below for details)
* All tables are selected by default - you can deselect tables you don't need
* Recommended configurations:
  * **Basic setup**: Account, Campaign, Creative history + Core performance tables
  * **Advanced setup**: Add demographic breakdown tables for audience analysis
* Click **Next**
  {% endstep %}

{% step %}
**Finish Setup**

* Define a sync period and lookback window
* For the first sync, you have the following options:
  * Activate auto-sync for recurring syncs based on your sync settings by clicking the switch button
  * Launch a historical data recovery by choosing your desired dates in the historical data tab
  * Launch a manual sync immediately by clicking the **Sync now** button
* Wait for the sync to complete, then navigate to your data warehouse to verify that tables are populated
* Check the connector dashboard for sync status and any potential errors
  {% endstep %}
  {% endstepper %}

***

## Prebuilt reports

### Dimension Tables

These tables track the structure and configuration of your LinkedIn Ads account, providing context for performance analysis and enabling audit trails.

* **Account History**: Account-level configuration including currency, account type, notification preferences (campaign optimization, creative approval/rejection, end of campaign alerts), serving statuses, and version tracking. Essential for multi-account management and understanding account-level settings that impact campaign delivery.
* **Campaign Group History**: Campaign group (formerly known as campaigns) information including name, status, serving statuses, run schedule start dates, creation and modification timestamps with actor information, allowed campaign types, test flag, and backfill status. Campaign groups organize multiple campaigns under a common budget and objective, enabling portfolio-level analysis.
* **Campaign History**: Comprehensive campaign configuration including account reference, campaign group association, audience expansion settings, daily budget (amount and currency), campaign format, objective type (brand awareness, website visits, engagement, video views, lead generation, website conversions, job applicants), locale (country and language), optimization target type, pacing strategy, creative selection mode, cost type, serving statuses, status, campaign type, unit cost, run schedule, offsite delivery settings, publisher restrictions, and complete audit trail with creation and modification timestamps. Central table for understanding campaign strategy and configuration evolution.
* **Creative History**: Individual creative asset details including account and campaign references, content reference, creation and modification timestamps with actor information, serving hold reasons, serving status, and intended status. Tracks the lifecycle of ad creatives from creation through approval to serving, essential for creative performance analysis and understanding what assets are active.

### Reference Data Tables (Dimensions)

These standardized reference tables provide demographic and targeting classification data for joining with performance tables.

* **Job Function**: Standardized LinkedIn job function taxonomy with function ID, name in English, and localized name. Used for targeting and reporting on professional roles (e.g., Accounting, Engineering, Marketing, Sales). Essential for B2B audience analysis and understanding which job functions respond best to campaigns.
* **Industries**: LinkedIn's standardized industry classification with industry ID, name in English, and localized name. Covers all LinkedIn industry verticals from technology to healthcare to finance. Critical for analyzing campaign performance by target industry and vertical-specific optimization.
* **Job Title**: Comprehensive LinkedIn job title reference with title ID, name, category (e.g., C-level, Director, Manager, Entry level), seniority (numeric ranking), and localized name. Enables granular analysis of which seniority levels and specific titles drive the best campaign results.
* **Geo Location**: Geographic location reference data with location ID, location type (country, region, city), English name, and localized name. Used for geographic targeting and performance analysis by location. Enables regional performance comparison and location-based budget allocation.
* **Organization**: LinkedIn organization (company) profiles including organization ID, localized name, English name, vanity name (custom URL), logo URL, and localized website URL. Links to member company demographics in performance tables, enabling account-based marketing analysis and understanding which companies are engaging with your ads.

### Metric Tables

These tables contain aggregated performance metrics at different levels, forming the foundation for campaign analysis and optimization.

* **Ad Analytics by Creative**: Daily performance metrics aggregated by creative including impressions, clicks, cost, engagement metrics (likes, comments, shares, follows), video metrics (views, completions, starts), conversion metrics (leads, other conversions), click-through rate, cost per click, cost per impression, viral metrics (viral impressions, viral clicks, viral engagement), and LinkedIn-specific metrics like lead form opens and sends. Essential for creative performance optimization and understanding which ad assets drive the best results.
* **Ad Analytics by Creative with Conversion Breakdown**: Creative-level performance with detailed conversion breakdown by conversion type. Contains all creative analytics metrics plus conversion-specific data including conversion ID, conversion name, conversion type, conversion value, post-click conversions, view-through conversions, and conversion rates. Critical for understanding ROI by conversion action and optimizing campaigns toward specific conversion goals like form fills, downloads, or purchases.
* **Ad Analytics by Campaign**: Campaign-level performance metrics aggregated across all creatives and ad groups. Includes impressions, clicks, cost, engagement, video metrics, conversions, efficiency metrics (CTR, CPC, CPM), viral metrics, and LinkedIn-specific conversion events (lead form submissions, follows, website actions). Provides high-level campaign performance overview for budget management and strategic optimization decisions.

### Demographic Breakdown Tables

These tables segment performance by LinkedIn's professional demographic dimensions, enabling deep audience insights and targeting optimization.

* **Ad Analytics by Member Company**: Campaign performance segmented by the company where LinkedIn members work. Includes all standard performance metrics plus member company ID (links to Organization table). Essential for account-based marketing, identifying high-value companies, and optimizing targeting for specific organizations. Enables analysis like "which companies generate the most leads" or "what's our CPL for Fortune 500 companies."
* **Ad Analytics by Member Company Size**: Campaign performance broken down by company size brackets (1-10, 11-50, 51-200, 201-500, 501-1000, 1001-5000, 5001-10000, 10001+ employees, self-employed). Identifies whether your campaigns perform better with SMBs, mid-market, or enterprise audiences. Critical for optimizing targeting strategies and budget allocation by company size segment.
* **Ad Analytics by Member Country**: Campaign performance segmented by the country of LinkedIn members. Includes all performance metrics plus member country (links to Geo table). Enables geographic performance analysis, identification of high-performing markets, and localization strategy optimization. Essential for international campaigns and market expansion planning.
* **Ad Analytics by Member Industry**: Campaign performance broken down by the industry of LinkedIn members (links to Industries reference table). Shows which industry verticals are most engaged and cost-effective. Critical for B2B campaigns targeting specific industries and for understanding cross-industry performance patterns.
* **Ad Analytics by Member Job Function**: Campaign performance segmented by job function (links to Job Function reference table). Identifies which professional functions (e.g., Marketing, Sales, IT, HR) respond best to your campaigns. Essential for role-based targeting optimization and understanding functional buying behaviors.
* **Ad Analytics by Member Job Title**: Campaign performance broken down by specific job titles (links to Job Title reference table). Provides granular insights into which titles and seniority levels drive the best results. Enables precise targeting optimization for decision-maker roles and analysis of engagement patterns by career level.
* **Ad Analytics by Member Region**: Campaign performance segmented by geographic region within countries (e.g., California, Ontario, Bavaria). More granular than country-level analysis, useful for regional campaigns and understanding sub-national performance patterns. Enables region-specific optimization and budget allocation strategies.

***

<a href="https://dbdiagram.io/e/682b4daf1227bdcb4eff888a/682b4fa51227bdcb4effdd6c" class="button primary" data-icon="table-tree">Prebuilt reports and definition</a>

***

## Troubleshooting

<details>

<summary>Connection Issues</summary>

* Verify that your LinkedIn account has Campaign Manager access
* Check that you have appropriate permissions (Account Manager or Campaign Manager role)
* Ensure your account is not suspended or restricted
* Try disconnecting and reconnecting the LinkedIn authorization
* Verify that you're using the correct LinkedIn account with access to the desired ad accounts

</details>

<details>

<summary>Missing Data</summary>

* Campaign and creative data requires campaigns to have been active and serving
* Demographic breakdowns may be limited for campaigns with small audience sizes (privacy protection)
* Conversion data requires proper LinkedIn Insight Tag implementation
* Historical data depends on when campaigns were created and started serving
* Reference data (job functions, industries, titles) is standardized by LinkedIn and may not include all variations

</details>

<details>

<summary>Metric Discrepancies</summary>

* Slight differences between LinkedIn Campaign Manager and QUANTI data can occur due to:
  * Time zone differences (LinkedIn uses Pacific Time)
  * Data aggregation timing
  * Currency conversions
  * Viral metrics being calculated differently
* Demographic breakdowns sum to campaign totals but individual members may be counted in multiple demographic segments

</details>

<details>

<summary>Need Help?</summary>

Contact QUANTI support at <support@quanti.io> or consult our comprehensive documentation at [https://docs.quanti.io](https://docs.quanti.io/)

</details>


# Mailchimp

Follow our setup guide to connect Mailchimp to QUANTI:

<a href="https://dbdiagram.io/e/684ae5df1dff20a534caede9/684ae84a1dff20a534cb4a46" class="button primary" data-icon="table-tree">Prebuilt reports and definition</a>

***

## <mark style="background-color:blue;">Prerequisites</mark>

To connect Mailchimp to Quanti:, you need to access a [Mailchimp](https://login.mailchimp.com/?locale=en) account.

***

## <mark style="background-color:blue;">Setup instructions</mark>

* Authorize your account : Connect your Mailchimp account to permit Quanti: to access to your data
* Connector information
  1. Connector Name : Name your connector. It must be unique.
  2. Dataset ID : Define the ID of the dataset. It must not exist yet, as it will be created and data will be sent there.
* Select queries: You can select pre-built queries that you want to sync.

***

## <mark style="background-color:blue;">Prebuilt reports</mark>

* **campaigns\_history**: Stores the setup and metadata of email campaigns, including delivery configuration, design options, and scheduling.
* **campaign\_recipient\_history**: Maps each campaign to its recipients, recording which members received which campaigns and their delivery status.
* **campaign\_recipient\_activity**: Captures recipient interactions such as opens, clicks, and bounces for detailed engagement tracking.
* **lists\_history**: Represents the structure and metadata of mailing lists, including list settings, creation details, and subscription management.
* **members\_history**: Maintains detailed records about individual subscribers, including identifiers, preferences, subscription sources, and status history.

***

<a href="https://dbdiagram.io/e/682704361227bdcb4e9c9d5b/6827045e1227bdcb4e9ca579" class="button primary" data-icon="table-tree">Prebuilt reports and definition</a>


# Meta Ads

Follow our setup guide to connect Meta to QUANTI:

<a href="https://dbdiagram.io/e/65c0ca08ac844320ae7740d3/67a5e256263d6cf9a06049b8" class="button primary" data-icon="table-tree">Prebuilt reports and definition</a>

***

## <mark style="background-color:blue;">Prerequisites</mark>

To connect Facebook Ads to QUANTI:, you need:

An active **Meta Ads Manager** account with the following permissions for the accounts you'd like to sync:

* An `ads_read` permission to sync Ads report information for any Ad accounts that you own or have been granted access to through this permission.
* An `ads_management` permission to sync Ads accounts' metadata. This permission also requests the `id` and `account_timezone` fields of Ad accounts. The `account_timezone` field is required to save the correct report date in the destination.
* A `business_management` permission is mandatory to ensure a successful setup. Without this permission, setup tests will fail

The [breakdowns](https://developers.facebook.com/docs/marketing-api/insights/breakdowns) and [fields](https://developers.facebook.com/docs/marketing-api/insights) you'd like to sync.

***

## <mark style="background-color:blue;">Setup instructions</mark>

1. Connect your Facebook account to permit Quanti: to access to your data
2. Connector information
   1. Connector Name : Name your connector. It must be unique.
   2. Dataset ID : Define the ID of the dataset. It must not exist yet, as it will be created and data will be sent there.
3. Select accounts to sync.
4. Create queries: You can either select pre-built queries or create your own custom queries.

{% hint style="warning" %}

### Token Expiration

Authentication tokens from third-party platforms may expire for various reasons. According to Meta's documentation, long-lived tokens are valid for 60 days. However, in practice, token behavior can be inconsistent: some tokens renew automatically while others expire as scheduled. Regular API usage generally reduces the chances of expiration, though this is not guaranteed.

If automatic renewal fails, project members will receive an email notification requesting re-authentication through the connector dashboard.
{% endhint %}

***

## Pre-built Queries

#### Stats & Conversions

* **ad\_stats**: Advertising performance at ad level.
* **ad\_conv**: Conversion performance at ad level.
* **adset\_stats**: Advertising performance at ad set level.
* **adset\_conv**: Conversion performance at ad set level.
* **campaign\_stats**: Advertising performance at campaign level.
* **campaign\_conv**: Conversion performance at campaign level.

#### Dimension Tables (History)

* **account\_history**: Account-level metadata history.
* **creative\_history**: Creative-level metadata history.
* **ad\_image\_history**: Ad image metadata history (URLs, dimensions, status).
* **campaign\_history**: Campaign-level metadata history.
* **ad\_set\_history**: Ad set-level metadata history.
* **ad\_history**: Ad-level metadata history.
* **ad\_video\_history**: Metadata of ad videos (thumbnail, duration, status) per ad account.

```mermaid
erDiagram
    ad_video_history {
        string id PK
        string title
        string description
        string picture
        string permalink_url
        float length
        timestamp created_time
        timestamp updated_time
    }
```

#### Breakdowns

* **ad\_stats\_age\_gender**: Ad performance broken down by age and gender.
* **ad\_conv\_age\_gender**: Conversion data broken down by age and gender.
* **ad\_stats\_country\_region**: Ad performance broken down by country and region.
* **ad\_conv\_country\_region**: Conversion data broken down by country and region.
* **ad\_stats\_device\_platform\_placement**: Ad performance broken down by device, platform, and placement.
* **ad\_conv\_device\_platform\_placement**: Conversion data broken down by device, platform, and placement.

{% hint style="warning" %}
When performing a historical data load, the account\_history and campaign\_history tables ignore the selected start date — they retrieve all available data since the ad account was created.

In contrast, the creative\_history, ad\_history, and adset\_history tables only load items that have been modified after the specified start date.

This behavior is designed to optimize performance and reduce load times.

As a result, any item that hasn't changed during the selected period will not appear in these \_history tables.

We recommend running two separate historical loads:

* One for campaign performance statistics
* Another for dimension tables (the \_history tables)

Be sure to choose a start date far enough in the past to ensure that all relevant items are properly captured.
{% endhint %}

***

<a href="https://dbdiagram.io/e/65c0ca08ac844320ae7740d3/67a5e256263d6cf9a06049b8" class="button primary" data-icon="table-tree">Prebuilt reports and definition</a>

***

## <mark style="background-color:blue;">Custom query</mark>

Custom reports let you build your own queries against the [Meta Ads Insights API](https://developers.facebook.com/docs/marketing-api/insights), with full control over the fields, breakdowns, and attribution windows collected. Each custom report produces a dedicated table in your dataset.

To validate field and breakdown combinations before configuring them in QUANTI, use the [Facebook Graph API Explorer](https://developers.facebook.com/docs/graph-api/guides/explorer/): it shows which fields are compatible with which breakdowns and surfaces errors before any data is collected.

### Building a custom report

In the connector setup, click **Add custom report** and configure:

* **Fields**: metrics and dimensions from the Meta Insights API (e.g. `impressions`, `spend`, `clicks`, `actions`, `conversions`, `reach`, `frequency`, `cpm`, `cpc`, `ctr`…). The full list is available in [Meta's documentation](https://developers.facebook.com/docs/marketing-api/insights/parameters/v21.0#fields).
* **Breakdowns**: optional additional dimensions to split results by (e.g. `age`, `gender`, `country`, `region`, `device_platform`, `publisher_platform`, `impression_device`, `placement`…). Breakdowns must be compatible with the fields selected — the Graph API Explorer will flag incompatible combinations.
* **Level**: granularity of the report — `ad`, `adset`, `campaign`, or `account`.
* **Action attribution windows**: defines the conversion window used to attribute actions to ads. See the compatibility table below.

### Action attribution windows

The `action_attribution_windows` parameter controls which click and view windows are used to count conversions. Not all windows are available on all conversion types:

| Window      | Web (Pixel) | Android | iOS 14+ |
| ----------- | :---------: | :-----: | :-----: |
| `1d_click`  |      ✅      |    ✅    |    ✅    |
| `7d_click`  |      ✅      |    ✅    |    ✅    |
| `1d_view`   |      ✅      |    ✅    |    ✅    |
| `28d_click` |      ✅      |    ✅    |    ❌    |
| `28d_view`  |      ✅      |    ✅    |    ❌    |
| `7d_view`   |      ✅      |    ✅    |    ❌    |

{% hint style="warning" %}
**`28d_click`, `28d_view` and `7d_view` are not available for iOS 14+ app campaigns.** Using these windows on app campaigns targeting iOS 14+ devices will result in empty or incomplete data. Use `1d_click` or `7d_click` for these campaigns.
{% endhint %}

### Deprecated parameters

Since **June 10, 2025**, Meta has deprecated the following two parameters. They are silently ignored by the API regardless of the value passed — Meta now applies its own defaults automatically:

* **`action_report_time`**: Meta now automatically uses `mixed` (impression-based for on-Meta actions, conversion-based for off-Meta actions). This parameter no longer has any effect.
* **`use_unified_attribution_setting`**: Meta now automatically aligns with the ad set's attribution settings. This parameter no longer has any effect.

These parameters have been removed from QUANTI's prebuilt reports and custom report configuration. If you have existing custom reports that included them, the reports will continue to function — the parameters are simply ignored by the API.


# Microsoft Advertising

Follow our setup guide to connect Microsoft Advertising to QUANTI:

<a href="https://dbdiagram.io/e/682704361227bdcb4e9c9d5b/6827045e1227bdcb4e9ca579" class="button primary" data-icon="table-tree">Prebuilt reports and definition</a>

***

## <mark style="background-color:blue;">Prerequisites</mark>

To connect Microsoft Advertising to Quanti:, you need to access a [Microsoft Advertising](https://ads.microsoft.com/?signout=true\&ccuisrc=4) account.

***

## <mark style="background-color:blue;">Setup instructions</mark>

* Connect your Microsoft account to permit Quanti: to access to your data
* Connector information
  1. Connector Name : Name your connector. It must be unique.
  2. Dataset ID : Define the ID of the dataset. It must not exist yet, as it will be created and data will be sent there.
* Select accounts to sync.
* Select queries: You can select pre-built queries that you want to sync.

***

## <mark style="background-color:blue;">Prebuilt reports</mark>

* Ad Performance Daily Report : Advertising performance at ad level (**Impressions, Clicks, Spend**)
* Campaign Performance Daily Report : Advertising performance at campaign level (**Impressions, Clicks, Spend**)

***

<a href="https://dbdiagram.io/e/67a9d95b263d6cf9a09cfbbc/67a9e062263d6cf9a09de479" class="button primary" data-icon="table-tree">Prebuilt reports and definition</a>


# Outbrain

Follow our setup guide to connect Microsoft Advertising to QUANTI:

<a href="https://dbdiagram.io/e/685aa0a9f413ba35089e41de/685aa60ff413ba35089f894a" class="button primary" data-icon="table-tree">Prebuilt reports and definition</a>

***

## <mark style="background-color:blue;">Prerequisites</mark>

To connect Microsoft Advertising to Quanti:, you need to access a [Outbrain](https://my.outbrain.com/login) account.

***

## <mark style="background-color:blue;">Setup instructions</mark>

* Use your Username & password to permit Quanti: to access to your data.
* Connector information
  1. Connector Name : Name your connector. It must be unique.
  2. Dataset ID : Define the ID of the dataset. It must not exist yet, as it will be created and data will be sent there.
* Select accounts to sync.
* Select queries: You can select pre-built queries that you want to sync.

***

## <mark style="background-color:blue;">Prebuilt reports</mark>

* **`campaign_conversion_report`**: Contains daily conversion performance data for marketing campaigns, aggregating direct and view-based metrics.
* **`campaign_report`**: Provides daily overall performance of advertising campaigns, including engagement and cost-related indicators.
* **`promoted_link_report`**: Provides daily performance data at the promoted link level, including user engagement and spending metrics.
* **`publisher_report`**: Provides details daily advertising performance segmented by publisher within campaigns.
* **`campaign_history`**: Stores the historical configuration and metadata of advertising campaigns, including targeting settings and status changes.
* **`marketer_history`**: Maintains historical information about marketers, including status and metadata changes over time.
* **`publisher_history`**: Lists metadata and URLs of publishers associated with advertising content.
* **`promoted_link_history`**: Contains the configuration and metadata history of promoted links, including status, URLs, and associated campaigns.

***

<a href="https://dbdiagram.io/e/685aa0a9f413ba35089e41de/685aa60ff413ba35089f894a" class="button primary" data-icon="table-tree">Prebuilt reports and definition</a>


# Pinterest

Follow our setup guide to connect Pinterest to QUANTI:

<a href="https://dbdiagram.io/e/68e7ba6bd2b621e42211ab2b/68e7be77d2b621e422129949" class="button primary" data-icon="table-tree">Prebuilt reports and definition</a>

***

## Prerequisites

Before connecting Pinterest Ads to QUANTI, ensure you have:

* **Pinterest Business Account**: A Pinterest Business account with active advertising campaigns
* **Ad Account Access**: Admin or Analyst access to the Pinterest Ad Account(s) you want to connect
* **Active Campaigns**: At least one active or historical advertising campaign to retrieve performance data
* **API Access**: Your Pinterest account must have API access enabled (automatically granted for Business accounts)

***

## Setup Instructions

{% stepper %}
{% step %}
**Authorize Pinterest Connection**

* Click on **Connect to Pinterest**
* You will be redirected to Pinterest's authorization page
* Log in with your Pinterest Business account credentials
* Review and accept the requested permissions:
  * See all of your advertising data, including ads, ad groups, campaigns etc
  * Afficher vos comptes utilisateurs et vos abonnés
* Click **Allow** to grant access
  {% endstep %}

{% step %}
**Connector Information**

* **Connector Name**: Define a unique name for your connector
* **Dataset ID**: Specify the BigQuery dataset ID where tables will be created
  * The dataset will be created automatically if it doesn't exist
* Click **Next**
  {% endstep %}

{% step %}
**Select Account(s)**

* Select the account(s) you want to connect to QUANTI
* You can select multiple Ad Accounts to track performance across different accounts
* Click **Next**
  {% endstep %}

{% step %}
**Select Queries**

* Review the available Prebuilt reports
* All tables are selected by default - you can deselect tables you don't need
* Click **Next**
  {% endstep %}

{% step %}
**Attribution Settings** *(optional)*

Configure how Pinterest attributes conversions in your report tables. These three fields are optional — leaving them blank preserves the current behavior (Pinterest API defaults apply).

| Field                        | API parameter            | Allowed values                  | Default    |
| ---------------------------- | ------------------------ | ------------------------------- | ---------- |
| **Click Attribution Window** | `click_window_days`      | 1 / 7 / 30 / 60                 | 30         |
| **View Attribution Window**  | `view_window_days`       | 1 / 7 / 30 / 60                 | 1          |
| **Conversion Report Time**   | `conversion_report_time` | `AD_EVENT` / `CONVERSION_EVENT` | `AD_EVENT` |

{% hint style="warning" %}
**View Attribution Window cannot exceed Click Attribution Window.** Valid combinations (click, view) are: (60, 60) (60, 30) (60, 7) (60, 1) (30, 30) (30, 7) (30, 1) (7, 7) (7, 1) (1, 1).
{% endhint %}

{% hint style="info" %}
**Conversion Report Time** controls the date used to report conversions:

* `AD_EVENT` — conversion is attributed to the date the user interacted with the ad (default)
* `CONVERSION_EVENT` — conversion is attributed to the date the conversion actually occurred

These settings only affect **Campaign Report**, **Ad Group Report**, and **Pin Promotion Report**. History/dimension tables are not impacted.
{% endhint %}
{% endstep %}

{% step %}
**Finish Setup**

* Define a sync period and a lookback window
* Click **Save**
* For the first sync, you have the following options:
  * Activate auto-sync for recurring syncs based on your sync settings by clicking the switch button
  * Launch a historical data recovery by choosing your desired dates in the historical data tab
  * Launch a manual sync immediately by clicking the **Sync now** button
* Wait for the sync to complete
* Navigate to your data warehouse to verify that tables are populated
* Check the connector dashboard for sync status and any potential errors
  {% endstep %}
  {% endstepper %}

***

## Prebuilt reports

### Dimension tables (append-only)

* **Advertiser History**: Advertiser account attributes including name, country, currency, permissions, and timestamps
* **Campaign History**: Campaign configuration and attributes at campaign level including status, budget caps, objectives, and scheduling
* **Ad Group History**: Ad group configuration including name, status, budget settings, targeting parameters, and optimization goals
* **Pin Promotion History**: Promoted Pin details including creative specifications, destination URLs, and promotion settings
* **Pin History**: Editorial and creative attributes of the Pin behind a Pinterest ad — title, description, alt text, dominant color, creative type (REGULAR, VIDEO, CAROUSEL, MAX\_VIDEO, SHOPPING, COLLECTION, IDEA), board, and promotion flag. Joins to `pin_promotion_history` via `pin_id`.
* **Pin Media**: Media asset metadata of the Pin — type (image / video / multi\_image), cover image URL, video duration (ms), dimensions, and Idea Pin item attributes. One row per Pin.
* **Pin Media Image**: Available image renditions of the Pin's media, one row per `(pin_id, image_size_label)`. Provides direct image URLs per resolution (150x150, 400x300, 600x, 1200x, originals) for display in dashboards without re-calling the API.

### Metric tables (delete-insert on `_quanti_date`)

Conversion metrics in these tables reflect the attribution window configured at connector level (see Attribution Settings above).

* **Campaign Report**: Daily performance metrics aggregated at campaign level including impressions, clicks, spend, and conversions
* **Ad Group Report**: Daily performance metrics aggregated at ad group level with detailed engagement and conversion tracking
* **Pin Promotion Report**: Daily performance metrics at Pin promotion level including video metrics, web sessions, and ROAS calculations

***

<a href="https://dbdiagram.io/e/68e7ba6bd2b621e42211ab2b/68e7be77d2b621e422129949" class="button primary" data-icon="table-tree">Prebuilt reports and definition</a>

***


# Rakuten Advertising

Follow our setup guide to connect Rakuten to QUANTI:

<a href="https://dbdiagram.io/e/68371607c07db17e778a23a0/68371711c07db17e778a5f0a" class="button primary" data-icon="table-tree">Prebuilt reports and definition</a>

***

## <mark style="background-color:blue;">Prerequisites</mark>

To connect Rakuten to QUANTI, you need an [Rakuten Advertising](https://rakutenadvertising.com/fr-fr/?utm_source=quanti.io\&utm_medium=partnership) account. In the last version of this connector, you cannot retrieve datas from any reports. You have to follow steps below including respect fields requested on the rakuten report.

***

## <mark style="background-color:blue;">Setup instructions</mark>

### Create a Rakuten Report and find the generated link

1. Log in to your [Rakuten account](https://auth.rakutenmarketing.com/auth/realms/rakuten-advertising/protocol/openid-connect/auth?client_id=security-admin-console\&redirect_uri=https%3A%2F%2Fauth.rakutenmarketing.com%2Fauth%2Fadmin%2Frakuten-advertising%2Fconsole%2F\&state=0bfc7308-d6d6-411a-a3a2-c858f86852ac\&response_mode=fragment\&response_type=code\&scope=openid\&nonce=37498c3d-5f4c-4dbd-826f-da13d0cb7827\&code_challenge=isEfEnMMx8QHWhWZptlAkdHIxfB3UrcJcjFMuWFf07o\&code_challenge_method=S256).
2. Click on tab Reporting < Statistics\ <br>

   <figure><img src="https://1847929239-files.gitbook.io/~/files/v0/b/gitbook-x-prod.appspot.com/o/spaces%2FoRN0sxIyI0UJdSqkwdBu%2Fuploads%2Fgit-blob-a53927cd7918e502d0bc87b07ea1e1057fc161d1%2Frakuten1.png?alt=media" alt="Access path to custom report tool"><figcaption><p>Access path to custom report tool</p></figcaption></figure>
3. Click on the button "+ Build a new report"\ <br>

   <figure><img src="https://1847929239-files.gitbook.io/~/files/v0/b/gitbook-x-prod.appspot.com/o/spaces%2FoRN0sxIyI0UJdSqkwdBu%2Fuploads%2Fgit-blob-39c858fd55dd1753c6ad2384d93b0729bae03aec%2Frakuten2.png?alt=media" alt="Build a new report" width="563"><figcaption><p>Build a new report</p></figcaption></figure>
4. Click on button "Add and Remove columns" and add the only and entire list below :<br>

   * Transaction Date
   * \# of impressions
   * \# of Clicks
   * \# of orders
   * Gross Commissions
   * Total Commissions
   * Sales
   * Order ID
   * Sub-Publihser ID
   * Sub-Publisher Name
   * Sub-Publisher URL
   * Publisher Group ID
   * Publisher Group Name
   * Publisher ID
   * Publisher Name
   * Publisher URL
   * Offer ID
   * Offer Name
   * Link Id
   * Link Name<br>

   <figure><img src="https://1847929239-files.gitbook.io/~/files/v0/b/gitbook-x-prod.appspot.com/o/spaces%2FoRN0sxIyI0UJdSqkwdBu%2Fuploads%2Fgit-blob-39db7e267ea2b30dfc96d5c756c698c2a86f9676%2Frakuten3.png?alt=media" alt="&#x22;Add and Remove Columns&#x22; pop-in" width="306"><figcaption><p>"Add and Remove Columns" pop-in</p></figcaption></figure>
5. Near the blue button "View Report", click on the arrow and "Get API" and copy the url generated.\ <br>

   <figure><img src="https://1847929239-files.gitbook.io/~/files/v0/b/gitbook-x-prod.appspot.com/o/spaces%2FoRN0sxIyI0UJdSqkwdBu%2Fuploads%2Fgit-blob-fad28b87fb17d1b19e94e8a9689c18f047744e27%2Frakuten4.png?alt=media" alt="Access path to the generated link"><figcaption><p>Access path to the generated link</p></figcaption></figure>

<figure><img src="https://1847929239-files.gitbook.io/~/files/v0/b/gitbook-x-prod.appspot.com/o/spaces%2FoRN0sxIyI0UJdSqkwdBu%2Fuploads%2F4BPY6Ew5oVxXp7PGIOyM%2FLinkShare-08-01-2025_03_31_PM.png?alt=media&amp;token=0aecd15f-3896-42a6-bbb7-7fe1a44471f5" alt=""><figcaption></figcaption></figure>

### Importante information

If you have several Rakuten accounts and want to fill a unique table, you have to create several Rakuten connectors of course and especially respect the list's order and metrics's names. You can change the list order by moving column headings.\ <br>

<figure><img src="https://1847929239-files.gitbook.io/~/files/v0/b/gitbook-x-prod.appspot.com/o/spaces%2FoRN0sxIyI0UJdSqkwdBu%2Fuploads%2Fgit-blob-1403091c195bc1a1d53a6f1da93ed191378ca36f%2Frakuten5.png?alt=media" alt="" width="563"><figcaption></figcaption></figure>

### Finish Quanti: configuration

```bash
//ran-reporting.rakutenmarketing.com/en/reports/[<API-REPORT>]/filters?
date_range=this-month&include_summary=Y&tz=GMT&date_type=transaction&token=[<API-KEY>]
```

1. In the connector setup form, enter the name of your choice.
2. Paste the Report key from the URL generated.
3. Paste the API token from the URL generated.

<figure><img src="https://1847929239-files.gitbook.io/~/files/v0/b/gitbook-x-prod.appspot.com/o/spaces%2FoRN0sxIyI0UJdSqkwdBu%2Fuploads%2Fdy1JyoSkriHDS32VY2SB%2FQuanti-App-08-01-2025_03_29_PM.png?alt=media&amp;token=6e1420d6-30ba-406e-886b-7669ad54d45c" alt=""><figcaption></figcaption></figure>

1. Settings : In most cases, you will need use
   1. Date type : transaction
   2. Timezone : UTC
2. Click Save & Test. Quanti: will take it from here and sync your Rakuten data.

***

## <mark style="background-color:blue;">Prebuilt reports</mark>

* Affiliate report : Ad performance tracking with campaign metrics and attribution details

***

<a href="https://dbdiagram.io/e/68371607c07db17e778a23a0/68371711c07db17e778a5f0a" class="button primary" data-icon="table-tree">Prebuilt reports and definition</a>


# RTB House

Follow our setup guide to connect RTB House to QUANTI:

<a href="https://dbdiagram.io/e/65bcd2efac844320ae4e9293/65ce242eac844320ae3a13b6" class="button primary" data-icon="table-tree">Prebuilt reports and definition</a>

***

## <mark style="background-color:blue;">Prerequisites</mark>

To connect RTB House to QUANTI, you need an [RTB House](https://www.rtbhouse.com/?utm_source=quanti.io\&utm_medium=partnership) account with API access.

***

## <mark style="background-color:blue;">Setup instructions</mark>

### Finish Quanti: configuration

1. Enter your Account credentials.
2. Enter the name of your choice.
3. Select your Advertiser Id(s).
4. Select an attribution mode.
5. Select the queries you want to sync.
6. Click Save. Quanti: will take it from here and sync your RTB House data.

***

## <mark style="background-color:blue;">Prebuilt reports</mark>

* Campaigns : Campaign metadata.
* Performances : Aggregated daily campaign performance metrics.

***

<a href="https://dbdiagram.io/e/65bcd2efac844320ae4e9293/65ce242eac844320ae3a13b6" class="button primary" data-icon="table-tree">Prebuilt reports and definition</a>


# Semrush

Follow our setup guide to connect Snapchat to QUANTI:

{% hint style="info" %}
The Semrush connector is currently in **beta**. Reach out to your CSM to enable it for your project.
{% endhint %}

## Overview

The Semrush connector retrieves SEO visibility data from the [Semrush Analytics API](https://developer.semrush.com/api/): organic keyword rankings, traffic estimates, and competitor analysis — scoped to a single domain.

## Prerequisites

Before setting up the Semrush connector, ensure you have:

* A **Semrush account** with API access enabled
* Your **Semrush API key** — available from *Subscription info → API units* in your Semrush dashboard
* The **domain to analyze** (without protocol, e.g. `example.com`)

## Setup Instructions

{% stepper %}
{% step %}
**Authorize your Semrush Connection**

Enter your Semrush credentials to allow QUANTI: to query the API on your behalf:

* **API Key**: Your Semrush API key — found in *Subscription info → API units*
* **Domain**: The domain to analyze, without protocol (e.g. `example.com`) — all reports are scoped to this domain
* **Regional database** *(optional)*: The Semrush regional database code for single-database reports (e.g. `us`, `fr`, `uk` — default: `us`)

Click **Next**
{% endstep %}

{% step %}
**Choose Reports**

Select the Semrush reports to sync into BigQuery:

* **Domain Overview (All Databases)** — daily visibility snapshot across all regional databases
* **Organic Search Keywords** — daily keyword ranking report with positions, search volume and traffic share
* **Organic Competitors** — daily competitive landscape with shared keywords and traffic estimates

{% hint style="info" %}
You can activate multiple reports in a single connector. Each report creates its own BigQuery table.
{% endhint %}

Click **Next**
{% endstep %}

{% step %}
**Finish Setup**

* Define your connector name and BigQuery dataset
* Save your sync settings
* You can now activate auto-sync or launch a first sync manually
  {% endstep %}
  {% endstepper %}

## Data Schema

[View schema on dbdiagram.io](https://dbdiagram.io/e/6a905637698f76ad5cd2a902/6a905647698f76ad5cd2a9d7)

### Domain Overview — `domain_ranks`

Daily snapshot of a domain's Semrush visibility across all regional databases: rank, organic and paid keywords, traffic and cost.

```mermaid
erDiagram
    domain_ranks {
        date _quanti_date PK
        string database PK
        string domain
        int rank
        int organic_keywords
        int organic_traffic
        float organic_cost
        int adwords_keywords
        int adwords_traffic
        float adwords_cost
        int pla_keywords
        int pla_uniques
    }
```

### Organic Search Keywords — `domain_organic`

Daily snapshot of the keywords a domain ranks for in Google's top organic results, with position, search volume, CPC and traffic share.

```mermaid
erDiagram
    domain_organic {
        date _quanti_date PK
        string phrase PK
        int position
        int previous_position
        int search_volume
        float cpc
        string url
        float traffic_percent
        float traffic_cost_percent
        float competition
        int number_of_results
    }
```

### Organic Competitors — `domain_organic_competitors`

Daily snapshot of domains competing in organic search, with relevance score and shared keywords.

```mermaid
erDiagram
    domain_organic_competitors {
        date _quanti_date PK
        string competitor_domain PK
        float competitor_relevance
        int common_keywords
        int organic_keywords
        int organic_traffic
        float organic_cost
        int adwords_keywords
    }
```

## Scheduling

* **Frequency**: Daily or Weekly (Daily recommended for tracking position changes)
* **Lookback window**: 1, 3, 5, 7, 14, or 30 days (default: 7 days)
* **Historical data**: Up to 3 years — load by 3, 6, or 12-month increments, or with a custom date range

## Notes

* **One domain per connector**: Each connector instance analyzes a single domain. Create multiple connectors to monitor several domains.
* **API unit consumption**: Each sync consumes Semrush API units. Monitor your usage in *Subscription info → API units*.
* **Regional database**: The `database` field in `domain_ranks` indicates which Semrush regional database the row belongs to. The optional credential restricts single-database reports to a specific region; if left empty, `us` is used.
* **Display limit**: Organic keywords and competitors reports return up to 1,000 rows per sync date.

## Troubleshooting

<details>

<summary>Authentication error / Invalid API key</summary>

* Verify your API key is correct and active in your Semrush account
* Ensure your Semrush subscription includes API access (API units must be > 0)

</details>

<details>

<summary>No data returned</summary>

* Check that the domain is entered without protocol (`example.com`, not `https://example.com`)
* Verify the domain exists in the selected Semrush regional database
* Ensure your Semrush plan includes access to the requested report type

</details>

<details>

<summary>Need Help?</summary>

Contact QUANTI: support at <support@quanti.io> or consult our documentation at <https://docs.quanti.io>

</details>


# Snapchat

Follow our setup guide to connect Snapchat to QUANTI:

<a href="https://dbdiagram.io/e/68c0383661a46d388e362747/68c03a9361a46d388e36b65a" class="button primary" data-icon="table-tree">Prebuilt reports and definition</a>

***

## <mark style="background-color:blue;">Prerequisites</mark>

To connect Snapchat to Quanti:, you need to access a [Business account](https://accounts.snapchat.com/v2/login).

***

## <mark style="background-color:blue;">Setup instructions</mark>

1. Connect your Snapchat account to permit Quanti: to access to your data
2. Connector information
   1. Connector Name : Name your connector. It must be unique.
   2. Dataset ID : Define the ID of the dataset. It must not exist yet, as it will be created and data will be sent there.
3. Select accounts : Choose accounts to sync.
4. Select queries : Choose the pre-built queries you’d like to synchronize—or skip this step if none apply.
5. Create queries: create your own custom queries queries you’d like to synchronize—or skip this step if none apply.

***

## <mark style="background-color:blue;">Prebuilt reports</mark>

* **ad\_account\_history**: Stores historical data about ad accounts and their configurations.
* **ad\_daily\_report**: Daily performance metrics at the ad level.
* **ad\_demographic\_daily\_report**: Ad performance metrics broken down by demographic segments.
* **ad\_device\_make\_daily\_report**: Ad metrics segmented by device make (e.g. Apple, Samsung).
* **ad\_device\_os\_daily\_report**: Ad metrics segmented by operating system (e.g. iOS, Android).
* **ad\_geo\_country\_daily\_report**: Ad metrics grouped by country.
* **ad\_geo\_dma\_daily\_report**: Ad metrics grouped by DMA (Designated Market Areas).
* **ad\_geo\_region\_daily\_report**: Ad metrics grouped by geographic regions.
* **ad\_history**: Contains historical records of individual ads and their statuses.
* **ad\_squad\_daily\_report**: Daily performance data aggregated at the ad squad level.
* **ad\_squad\_demographic\_daily\_report**: Ad squad performance data by demographic attributes.
* **ad\_squad\_device\_make\_daily\_report**: Ad squad metrics by device make.
* **ad\_squad\_device\_os\_daily\_report**: Ad squad metrics by operating system.
* **ad\_squad\_geo\_country\_daily\_report**: Ad squad performance by country.
* **ad\_squad\_geo\_dma\_daily\_report**: Ad squad performance by DMA region.
* **ad\_squad\_geo\_region\_daily\_report**: Ad squad performance by broader geographic regions.
* **ad\_squad\_history**: Historical configuration and status data for ad squads.
* **campaign\_daily\_report**: Daily performance metrics at the campaign level.
* **campaign\_demographic\_daily\_report**: Campaign metrics by age and gender.
* **campaign\_device\_make\_daily\_report**: Campaign metrics segmented by device make.
* **campaign\_device\_os\_daily\_report**: Campaign metrics segmented by OS.
* **campaign\_geo\_country\_daily\_report**: Campaign metrics by country.
* **campaign\_geo\_dma\_daily\_report**: Campaign metrics by DMA region.
* **campaign\_geo\_region\_daily\_report**: Campaign metrics by larger regions.
* **campaign\_history**: Historical data of campaign configurations and statuses.
* **organization\_history**: Historical data about advertiser organizations.

***

<a href="https://dbdiagram.io/e/68c0383661a46d388e362747/68c03a9361a46d388e36b65a" class="button primary" data-icon="table-tree">Prebuilt reports and definition</a>


# Stylight

Follow our setup guide to connect Stylight to QUANTI:

<a href="https://dbdiagram.io/e/65c0b938ac844320ae75cb9c/65ce2459ac844320ae3a1803" class="button primary" data-icon="table-tree">Prebuilt reports and definition</a>

***

## <mark style="background-color:blue;">Prerequisites</mark>

To connect Stylight to QUANTI, you need a [Stylight](https://partner.stylight.com/?utm_source=quanti.io\&utm_medium=partnership) account with API access.

***

## <mark style="background-color:blue;">Setup instructions</mark>

### Find Email and Password

1. Email and Password needed are simply your account credentials used to connect to your [Stylight platform](https://partner.stylight.net/login).

### Finish Quanti: configuration

1. Enter your Account credentials you found in Step 1.
2. Enter the name of your choice.
3. Click Save & Test. Quanti: will take it from here and sync your Stylight data.

***

## <mark style="background-color:blue;">Prebuilt reports</mark>

* Statistics : Aggregates statistics per vertical and device.

***

<a href="https://dbdiagram.io/e/65c0b938ac844320ae75cb9c/65ce2459ac844320ae3a1803" class="button primary" data-icon="table-tree">Prebuilt reports and definition</a>


# Taboola

Follow our setup guide to connect Taboola to QUANTI:

<a href="https://dbdiagram.io/e/68d2990c7c85fb9961f96134/68d299e47c85fb9961f98ba6" class="button primary" data-icon="table-tree">Prebuilt reports and definition</a>

***

## <mark style="background-color:blue;">Prerequisites</mark>

To connect Taboola to Quanti:, you need to access a [Taboola](https://authentication.taboola.com/authentication/login) account as well as a Client ID and Secret ID, which are only available by contacting your Taboola Account Manager.

***

## <mark style="background-color:blue;">Setup instructions</mark>

1. Connect your Taboola account to permit Quanti: to access to your data
2. Connector information
   1. Connector Name : Name your connector. It must be unique.
   2. Dataset ID : Define the ID of the dataset. It must not exist yet, as it will be created and data will be sent there.
3. Select accounts to sync.
4. Select queries: You can select pre-built queries you want to sync.

***

## <mark style="background-color:blue;">Prebuilt reports</mark>

* **account\_history**: Contains historical records of advertising accounts, including their configurations and activity status.
* **campaign\_history**: Tracks the lifecycle and setup of advertising campaigns over time.
* **campaign\_site\_day\_report**: Provides daily performance insights for campaigns across different sites and time periods.
* **campaign\_item\_report**: Daily performance by promoted item (article), including destination URL, thumbnail and content provider.
* **user\_segment\_report**: Daily campaign performance broken down by 3rd party audience segment (Marketplace Audiences).

***

## <mark style="background-color:blue;">Data Schema</mark>

### Dimensions

#### `account_history`

```mermaid
erDiagram
    account_history {
        timestamp _quanti_loaded_at PK
        int id PK
        string account_id PK
        boolean is_active
        string language
        string name
        string parent_network
        string timezone
        string type
    }
```

#### `campaign_history`

```mermaid
erDiagram
    campaign_history {
        timestamp _quanti_loaded_at PK
        string account_id PK
        int id PK
        string approval_state
        float cpc
        string daily_ad_delivery_model
        float daily_cap
        date end_date
        boolean is_active
        string name
        float spending_limit
        string spending_limit_model
        float spent
        date start_date
        string status
        string tracking_code
        string traffic_allocation_mode
    }
```

### Reports

#### `campaign_site_day_report`

```mermaid
erDiagram
    campaign_site_day_report {
        timestamp _quanti_date PK
        int campaign_id PK
        string site PK
        string campaign_name
        string site_name
        int impressions
        int visible_impressions
        int clicks
        float spent
        float ctr
        float vctr
        float cpc
        float cpm
        float vcpm
        float cpa
        float roas
        float conversions_value
        string currency
        string timezone
    }
```

#### `campaign_item_report`

```mermaid
erDiagram
    campaign_item_report {
        timestamp _quanti_date PK
        int campaign_id PK
        string item_id PK
        string campaign_name
        string item_name
        string url
        string thumbnail_url
        string content_provider
        int impressions
        int visible_impressions
        int clicks
        float spent
        float conversions_value
        float ctr
        float vctr
        float cpc
        float cpm
        float vcpm
        float cpa
        float cvr
        float roas
        string currency
    }
```

#### `user_segment_report`

```mermaid
erDiagram
    user_segment_report {
        timestamp _quanti_date PK
        int campaign_id PK
        string data_partner_audience_id PK
        string partner_name
        string audience_name
        string audience_description
        int impressions
        int visible_impressions
        int clicks
        float spent
        float conversions_value
        float ctr
        float vctr
        float cpc
        float cpm
        float vcpm
        float cpa
        float cvr
        float roas
        string currency
        string timezone
    }
```

***

<a href="https://dbdiagram.io/e/68d2990c7c85fb9961f96134/68d299e47c85fb9961f98ba6" class="button primary" data-icon="table-tree">Prebuilt reports and definition</a>


# TikTok

Follow our setup guide to connect Tiktok to QUANTI:

<a href="https://dbdiagram.io/e/683722b0c07db17e778d3253/683722bdc07db17e778d3643" class="button primary" data-icon="table-tree">Prebuilt reports and definition</a>

***

## <mark style="background-color:blue;">Prerequisites</mark>

To connect Tiktok to Quanti:, you need to access a [Tiktok](https://ads.tiktok.com/) account.

***

## <mark style="background-color:blue;">Setup instructions</mark>

1. Connect your Tiktok account to permit Quanti: to access to your data
2. Connector information
   1. Connector Name : Name your connector. It must be unique.
   2. Dataset ID : Define the ID of the dataset. It must not exist yet, as it will be created and data will be sent there.
3. Select accounts to sync.
4. Select queries: You can select pre-built queries you want to sync.

***

## <mark style="background-color:blue;">Prebuilt reports</mark>

### Dimension tables (append-only)

* **Advertiser:** Attributes information at advertiser level
* **Campaign history:** Attributes information at campaign level
* **Ad group history:** Attributes information at adgroup level.
* **Ad history:** Attributes information at ad level.
* **Image history:** Attributes information at image level (format, dimensions, URL, carousel usability).
* **Video history:** Video creative asset metadata — format, dimensions (width/height), poster/thumbnail URL. Joins to `ad_history` via `video_id`.

### Metric tables (delete-insert on `_quanti_date`)

* **Ad daily report:** Advertising report at ad level.

***

<a href="https://dbdiagram.io/e/683722b0c07db17e778d3253/683722bdc07db17e778d3643" class="button primary" data-icon="table-tree">Prebuilt reports and definition</a>


# TikTok Organic

Follow our setup guide to connect TikTok Organic to QUANTI:

<a href="https://dbdiagram.io/e/69bd5d7d78c6c4bc7a302be3/69bd5ddefb2db18e3bcabd49" class="button primary" data-icon="table-tree">Prebuilt reports and definition</a>

***

## Prerequisites

Before connecting TikTok Organic to QUANTI, ensure you have:

* **TikTok Business account**: Your TikTok profile must be a Business account. Personal and Creator accounts are not supported.
  * To convert: open the TikTok app → Settings → Manage account → Switch to Professional account → Business
* **Single account per connector**: TikTok's API only allows one Business account per connector. To sync multiple accounts, create one connector per account.

***

## Setup Instructions

{% stepper %}
{% step %}
**Authorize your TikTok Business account**

* Click **Continue with TikTok Business**
* You will be redirected to TikTok's authorization page
* Log in with your TikTok Business account credentials
* Review and approve the requested permissions
* You will be redirected back to QUANTI automatically

{% hint style="warning" %}
Make sure you log in with a **TikTok Business** account. If your account is not a Business account, you will see an error. You can convert your account in the TikTok app under Settings → Manage account → Switch to Professional account → Business.
{% endhint %}
{% endstep %}

{% step %}
**Confirm your account**

* QUANTI displays the details of the authenticated account: display name, username, avatar, and account type
* Verify this is the correct account and click **Continue**

{% hint style="info" %}
Only one TikTok Business account can be connected per connector. To sync a different account, create a new connector.
{% endhint %}
{% endstep %}

{% step %}
**Select pre-built reports**

* Review the available pre-built reports (see section below for details)
* All reports are selected by default — deselect any you don't need
* At least one report must be selected to continue
* Click **Continue**
  {% endstep %}

{% step %}
**Connector Information**

* **Connector Name**: A unique name for this connector (default: `TikTok Organic - {display_name}`)
* **Dataset ID**: The BigQuery dataset ID where tables will be created (default: `tiktokorganic_{username}`)
  * Must be lowercase, start with a letter, and use only letters, numbers, and underscores
  * The dataset will be created automatically if it doesn't exist
* Click **Save** to create the connector
  {% endstep %}

{% step %}
**Finish setup**

* For the first sync, you have the following options:
  * Activate auto-sync for recurring syncs (daily or weekly) by clicking the switch button
  * Launch a historical data recovery — maximum **60 days** of history available
  * Launch a manual sync immediately by clicking the **Sync now** button
* Wait for the sync to complete. Then navigate to your data warehouse to verify that tables are populated
  {% endstep %}
  {% endstepper %}

***

## Prebuilt reports

### Profile

**profile**: Account profile attributes — static descriptive data about the TikTok Business account. One row per account, updated at each sync. Dimensions: username. Fields: display\_name, bio\_description, profile\_image, profile\_deep\_link, is\_verified, is\_business\_account.

**profile\_snapshot\_metric**: Cumulative account metrics captured at each sync time — a new row is inserted at every sync to historize the evolution of account KPIs. Dimensions: username, \_quanti\_sync\_date. Metrics: followers\_count, following\_count, total\_likes, videos\_count. Also includes audience demographics as JSON arrays: audience\_countries, audience\_cities, audience\_ages, audience\_genders.

**profile\_daily\_metric**: Daily engagement metrics at account level. Each row represents one day for one account. Dimensions: username, date. Metrics: video\_views, unique\_video\_views, profile\_views, likes, comments, shares, daily\_new\_followers, daily\_lost\_followers, daily\_total\_followers, engaged\_audience, bio\_link\_clicks. Business-only metrics (populated only for accounts with a configured business profile): phone\_number\_clicks, lead\_submissions, app\_download\_clicks, email\_clicks, address\_clicks. Also includes audience\_activity (hourly follower activity, stored as JSON array).

***

### Video

**video\_snapshot\_metric**: Video-level metrics captured at each sync time — a new row is inserted per video at every sync to track the evolution of engagement over time. Dimensions: item\_id, \_quanti\_sync\_date. Fields: create\_time, caption, thumbnail\_url, embed\_url, share\_url. Lifetime cumulative metrics: likes, comments, shares, video\_views, reach, video\_duration, total\_time\_watched, average\_time\_watched, full\_video\_watched\_rate. Also includes impression\_sources and audience\_countries (stored as JSON arrays).

***

```mermaid
erDiagram
    profile {
        TIMESTAMP _quanti_loaded_at PK
        STRING    username PK
        STRING    display_name
        STRING    bio_description
        BOOLEAN   is_verified
        BOOLEAN   is_business_account
    }
    profile_snapshot_metric {
        TIMESTAMP _quanti_loaded_at PK
        STRING    username PK
        TIMESTAMP _quanti_sync_date PK
        INTEGER   followers_count
        INTEGER   following_count
        INTEGER   total_likes
        INTEGER   videos_count
        STRING    audience_countries
        STRING    audience_ages
        STRING    audience_genders
    }
    profile_daily_metric {
        STRING  _quanti_ad_account
        DATE    _quanti_date PK
        STRING  _quanti_id
        STRING  username PK
        DATE    date PK
        INTEGER video_views
        INTEGER unique_video_views
        INTEGER profile_views
        INTEGER likes
        INTEGER comments
        INTEGER shares
        INTEGER daily_new_followers
        INTEGER daily_lost_followers
        INTEGER daily_total_followers
        INTEGER engaged_audience
        INTEGER bio_link_clicks
        STRING  audience_activity
    }
    video_snapshot_metric {
        TIMESTAMP _quanti_loaded_at PK
        STRING    item_id PK
        TIMESTAMP _quanti_sync_date PK
        TIMESTAMP create_time
        STRING    caption
        INTEGER   likes
        INTEGER   comments
        INTEGER   shares
        INTEGER   video_views
        INTEGER   reach
        FLOAT     video_duration
        FLOAT     total_time_watched
        FLOAT     average_time_watched
        FLOAT     full_video_watched_rate
        STRING    impression_sources
        STRING    audience_countries
    }

    profile ||--o{ profile_snapshot_metric : "username"
    profile ||--o{ profile_daily_metric    : "username"
```

***

<a href="https://dbdiagram.io/e/69bd5d7d78c6c4bc7a302be3/69bd5ddefb2db18e3bcabd49" class="button primary" data-icon="table-tree">Prebuilt reports and definition</a>

***

## Notes

* **Data refresh**: Syncs run daily (default at 3:00 AM) or weekly. The default lookback window is 5 days to capture retroactive metric adjustments.
* **Historical data**: Historical recovery is limited to a maximum of **60 days**.
* **Metric delay**: Some metrics may have a delay of 24 to 48 hours before being available via TikTok's API.
* **Token management**: TikTok Business API issues long-lived tokens that do not expire automatically. Tokens can be revoked manually by the user in TikTok → Settings → Security → Third-party apps. If a token is revoked, you will need to reconnect the connector.
* **Business-only metrics**: Fields such as `phone_number_clicks`, `lead_submissions`, `app_download_clicks`, `email_clicks`, and `address_clicks` in `profile_daily_metric` are only populated for accounts registered as a TikTok Business account with a configured business profile.
* **Custom reports**: This connector does not support custom queries. Only the pre-built reports above are available.

***

## Troubleshooting

<details>

<summary>Connection Issues</summary>

* Verify that your TikTok account is a Business account (not a Creator or Personal account)
* To convert: TikTok app → Settings → Manage account → Switch to Professional account → Business
* If you see an "Unverified app" warning during authorization, this is expected — click **Continue** to proceed
* If the connection fails, check that you have not revoked the app's permissions in TikTok Settings → Security → Third-party apps

</details>

<details>

<summary>Missing Data</summary>

* Historical data is limited to the last 60 days — data older than that cannot be recovered
* Some metrics may not be available immediately after publication (24–48 hour delay)
* Business-only metrics (phone clicks, leads, etc.) will be empty if your account does not have a configured business profile
* The `video_snapshot_metric` table only contains videos that were public at the time of the sync

</details>

<details>

<summary>Need Help?</summary>

Contact QUANTI support at <support@quanti.io> or consult our comprehensive documentation at [https://docs.quanti.io](https://docs.quanti.io/)

</details>


# TimeOne

Follow our setup guide to connect TimeOne to QUANTI:

<a href="https://dbdiagram.io/e/682b50671227bdcb4efffd62/682b50e91227bdcb4e00141e" class="button primary" data-icon="table-tree">Prebuilt reports and definition</a>

***

## <mark style="background-color:blue;">Prerequisites</mark>

To connect TimeOne to QUANTI, you need a [TimeOne](https://www.timeone.io/en/?utm_source=quanti.io\&utm_medium=partnership) account.

***

## <mark style="background-color:blue;">Setup instructions</mark>

### Find your credentials

1. Connect to your [TimeOne platform](https://login.timeonegroup.com/).
2. Your Advertiser Id is shown on the header bar when you arrive in Dashboard home.\ <br>

   <figure><img src="https://1847929239-files.gitbook.io/~/files/v0/b/gitbook-x-prod.appspot.com/o/spaces%2FoRN0sxIyI0UJdSqkwdBu%2Fuploads%2Fgit-blob-ee91c0b5f4b8ecf92cfaf74bb22872b9c1efa602%2Ftimeone1.png?alt=media" alt="Advertiser ID"><figcaption><p>Advertiser ID</p></figcaption></figure>
3. Your uniqId is given by your Account Manager. please, referre to him.

### Finish Quanti: configuration

1. In the connector setup form, enter the name of your choice.
2. Enter your credentials found in Step 1.
3. Click Save & Test. Quanti: will take it from here and sync your TimeOne data.

***

## <mark style="background-color:blue;">Prebuilt reports</mark>

* **Transactions**: Records individual affiliate events with detailed transaction information.
* **Performances**: Aggregated daily statistics for affiliate programs.

***

<a href="https://dbdiagram.io/e/682b50671227bdcb4efffd62/682b50e91227bdcb4e00141e" class="button primary" data-icon="table-tree">Prebuilt reports and definition</a>


# Tune

Follow our setup guide to connect Tune to QUANTI:

{% hint style="info" %}
This connector uses the [Tune (HasOffers) Affiliate API](https://developers.tune.com/affiliate/) with API key authentication. It pulls data from the **affiliate/partner point of view** within the advertiser's network.
{% endhint %}

***

## Overview

The Tune connector pulls affiliate performance data from your Tune (HasOffers) partner account into your data warehouse. It covers approved offers, daily aggregated stats, and individual conversion records.

Data is split into two types:

* **Dimension table** (`offers`) — list of approved offers for this partner account, refreshed on each run using append-only insertion.
* **Performance tables** (`stats`, `conversions`) — daily stats and individual conversion events, refreshed with a configurable lookback window using delete-insert.

***

## Prerequisites

* An active **Tune / HasOffers affiliate account**
* Your **Network ID** — the subdomain part of `NETWORKID.api.hasoffers.com`
* A **Partner API Key** — request it from your affiliate account (network admin approval may be required)

***

## Setup Instructions

{% stepper %}
{% step %}
**Enter your API credentials**

Provide your **Network ID** and **Partner API Key**. The network ID is the subdomain of your HasOffers instance (e.g. `mynetwork` in `mynetwork.api.hasoffers.com`).
{% endstep %}

{% step %}
**Select your Prebuilt reports**

Choose which prebuilt reports to activate. You can enable all reports or select only those relevant to your use case. See the [Prebuilt Reports](#prebuilt-reports) section for a description of each table.
{% endstep %}

{% step %}
**Name your connector**

Give the connector a unique name within your QUANTI: project, then click **Create**.
{% endstep %}
{% endstepper %}

***

## Prebuilt Reports

The connector provides **3 prebuilt tables** organized into two groups: offers and performance.

### Data model

<a href="https://dbdiagram.io/e/6a9ad9345450bea1bef104c4/6a9ad9435450bea1bef1057b" class="button primary" data-icon="table-tree">Prebuilt reports and definition</a>

```mermaid
erDiagram
    offers {
        integer id PK
        string name
        string status
        string payout_type
        float default_payout
    }
    stats {
        date stat_date PK
        integer offer_id PK
        integer impressions
        integer clicks
        integer conversions
        float payout
        float cpa
        float cpc
        float ctr
    }
    conversions {
        integer id PK
        timestamp datetime
        integer offer_id
        float payout
        string status
        string advertiser_info
        string affiliate_info1
        timestamp session_datetime
        string currency
    }

    offers ||--o{ stats : "offer_id"
    offers ||--o{ conversions : "offer_id"
```

### Offers

| Table    | Description                                                                                                                                |
| -------- | ------------------------------------------------------------------------------------------------------------------------------------------ |
| `offers` | List of offers approved for this partner account, with name, status, payout type, and default payout. Refreshed on each run (append-only). |

### Performance

| Table         | Description                                                                                                                                                                                                                           |
| ------------- | ------------------------------------------------------------------------------------------------------------------------------------------------------------------------------------------------------------------------------------- |
| `stats`       | Daily partner performance statistics grouped by offer: impressions, clicks, conversions, payout, CPA, CPC, CTR. Key: `stat_date` + `offer_id`. Refreshed by delete-insert.                                                            |
| `conversions` | Individual conversion records with offer, payout amount, status (approved / pending / rejected), custom tracking parameters, and click session timestamp. Key: `id` (unique conversion ID). Refreshed by delete-insert on `datetime`. |

***

<a href="https://dbdiagram.io/e/6a9ad9345450bea1bef104c4/6a9ad9435450bea1bef1057b" class="button primary" data-icon="table-tree">Prebuilt reports and definition</a>

***

## Scheduling

| Setting             | Options                       |
| ------------------- | ----------------------------- |
| **Frequency**       | Daily (recommended) or Weekly |
| **Lookback window** | 1, 3, or 5 days (default: 5)  |
| **Historical load** | Up to 730 days (≈2 years)     |

{% hint style="info" %}
`stats` and `conversions` use a **delete-insert** strategy on the lookback window to account for late status changes (e.g. conversions moving from `pending` to `approved` or `rejected`). The `offers` table uses **append-only** insertion.
{% endhint %}

***

## Troubleshooting

<details>

<summary>Authentication error — invalid credentials</summary>

Double-check your **Network ID** (subdomain only, without `.api.hasoffers.com`) and your **Partner API Key**. API keys are network-scoped — a key from one network will not work on another. If the error persists, regenerate your API key from your affiliate account or contact your network admin.

</details>

<details>

<summary>conversions table only shows pending conversions</summary>

The lookback window controls how far back conversions are re-fetched. If you need to capture status changes (e.g. a pending conversion approved after several days), use a lookback of at least 5 days or trigger a historical reload covering the full expected approval window.

</details>

<details>

<summary>stats or conversions table is empty after the first run</summary>

Verify that your partner account has activity within the configured lookback window. If your account was recently approved or if the selected offers have no traffic yet, the tables will be empty. Extend the lookback window or trigger a historical load.

</details>

<details>

<summary>Need help?</summary>

Contact QUANTI: support at <support@quanti.io> or consult our documentation at <https://docs.quanti.io>

</details>


# Wonderpush

Follow our setup guide to connect Wonderpush to QUANTI:

<a href="https://dbdiagram.io/e/65c356a8ac844320aea34431/65ce2477ac844320ae3a1b28" class="button primary" data-icon="table-tree">Prebuilt reports and definition</a>

***

## <mark style="background-color:blue;">Prerequisites</mark>

To connect Wonderpush to QUANTI, you need a [Wonderpush](https://www.wonderpush.com/fr/?utm_source=quanti.io\&utm_medium=partnership) account.

***

## <mark style="background-color:blue;">Setup instructions</mark>

### Find API key

1. Log in to your [Wonderpush account](https://partner.wonderpush.net/login).
2. In the top-right corner, click on your profile. Next, click on Settings < API credentials.
3. Make a note of the Access token. You will need it to configure QUANTI:.

### Finish Quanti: configuration

1. Enter your Access token you found in Step 1.
2. Enter the name of your choice.
3. Select the queries you want to sync.
4. Click Save. Quanti: will take it from here and sync your Wonderpush data.

***

## <mark style="background-color:blue;">Prebuilt reports</mark>

* Campaign list : Stores unique campaign identifiers and their names.
* Notifications : Aggregates daily event counts by campaign, type, and subtype.
* Subscriptions : Aggregates daily event counts by campaign, type, and subtype.

***

<a href="https://dbdiagram.io/e/65c356a8ac844320aea34431/65ce2477ac844320ae3a1b28" class="button primary" data-icon="table-tree">Prebuilt reports and definition</a>


# X Ads

Follow our setup guide to connect X Ads to QUANTI:

{% hint style="info" %}
This connector is currently in **beta**. It uses the [X Ads API v12](https://developer.x.com/en/docs/x-ads-api) via OAuth 1.0a.
{% endhint %}

<a href="https://dbdiagram.io/e/6a9ab9a550ad2c46dc403b31/6a9ab9b95450bea1beef25a1" class="button primary" data-icon="table-tree">Prebuilt reports and definition</a>

***

## Overview

The X Ads connector pulls campaign management data and performance analytics from your X Ads account into your data warehouse. It covers the full advertising hierarchy — from account configuration down to individual promoted tweets — along with tweet content and media assets.

Data is split into two types:

* **History tables** (SCD Type 2) — capture every change to campaigns, ad groups, creatives and account settings over time by appending a new row whenever `updated_at` changes.
* **Stats tables** — daily performance metrics at campaign, line item, and promoted tweet level, refreshed with a configurable lookback window.

***

## Prerequisites

* An active **X Ads account**
* Access to the account as **Account Admin** or higher

No developer app or API keys are required — authentication is handled via OAuth 1.0a directly in the setup flow.

***

## Setup Instructions

{% stepper %}
{% step %}
**Connect your X account**

Click **Connect with X** and authorize QUANTI: to access your X Ads account. You will be redirected to X to approve the connection, then returned to QUANTI:.
{% endstep %}

{% step %}
**Select your Ad Accounts**

Choose one or more X Ads accounts to sync. Each selected account will be synchronized independently.
{% endstep %}

{% step %}
**Select your Prebuilt reports**

Choose which prebuilt reports to activate. You can enable all reports or select only those relevant to your use case. See the [Prebuilt Reports](#prebuilt-reports) section for a description of each table.
{% endstep %}

{% step %}
**Name your connector**

Give the connector a unique name within your QUANTI: project, then click **Create**.
{% endstep %}
{% endstepper %}

***

## Prebuilt Reports

The connector provides **16 prebuilt tables** organized into four groups: account & media, campaign structure, performance metrics, and tweet content.

### Data model

👉 [Open interactive diagram on dbdiagram.io](https://dbdiagram.io/e/6a9ab9a550ad2c46dc403b31/6a9ab9b95450bea1beef25a1)

```mermaid
erDiagram
    account_history {
        string account_id PK
        timestamp updated_at PK
        string name
        string timezone
        string approval_status
        string industry_type
    }
    account_media_history {
        string account_id PK
        string account_media_id PK
        timestamp updated_at PK
        string media_key
        string creative_type
    }
    media_library {
        string account_id PK
        string media_key PK
        string media_type
        string media_status
        timestamp created_at
    }
    campaign_history {
        string account_id PK
        string campaign_id PK
        timestamp updated_at PK
        string name
        string entity_status
        int daily_budget_amount_local_micro
        string currency
    }
    campaign_stats {
        date date PK
        string account_id PK
        string campaign_id PK
        string placement PK
        int impressions
        int clicks
        int billed_charge_local_micro
    }
    line_item_history {
        string account_id PK
        string line_item_id PK
        timestamp updated_at PK
        string campaign_id
        string name
        string entity_status
        string bid_strategy
        int bid_amount_local_micro
    }
    line_item_stats {
        date date PK
        string account_id PK
        string line_item_id PK
        string placement PK
        string campaign_id
        int impressions
        int clicks
        int billed_charge_local_micro
    }
    media_creative_history {
        string account_id PK
        string media_creative_id PK
        timestamp updated_at PK
        string line_item_id
        string account_media_id
        string entity_status
    }
    promoted_tweet_history {
        string account_id PK
        string promoted_tweet_id PK
        timestamp updated_at PK
        string tweet_id
        string line_item_id
        string entity_status
        string approval_status
    }
    promoted_tweet_stats {
        date date PK
        string account_id PK
        string promoted_tweet_id PK
        string placement PK
        string tweet_id
        string line_item_id
        int impressions
        int clicks
        int billed_charge_local_micro
    }
    tweet {
        string account_id PK
        string tweet_id PK
        string full_text
        string lang
        string tweet_type
        boolean nullcast
        timestamp created_at
    }
    tweet_hashtag {
        string account_id PK
        string tweet_id PK
        string text PK
    }
    tweet_media {
        string account_id PK
        string tweet_id PK
        string media_id PK
        string media_type
        string media_url_https
    }
    tweet_symbol {
        string account_id PK
        string tweet_id PK
        string text PK
    }
    tweet_url {
        string account_id PK
        string tweet_id PK
        string url PK
        string expanded_url
    }
    tweet_user_mention {
        string account_id PK
        string tweet_id PK
        string user_id PK
        string screen_name
    }

    account_history ||--o{ campaign_history : "account_id"
    account_history ||--o{ account_media_history : "account_id"
    account_media_history }o--o{ media_library : "media_key"
    campaign_history ||--o{ campaign_stats : "campaign_id"
    campaign_history ||--o{ line_item_history : "campaign_id"
    line_item_history ||--o{ line_item_stats : "line_item_id"
    line_item_history ||--o{ media_creative_history : "line_item_id"
    line_item_history ||--o{ promoted_tweet_history : "line_item_id"
    media_creative_history }o--o{ account_media_history : "account_media_id"
    promoted_tweet_history ||--o{ promoted_tweet_stats : "promoted_tweet_id"
    promoted_tweet_history }o--|| tweet : "tweet_id"
    tweet ||--o{ tweet_hashtag : "tweet_id"
    tweet ||--o{ tweet_media : "tweet_id"
    tweet ||--o{ tweet_symbol : "tweet_id"
    tweet ||--o{ tweet_url : "tweet_id"
    tweet ||--o{ tweet_user_mention : "tweet_id"
```

### Account & Media

| Table                   | Description                                                                                                                                 |
| ----------------------- | ------------------------------------------------------------------------------------------------------------------------------------------- |
| `account_history`       | Account settings and configuration — SCD Type 2 on `updated_at`. Tracks name, timezone, approval status, and industry type.                 |
| `account_media_history` | Account-level media assets (preroll/interstitial) — SCD Type 2 on `updated_at`.                                                             |
| `media_library`         | Catalog of all media assets (images, videos, GIFs) in the account, refreshed on each run. Joinable to tweets and creatives via `media_key`. |

### Campaign Structure

| Table                    | Description                                                                                                             |
| ------------------------ | ----------------------------------------------------------------------------------------------------------------------- |
| `campaign_history`       | Campaign settings, budget, and status — SCD Type 2 on `updated_at`. Tracks budget changes, pauses, and schedule edits.  |
| `line_item_history`      | Ad group targeting, bidding, and status — SCD Type 2 on `updated_at`. Includes bid strategy, placements, and objective. |
| `media_creative_history` | Associations between line items and account media assets — SCD Type 2 on `updated_at`.                                  |
| `promoted_tweet_history` | Promoted tweet associations and their serving/approval status — SCD Type 2 on `updated_at`.                             |

### Performance Metrics

Stats tables provide **daily metrics** segmented by `placement` (`ALL_ON_TWITTER` or `PUBLISHER_NETWORK`).

| Table                  | Description                                                                                            |
| ---------------------- | ------------------------------------------------------------------------------------------------------ |
| `campaign_stats`       | Daily metrics at campaign level. Key: `date` + `account_id` + `campaign_id` + `placement`.             |
| `line_item_stats`      | Daily metrics at ad group level. Key: `date` + `account_id` + `line_item_id` + `placement`.            |
| `promoted_tweet_stats` | Daily metrics at promoted tweet level. Key: `date` + `account_id` + `promoted_tweet_id` + `placement`. |

All stats tables share the same metric set:

| Metric                                    | Description                                                                           |
| ----------------------------------------- | ------------------------------------------------------------------------------------- |
| `impressions`                             | Number of times the ad was displayed                                                  |
| `engagements`                             | Total interactions                                                                    |
| `clicks`                                  | Total clicks                                                                          |
| `url_clicks`                              | Clicks on URLs in the ad                                                              |
| `card_engagements`                        | Interactions with the attached card                                                   |
| `likes`                                   | Number of likes                                                                       |
| `replies`                                 | Number of replies                                                                     |
| `retweets`                                | Number of retweets                                                                    |
| `follows`                                 | New followers gained from the ad                                                      |
| `profile_visits`                          | Visits to the advertiser's profile                                                    |
| `hashtag_clicks`                          | Clicks on hashtags in the ad                                                          |
| `billed_engagements`                      | Billable engagement actions                                                           |
| `billed_charge_local_micro`               | Total spend in local currency (micros — divide by 1,000,000 to get the actual amount) |
| `video_total_views`                       | MRC video views (≥50% in-view for 2s)                                                 |
| `video_3s100pct_views`                    | 100% in-view views lasting ≥3s                                                        |
| `video_views_25` / `_50` / `_75` / `_100` | Views reaching 25%, 50%, 75%, 100% completion                                         |
| `video_content_starts`                    | Times video content started                                                           |
| `video_6s_views`                          | Views lasting ≥6s                                                                     |

### Tweet Content

| Table                | Description                                                                                             |
| -------------------- | ------------------------------------------------------------------------------------------------------- |
| `tweet`              | Content and metadata of all tweets (organic and promoted). Entities are denormalized into child tables. |
| `tweet_hashtag`      | Hashtags extracted from tweet entities — one row per hashtag per tweet.                                 |
| `tweet_media`        | Media assets attached to tweets — one row per media per tweet.                                          |
| `tweet_symbol`       | Cashtags extracted from tweet entities — one row per cashtag per tweet.                                 |
| `tweet_url`          | URLs extracted from tweet entities — one row per URL per tweet.                                         |
| `tweet_user_mention` | User mentions extracted from tweet entities — one row per mention per tweet.                            |

***

<a href="https://dbdiagram.io/e/6a9ab9a550ad2c46dc403b31/6a9ab9b95450bea1beef25a1" class="button primary" data-icon="table-tree">Prebuilt reports and definition</a>

***

## Scheduling

| Setting             | Options                       |
| ------------------- | ----------------------------- |
| **Frequency**       | Daily (recommended) or Weekly |
| **Lookback window** | 1, 3, 7, 14, or 30 days       |
| **Historical load** | Up to 730 days (≈2 years)     |

{% hint style="info" %}
Stats tables use a **delete-insert** strategy on the lookback window: each run deletes and reloads the selected period to account for delayed reporting from X. History (dimension) tables use **append-only** insertion based on `updated_at`.
{% endhint %}

***

## Troubleshooting

<details>

<summary>OAuth authorization fails or expires</summary>

X OAuth 1.0a tokens do not expire automatically, but they can be revoked by the user or by X (e.g. after a password change). If the connector reports an authentication error, reconnect your X account from the connector's **Settings** tab.

</details>

<details>

<summary>Some prebuilt tables are empty after the first run</summary>

Certain tables (e.g. `tweet_hashtag`, `tweet_symbol`) only contain data if the corresponding entities exist in your promoted tweets. An empty table for a newly connected account is expected if no such content has been promoted.

</details>

<details>

<summary>Stats show a discrepancy with the X Ads interface</summary>

X applies late attribution corrections within a 30-day window. Use a lookback of at least 7 days to capture these adjustments. For month-over-month comparisons, a 30-day lookback is recommended.

</details>

<details>

<summary>Need help?</summary>

Contact QUANTI: support at <support@quanti.io> or consult our documentation at <https://docs.quanti.io>

</details>


# Reverse connectors


# Adobe Analytics

Follow our setup guide to push Classifications and offline data to Adobe Analytics with QUANTI:

{% hint style="info" %}
This connector replaces the two separate connectors that previously handled **Adobe Analytics — Classification** and **Adobe Analytics — Data Source**. Both push types are now available in a single connector.
{% endhint %}

{% hint style="warning" %}
Adobe Analytics takes time to process imports — it does not communicate how long this processing takes. Imported data is **not immediately visible** in the interface.

We recommend syncing this connector **no more than once per day** to give Adobe sufficient processing time.
{% endhint %}

***

## Overview

The Adobe Analytics Reverse connector pushes data **from your data warehouse into Adobe Analytics**. It supports two push types:

* **Classification** — enriches an Adobe Analytics dimension by importing a lookup table (e.g. tracking code → campaign name, channel…)
* **Data Source** — imports offline business data (CRM, call center, in-store transactions) to unify attribution across online and offline channels

In data warehousing terms: Classifications populate **dimension tables** and Data Sources populate **fact tables**. Adobe matches them using a shared primary key (the tracking code).

***

## Prerequisites

* An **Adobe Experience Cloud** account with access to Adobe Analytics
* Access to [Adobe Developer Console](https://developer.adobe.com/console) to create OAuth Server-to-Server credentials

***

## Setup Instructions

{% stepper %}
{% step %}
**Create your API credentials**

In [Adobe Developer Console](https://developer.adobe.com/console/home):

1. Create a new project (or open an existing one)
2. Click **Add API** and select **Adobe Analytics**
3. Choose **OAuth Server-to-Server** as the authentication method
4. Give your project a name (e.g. `Quanti Reverse Connector`)
5. Select your organization and click **Save configured API**

Note your **Client ID** (API Key) and **Client Secret** — you will need both in the next step. Your **Global Company ID** will be detected automatically.
{% endstep %}

{% step %}
**Authorize your Adobe Analytics connection**

In QUANTI:, enter the credentials you retrieved:

* **Client ID** — found on the project overview page in Adobe Developer Console
* **Client Secret** — click *OAuth Server-to-Server → Retrieve Client Secret*

QUANTI: will automatically detect the **Global Company ID** associated with your credentials.
{% endstep %}

{% step %}
**Select your Report Suites**

Choose the Adobe Analytics Report Suites into which classifications and offline data will be pushed.
{% endstep %}

{% step %}
**Choose your push type**

Select the push templates to activate:

* **Classification** — to enrich an Adobe Analytics dimension (lookup table import)
* **Data Source — Offline import** — to import offline events and transactions

You can activate both in a single connector. Field mapping is configured in the **Mapping** tab after the connector is created.
{% endstep %}

{% step %}
**Connector information**

* **Connector name** — must be unique within your QUANTI: project

Source queries and field mappings for each activated push type are configured in the **Mapping** tab after creation.
{% endstep %}
{% endstepper %}

***

## Push Types

### Classification

Imports a lookup table that enriches an Adobe Analytics dimension. Each row maps a **key** (dimension value, e.g. a tracking code) to one or more classification columns (e.g. Channel, Campaign Name).

Adobe matches the imported keys against collected dimension values in your report suite.

**Available fields:**

| Field           | Type   | Required | Description                                                                                                                  |
| --------------- | ------ | -------- | ---------------------------------------------------------------------------------------------------------------------------- |
| `key`           | STRING | ✅        | The dimension value to classify (e.g. tracking code, product ID). Primary key used by Adobe to match against collected data. |
| `channel`       | STRING | —        | Example classification column — rename or replace to match your dimension sub-attributes in Adobe.                           |
| `campaign_name` | STRING | —        | Example classification column — rename or replace to match your dimension sub-attributes in Adobe.                           |

{% hint style="info" %}
Classification columns are flexible: add or rename them to reflect your exact classification dataset in Adobe Analytics. The only mandatory field is `key`.
{% endhint %}

**Before activating Classification**, you must declare your classification fields in Adobe Analytics:

1. In Adobe Analytics, go to **Admin → Report Suites → \[select your suite] → Edit Settings → Conversion → Conversion Classifications**
2. Select Classification Type (e.g. **Campaign**) and add your classification field names
3. Note the field names — they must match the column names you configure in QUANTI:

📖 [Adobe Classifications API documentation](https://developer.adobe.com/analytics-apis/docs/2.0/guides/endpoints/classifications/)

***

### Data Source — Offline import

Imports offline events (CRM conversions, call center data, in-store transactions) into Adobe Analytics via the Data Sources 2.0 API. Enables unified attribution between digital campaigns and offline conversions.

**Available fields:**

| Field        | Type   | Required | Description                                                                                                     |
| ------------ | ------ | -------- | --------------------------------------------------------------------------------------------------------------- |
| `row_id`     | STRING | ✅        | Internal row identifier — used as idempotence key for the import batch.                                         |
| `date`       | DATE   | ✅        | Date of the offline event (transaction date, call date…). Sent to Adobe as MM/DD/YYYY.                          |
| `visitor_id` | STRING | —        | Adobe Analytics visitor ID (MCID / ECID). Used to stitch the offline event to an online session when available. |
| `campaign`   | STRING | —        | Tracking code (campaign variable) for offline attribution back to digital campaigns.                            |
| `events`     | STRING | —        | Comma-separated list of Adobe Analytics events triggered by this row.                                           |
| `revenue`    | FLOAT  | —        | Transaction revenue, margin, or lead value.                                                                     |
| `currency`   | STRING | —        | ISO 4217 currency code (e.g. `EUR`, `USD`).                                                                     |
| `products`   | STRING | —        | Product string in Adobe Analytics format.                                                                       |

{% hint style="info" %}
The `campaign` field is the join key between your Data Source rows and your Classification lookup: Adobe uses it to attach classification attributes (channel, campaign name…) to each offline event.
{% endhint %}

**Before activating Data Source**, you must create the data source and declare your custom metrics in Adobe Analytics:

1. Go to **Admin → Data Sources → \[select your suite] → Create**
2. Select **Ad Campaigns** then **Generic Pay-Per-Click Service**
3. Name your data source and provide a notification email
4. Map your custom metrics and tracking code fields as prompted

Then declare custom metrics at **Admin → Report Suites → Edit Settings → Conversion → Success Events**.

📖 [Adobe Data Sources API documentation](https://developer.adobe.com/analytics-apis/docs/2.0/guides/endpoints/data-sources/)

***

## How Classification and Data Source work together

Adobe Analytics matches your two imports using the **tracking code** as a shared primary key:

* The **Data Source** row carries the `campaign` field (tracking code) + metrics (revenue, events…)
* The **Classification** row carries the same `key` (tracking code) + dimension attributes (channel, campaign name…)

Adobe joins them in the interface, giving you a fully enriched view of your offline conversions — segmented by campaign, channel, and any other classification dimension you configured.

***

## Scheduling

* **Default frequency**: Daily (recommended — at 3 AM)
* **Lookback window**: 2, 7, or 30 days (default: 7 days)
* **Historical load**: 3, 6, or 12 months — or a custom date range (up to 365 days)

***

## Troubleshooting

<details>

<summary>Data imported but not visible in Adobe Analytics yet</summary>

Adobe Analytics processes imports asynchronously and does not expose a processing timeline. Wait at least a few hours after a sync before checking the interface. Avoid triggering multiple syncs in quick succession.

</details>

<details>

<summary>Classification keys are not matching</summary>

Verify that the `key` values in your QUANTI: mapping exactly match the dimension values collected in Adobe Analytics (case-sensitive). A mismatch means Adobe cannot attach classification attributes to those rows.

</details>

<details>

<summary>Authentication error / Invalid credentials</summary>

* Verify that your **Client ID** and **Client Secret** are correct and that the OAuth Server-to-Server credential is active in Adobe Developer Console
* Ensure the Adobe Analytics API has been added to the project and is set to **OAuth Server-to-Server**

</details>

<details>

<summary>Need help?</summary>

Contact QUANTI: support at <support@quanti.io> or consult our documentation at <https://docs.quanti.io>

</details>


# Google Ads

Follow our setup guide to push offline conversions and audiences to Google Ads with QUANTI:

{% hint style="info" %}
This connector uses **two Google APIs**: the **Data Manager API** (OCI, Enhanced Conversions for Leads, Customer Match) and the **Google Ads API v24** (Conversion Adjustments and account setup). Both are covered by a single OAuth authorization.
{% endhint %}

***

## Overview

The Google Ads Reverse connector pushes data **from your data warehouse into Google Ads**. It supports four push types:

* **OCI — Standard (revenue)** — upload offline click conversions with gross revenue to feed tROAS Smart Bidding
* **OCI — Margin-based Smart Bidding** — same as above but with margin instead of revenue, to optimize on profitability
* **Enhanced Conversions for Leads (ECL)** — close the B2B / lead-gen attribution loop by sending lead conversions enriched with hashed PII
* **Conversion Adjustments** — retroactively modify a conversion already uploaded (value restatement, full retraction, or PII enhancement)
* **Customer Match** — sync a user audience (CRM list) to Google Ads for targeting, exclusion, or as a seed for Performance Max

Multiple push types can be activated on a single connector. Each is configured independently in the **Mapping** tab after creation.

***

## Prerequisites

* A **Google account** with admin access to the target Google Ads account(s)
* A **Google Ads MCC** (Manager Account) — required for API access, even for a single account. The MCC must have API access enabled.
* For OCI and ECL: a **conversion action** configured in Google Ads with the correct type (`import from clicks` for OCI, `enhanced conversions for leads` for ECL)
* For ECL specifically: the **Enhanced Conversions for Leads** terms must be accepted in the Google Ads UI (Admin → Conversions → Settings)
* For Conversion Adjustments: the target account must be allowlisted for the Conversion Upload Service (grandfathered accounts only — new accounts use Data Manager)

***

## Setup Instructions

{% stepper %}
{% step %}
**Authorize your Google account**

Click **Continue with Google** and sign in with the Google account that has access to your MCC and customer accounts.

QUANTI: requests the following scopes: `adwords` (Google Ads API access) and `datamanager` (Data Manager API access for OCI, ECL, and Customer Match). Both scopes are required — if you previously connected your Google account without the `datamanager` scope, you must re-authorize.
{% endstep %}

{% step %}
**Select your MCC (login account)**

Select the **MCC (Manager Account)** to use for API calls. This is the account QUANTI: will authenticate as when calling the Google Ads API. It must have manager access to the customer accounts selected in the next step.

The MCC Customer ID is a 10-digit number visible in the Google Ads interface (top-right corner). Do not include hyphens.
{% endstep %}

{% step %}
**Select your customer accounts**

Select one or more **Google Ads customer accounts** (the leaf accounts where conversions and audiences will land). These are the accounts containing your conversion actions and user lists.

If you manage multiple brands or clients, you can target multiple accounts in a single connector — the `conversion_action` field in your source table determines which account each row goes to.
{% endstep %}

{% step %}
**Choose your push types**

Select the push templates to activate. Each template corresponds to a distinct push type:

* **OCI — Standard (revenue)** — offline click conversions with revenue value
* **OCI — Margin-based Smart Bidding** — offline click conversions with margin value
* **Enhanced Conversions for Leads** — lead conversions with hashed PII
* **Conversion Adjustments** — corrections to previously uploaded conversions
* **Customer Match** — audience synchronization from your CRM

You can activate multiple templates. Source table and field mapping for each are configured in the **Mapping** tab after creation.
{% endstep %}

{% step %}
**Name your connector**

Give the connector a unique name within your QUANTI: project, then click **Create**. Source queries and field mappings are configured in the **Mapping** tab.
{% endstep %}
{% endstepper %}

***

## Push Types

### OCI — Standard (revenue)

Uploads offline click conversions attributed to a Google Ads click. Use this template when your Smart Bidding strategy optimizes on **gross revenue** (tROAS on revenue).

The conversion must have been preceded by a Google Ads click — the GCLID is the join key between the click and the offline event.

**Fields:**

| Field                        | Type      | Required | Description                                                                                                                                                                                                                                                               |
| ---------------------------- | --------- | -------- | ------------------------------------------------------------------------------------------------------------------------------------------------------------------------------------------------------------------------------------------------------------------------- |
| `gclid`                      | STRING    | ✅        | Google Click Identifier captured at the time of the click (typically stored in your CRM or landing page). Must be the GCLID from the original click that led to the conversion — not a later click.                                                                       |
| `conversion_action`          | STRING    | ✅        | Full resource name of the Google Ads conversion action: `customers/{customer_id}/conversionActions/{conversion_action_id}`. Find it in Google Ads → Goals → Conversions → click the action → the ID is in the URL, or use the Google Ads API to list conversion actions.  |
| `conversion_time`            | TIMESTAMP | ✅        | UTC timestamp of the offline conversion event (order confirmed, payment received…). Format: RFC3339 (`2024-11-15T14:32:00Z`). Must be within the conversion action's attribution window (up to 90 days).                                                                  |
| `conversion_value`           | FLOAT     | ✅        | Gross revenue of the conversion in the currency specified. Used directly by Smart Bidding to optimize tROAS.                                                                                                                                                              |
| `currency`                   | STRING    | ✅        | ISO 4217 currency code (`EUR`, `USD`, `GBP`…). Must match the currency accepted by the conversion action.                                                                                                                                                                 |
| `order_id`                   | STRING    | ✅        | Unique order or transaction identifier. Used as the idempotence key — if the same `order_id` is uploaded twice, Google deduplicates. Also used to reference the conversion in Conversion Adjustments.                                                                     |
| `consent_ad_user_data`       | STRING    | —        | DMA consent signal for sending this user's data to Google. Map the consent column from your tag or CMP. Accepted values: `granted`, `denied` (also `true`/`false`, `1`/`0`). If left unmapped, no consent signal is sent — EEA conversions may be rejected or unutilized. |
| `consent_ad_personalization` | STRING    | —        | DMA consent signal for using this user's data for ad personalization. Same accepted values as `consent_ad_user_data`. Required for remarketing and Customer Match in the EEA.                                                                                             |

***

### OCI — Margin-based Smart Bidding

Identical to OCI Standard in structure, but the `conversion_value` field carries the **margin** rather than the gross revenue. Use this template to teach Smart Bidding to optimize on profitability rather than turnover.

**Fields:** identical to OCI Standard. The only semantic difference is in `conversion_value`:

| Field                        | Type      | Required | Description                                                                                                                                                                     |
| ---------------------------- | --------- | -------- | ------------------------------------------------------------------------------------------------------------------------------------------------------------------------------- |
| `gclid`                      | STRING    | ✅        | Google Click Identifier captured at click time.                                                                                                                                 |
| `conversion_action`          | STRING    | ✅        | Resource name of the conversion action (`customers/{customer_id}/conversionActions/{id}`). Should be a dedicated margin conversion action — do not mix with the revenue action. |
| `conversion_time`            | TIMESTAMP | ✅        | UTC timestamp of the conversion event (RFC3339).                                                                                                                                |
| `conversion_value`           | FLOAT     | ✅        | **Margin** of the order (revenue minus cost of goods). This is the value Smart Bidding will optimize on — ensure it reflects the actual margin, not revenue.                    |
| `currency`                   | STRING    | ✅        | ISO 4217 currency code.                                                                                                                                                         |
| `order_id`                   | STRING    | ✅        | Unique order identifier. Used as idempotence key and reference for future Adjustments.                                                                                          |
| `consent_ad_user_data`       | STRING    | —        | DMA consent — same values as OCI Standard.                                                                                                                                      |
| `consent_ad_personalization` | STRING    | —        | DMA consent — same values as OCI Standard.                                                                                                                                      |

{% hint style="info" %}
Google recommends using a **dedicated conversion action** for margin-based bidding, separate from your revenue action. This avoids polluting your revenue reporting with margin figures.
{% endhint %}

***

### Enhanced Conversions for Leads (ECL)

Sends lead conversion events enriched with **hashed PII** (email, phone, name, address) to Google Ads. ECL closes the B2B attribution loop: when a lead clicks a Google Ad, submits a form, and later converts in your CRM, ECL matches the CRM event back to the original click using the lead's identity — even without a GCLID.

QUANTI: automatically normalizes and hashes all PII fields with SHA-256 before sending:

* **Email**: lowercased, all whitespace removed, and for `gmail.com`/`googlemail.com` addresses the dots in the local part and any `+suffix` are stripped (Google normalization spec)
* **Phone**: normalized to E.164 format, then hashed
* **First/last name**: lowercased and trimmed — **accents are preserved** (Google's spec does not require removing them and removing them would reduce match rate on French or accented names)
* **Country code and postal code**: sent as-is, not hashed

**Fields:**

| Field                        | Type      | Required | Description                                                                                                                                                                                                  |
| ---------------------------- | --------- | -------- | ------------------------------------------------------------------------------------------------------------------------------------------------------------------------------------------------------------ |
| `order_id`                   | STRING    | ✅        | Internal lead identifier (form submission ID, CRM lead ID…). Used as idempotence key and reference for future Conversion Adjustments.                                                                        |
| `conversion_action`          | STRING    | ✅        | Resource name of the **Enhanced Conversions for Leads** conversion action (`customers/{customer_id}/conversionActions/{id}`). The action must be of type ECL — a standard import action will not accept PII. |
| `conversion_time`            | TIMESTAMP | ✅        | UTC timestamp of the lead event (form submission, MQL qualification, opportunity won…). RFC3339 format.                                                                                                      |
| `gclid`                      | STRING    | —        | Google Click Identifier captured at form submission. Optional — Google can match the event using PII alone, but providing the GCLID significantly improves match rate when available.                        |
| `conversion_value`           | FLOAT     | —        | Lead value — typically a predicted LTV, deal size, or stage-weighted opportunity value.                                                                                                                      |
| `currency`                   | STRING    | —        | ISO 4217 currency code. Required if `conversion_value` is provided.                                                                                                                                          |
| `email`                      | STRING    | —        | Lead email address in its raw form — QUANTI: handles normalization and SHA-256 hashing before upload. Provide at least one of email or phone for matching.                                                   |
| `phone_number`               | STRING    | —        | Lead phone number (any format accepted — QUANTI: normalizes to E.164 using France as default region). Hashed before upload.                                                                                  |
| `first_name`                 | STRING    | —        | Lead first name (raw — QUANTI: lowercases and hashes).                                                                                                                                                       |
| `last_name`                  | STRING    | —        | Lead last name (raw — QUANTI: lowercases and hashes).                                                                                                                                                        |
| `country_code`               | STRING    | —        | ISO 3166-1 alpha-2 country code (`FR`, `US`…). Sent in clear — used for address-based matching.                                                                                                              |
| `postal_code`                | STRING    | —        | Postal code. Sent in clear — used for address-based matching.                                                                                                                                                |
| `consent_ad_user_data`       | STRING    | —        | DMA consent signal. Accepted values: `granted`, `denied` (also `true`/`false`, `1`/`0`). Required for EEA leads.                                                                                             |
| `consent_ad_personalization` | STRING    | —        | DMA consent signal for personalization. Same values.                                                                                                                                                         |

{% hint style="warning" %}
Before activating ECL, you must accept the **Enhanced Conversions for Leads** terms in the Google Ads UI: **Goals → Conversions → Settings → Enhanced conversions for leads → Turn on**. Without this, uploads will fail with `DESTINATION_ACCOUNT_ENHANCED_CONVERSIONS_TERMS_NOT_SIGNED`.
{% endhint %}

***

### Conversion Adjustments

Retroactively corrects a conversion already uploaded via OCI or ECL. Lookback window: **90 days**.

Three adjustment types are supported:

| Type          | When to use                                                                                             |
| ------------- | ------------------------------------------------------------------------------------------------------- |
| `RESTATEMENT` | Update the conversion value (margin revised, partial refund, order updated). Requires `adjusted_value`. |
| `RETRACTION`  | Remove the conversion entirely (full refund, order cancelled). No value needed.                         |
| `ENHANCEMENT` | Add PII to a previously uploaded click conversion (ECL flow — not applicable to most use cases).        |

{% hint style="info" %}
The legacy value `RESTATE_VALUE` is accepted as an alias for `RESTATEMENT` to avoid breaking existing source tables.
{% endhint %}

**Fields:**

| Field                  | Type      | Required | Description                                                                                                                                                                           |
| ---------------------- | --------- | -------- | ------------------------------------------------------------------------------------------------------------------------------------------------------------------------------------- |
| `order_id`             | STRING    | ✅        | Order identifier — must match exactly the `order_id` sent in the original OCI upload. Used by Google to look up the conversion to adjust.                                             |
| `conversion_action`    | STRING    | ✅        | Resource name of the conversion action (`customers/{customer_id}/conversionActions/{id}`). Must match the one used in the original upload.                                            |
| `adjustment_type`      | STRING    | ✅        | `RESTATEMENT`, `RETRACTION`, or `ENHANCEMENT`. `RESTATE_VALUE` is accepted as an alias for `RESTATEMENT`.                                                                             |
| `adjustment_date_time` | TIMESTAMP | ✅        | UTC timestamp of the adjustment event (refund date, cancellation date…). Must be **after** the original conversion time and within 90 days. Format: RFC3339 (`2024-11-20T10:00:00Z`). |
| `adjusted_value`       | FLOAT     | —        | New conversion value after adjustment. **Required for `RESTATEMENT`** — the row is rejected without it. Not used for `RETRACTION`.                                                    |
| `currency`             | STRING    | —        | ISO 4217 currency code. Required for `RESTATEMENT` if the original conversion had a currency.                                                                                         |

{% hint style="warning" %}
Conversion Adjustments use the **Google Ads API** (not the Data Manager API). They are only available to accounts that were allowlisted for `ConversionUploadService` before June 15, 2026. New accounts cannot use Adjustments — contact QUANTI: support if you need this for a new account.
{% endhint %}

***

### Customer Match

Syncs a user audience from your data warehouse to a Google Ads **user list**. Use it for:

* Retargeting or exclusion lists (CRM customers, churned users, existing buyers)
* Lookalike / Performance Max seeds
* Observation audiences for Smart Bidding insights

QUANTI: automatically creates the user list in Google Ads (named `Quanti Reverse — {prebuild_id}`) and keeps it in sync. PII is hashed with SHA-256 before upload — provide at least one identifier (email or phone) per row for a usable match rate.

**Sync modes:**

| Mode               | Behavior                                                                                                                 |
| ------------------ | ------------------------------------------------------------------------------------------------------------------------ |
| `mirror` (default) | Full sync — members added in the source are added to the list; members removed from the source are removed from the list |
| `add_only`         | Additive — new members are added, existing members are never removed                                                     |
| `remove_only`      | Removal only — members present in the source are removed from the list                                                   |

**Fields:**

| Field                        | Type   | Required | Description                                                                                                                                                                                 |
| ---------------------------- | ------ | -------- | ------------------------------------------------------------------------------------------------------------------------------------------------------------------------------------------- |
| `user_id`                    | STRING | ✅        | Internal user identifier — used as deduplication key when syncing the audience. Does not need to match any Google identifier.                                                               |
| `email`                      | STRING | —        | Email address in raw form — QUANTI: normalizes (lowercase, whitespace removal, Gmail dot/plus stripping) then hashes with SHA-256. Provide at least email or phone for a useful match rate. |
| `phone_number`               | STRING | —        | Phone number (any format) — QUANTI: normalizes to E.164 (default region: FR) then hashes with SHA-256.                                                                                      |
| `first_name`                 | STRING | —        | First name — QUANTI: lowercases, trims, keeps accents, then hashes with SHA-256.                                                                                                            |
| `last_name`                  | STRING | —        | Last name — QUANTI: lowercases, trims, keeps accents, then hashes with SHA-256.                                                                                                             |
| `country_code`               | STRING | —        | ISO 3166-1 alpha-2 country code (`FR`, `US`…). Sent in clear — used for address-based matching alongside postal code.                                                                       |
| `postal_code`                | STRING | —        | Postal code. Sent in clear — used for address-based matching.                                                                                                                               |
| `consent_ad_user_data`       | STRING | —        | DMA consent signal. Accepted values: `granted`, `denied` (also `true`/`false`, `1`/`0`). Required for EEA audiences — members without consent granted may be excluded by Google.            |
| `consent_ad_personalization` | STRING | —        | DMA consent signal for personalization. Same values. Required for remarketing in the EEA.                                                                                                   |

{% hint style="info" %}
To maximize match rate, provide at least **email** combined with **first name**, **last name**, and **country code**. Match rate is typically 40–70% on B2C CRM lists and lower on B2B lists.

The minimum audience size to run a campaign is **1,000 matched members**.
{% endhint %}

***

## Consent & DMA (European users)

For users in the European Economic Area (EEA), Google requires a **consent signal** alongside each conversion event or audience member. QUANTI: carries this signal **per row** via two optional fields available on all push types (except Conversion Adjustments):

| Field                        | Accepted values                                              | Meaning                                       |
| ---------------------------- | ------------------------------------------------------------ | --------------------------------------------- |
| `consent_ad_user_data`       | `granted`, `true`, `1`, `yes` / `denied`, `false`, `0`, `no` | Consent to send this user's data to Google    |
| `consent_ad_personalization` | same                                                         | Consent to use this data for personalized ads |

If a value is absent or unrecognized, the field is **omitted** from the payload — QUANTI: never infers consent.

The natural source for these columns is your **QUANTI: Tag Analytics** connector (`ad_user_data` / `ad_personalization` columns from Consent Mode v2), or your CMP export if you collect consent server-side.

***

## Scheduling

| Setting             | Options                                                                   |
| ------------------- | ------------------------------------------------------------------------- |
| **Frequency**       | Daily (default, at 3 AM)                                                  |
| **Lookback window** | 7 days (default) — rows from the past N days are re-processed on each run |

{% hint style="info" %}
The lookback window applies to **OCI, ECL, and Customer Match**. For **Conversion Adjustments**, the lookback covers adjustments whose `adjustment_date_time` falls within the window. Google's own lookback limit for adjustments is **90 days** from the original conversion.
{% endhint %}

***

## Troubleshooting

<details>

<summary>Authentication fails with "insufficient authentication scopes"</summary>

The Google account was previously connected without the `datamanager` scope (required for OCI, ECL, and Customer Match). You must re-authorize the connector: go to the connector **Settings** tab, disconnect, then reconnect with the same Google account — the new authorization dialog will include both scopes.

</details>

<details>

<summary>OCI / ECL rows are rejected with "CUSTOMER_NOT_ALLOWLISTED_FOR_THIS_FEATURE"</summary>

This error appears when the account was created after June 15, 2026 and is not yet provisioned on the Data Manager API. Contact QUANTI: support — the Data Manager API project must be activated for your OAuth client.

</details>

<details>

<summary>ECL fails with "DESTINATION_ACCOUNT_ENHANCED_CONVERSIONS_TERMS_NOT_SIGNED"</summary>

The Google Ads account has not accepted the Enhanced Conversions for Leads terms. In the Google Ads UI: **Goals → Conversions → Settings → Enhanced conversions for leads → Turn on**. This is a one-time per-account step that cannot be done via API.

</details>

<details>

<summary>Conversion value appears in Google Ads but Smart Bidding is not reacting</summary>

Verify that: (1) the conversion action is set to **Include in conversions** in Google Ads, (2) the action type matches your bidding strategy (revenue vs. margin), (3) there is enough volume — Smart Bidding needs at least 30–50 conversions per month to learn. Offline conversions may take 24–48 hours to appear in reporting.

</details>

<details>

<summary>Customer Match list is created but match rate is 0% or very low</summary>

Common causes: (1) the audience has fewer than 1,000 rows — Google requires a minimum for privacy reasons; (2) only one PII field is mapped — combine email with name and country for better results; (3) gmail.com emails are not being matched because the normalization rule (dot removal) was not applied — QUANTI: handles this automatically, but verify the source data is not pre-hashed.

</details>

<details>

<summary>Conversion Adjustment rejected with "CONVERSION_NOT_FOUND"</summary>

The `order_id` in the adjustment row does not match any previously uploaded conversion. Verify that: (1) the `order_id` is identical to the one sent in the original OCI upload (exact string match, case-sensitive); (2) the original conversion was uploaded successfully (check the connector run logs); (3) the `conversion_action` resource name matches the original.

</details>

<details>

<summary>Need help?</summary>

Contact QUANTI: support at <support@quanti.io> or consult our documentation at <https://docs.quanti.io>

</details>


---

[Next Page](/llms-full.txt/1)